How to restore a Full cPanel Account using JetBackup 5


Cheap reseller Hosting


Before starting the article please make note of the possible consequences when restoring Full Account Backups:

  • Service downtime: Your cPanel account will be pulled down and re-developed during this restoration process. Based on the total size of your account, you can expect interruptions for a few minutes up to one hour.
  • Viable data loss: All websites, primary domains, addon domains, aliases, and associated databases will get restored, just select the date and time. Any changes done after that time will get lost.
  • Viable email loss: All email accounts will be restored to the selected date and time. If any email is received after that selected time will be lost.

Check the below steps to restore a Full cPanel Account using JetBackup 5

You have to log in to your cPanel.

    After logging in browse the Files section and tab on jetBackup5

    Under the “Restore & Download section, the tab “Full Backups

    Next, you have to select the backup for the folder that you like to restore (sorted by date), then click the Restore button.

    In the fifth step, you have to tab the Restore Summary screen, where you’ll see the selected backups to restore the items To Restore, then click Restore Selected Items.

    Now, you have to wait for Queue to complete the restoration job, the ‘Completed’ status will be shown when the restore process is completed.

    In the bottom line, “Processing… state, the backup will get downloaded from the backup server, and your account will be pulled down and re-developed, rendering your account inoperable for some time. You have to keep patient.

    Let’s learn the Queue statuses:

    The queue status “Pending” indicates the server is waiting for the restoration task to be processed.

    The queue status “In Progress” indicates that you need to wait, and avoid any actions inside the cPanel account, till the restoration is done.

    The queue status “completed” indicates that the restoration has been successful. If you have shown the queue status “Failed”, you have to try another date or contact their support team.


    Cheap web Hosting


    How to Enable LiteSpeed Web Cache Manager on cPanel?


    Cheap reseller Hosting


    LiteSpeed is a built-in caching engine that allows to boost website performance. This guide will describe the steps to enable LiteSpeed web cache manager in cPanel.Initially, you have to log in to your cPanel account with a username and password.

    1. Initially, you have to log in to your cPanel account with a username and password.

    2. Once you have logged in to your cPanel the cPanel dashboard will be shown, scroll down and go to the Advanced section > LiteSpeed Web Cache Manager.

    3. After logging in, you have to click on the WordPress cache icon.

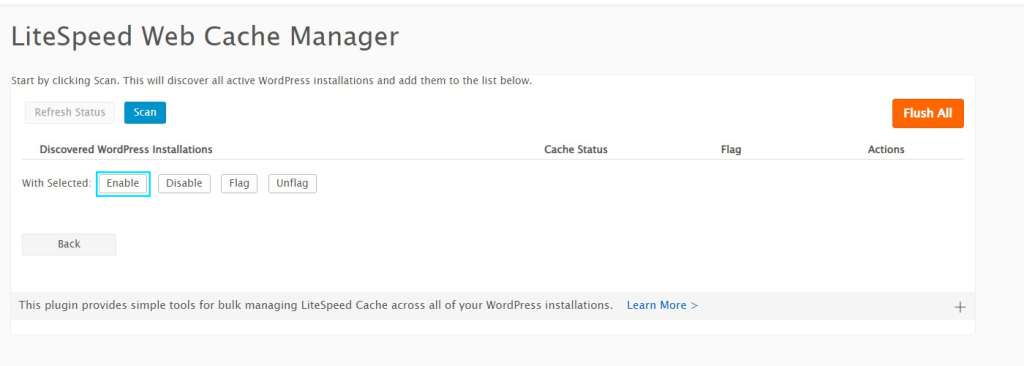
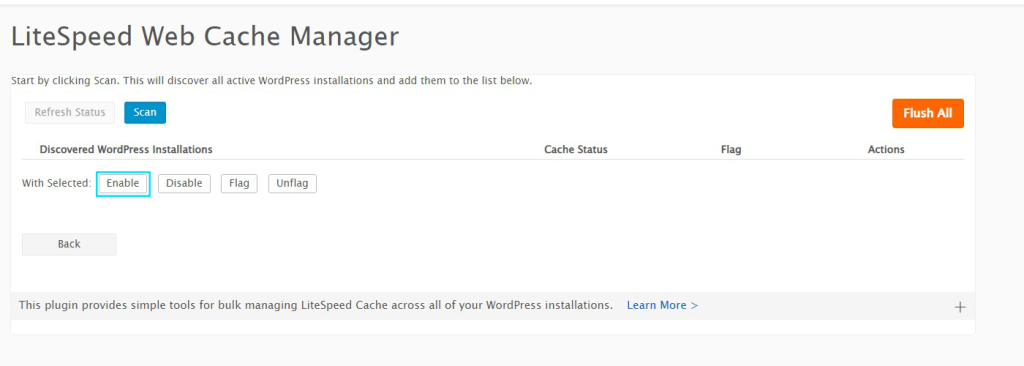
    4. The next step is to click on the Scan button. This will highlight all the active WordPress installations.

    5. Eventually, once all the WordPress installations are discovered, you have to select the ones you want to activate and then click on Enable.

    This is how you can implement these steps to use LiteSpeed web cache manager for WordPress sites on your cPanel server.

    In conclusion,

    enabling LiteSpeed Web Cache Manager on cPanel can significantly enhance website performance and speed, ultimately improving user experience and search engine rankings.

    By following the simple steps outlined in this guide, website owners can harness the power of caching to optimize their site’s performance.

    Embracing LiteSpeed Cache can lead to tangible benefits, such as reduced server load and faster page load times. Stay ahead in the digital landscape by leveraging this powerful tool to deliver a seamless and efficient web experience for your visitors.


    Cheap web Hosting


    How to configure SSH keys using cPanel


    Cheap reseller Hosting


    Configuring SSH keys using cPanel involves generating a key pair on the server and adding the public key to your server’s authorized keys file. Here’s a breakdown of the steps:

    Generating a Key Pair on cPanel:

    1. Log in to cPanel.
    2. Navigate to the Security section and find the SSH Access tool.
    3. Click on Manage SSH Keys.
    4. Click on Generate a New Key.
    5. You can choose a name for the key pair or leave the default “id_rsa”.
    6. Optionally, set a strong password for the key and click Generate Key.

    Adding the Public Key to Authorized Keys:

    1. In the Manage SSH Keys section, you need to scroll down to the Authorized Keys area.
    2. Next, you have to click on Manage next to the key you just generated.
    3. A box with the public key will be displayed. You can copy the entire contents of the box.
    4. Here you’ll need to access your server through another method (like root access or a current SSH connection) and add the copied public key to the authorized_keys file located in the .ssh directory of your home directory.

    Downloading the Private Key (for SSH client):

    1. Go back to the Manage SSH Keys section in cPanel.
    2. Find the key you have created under Private Keys.
    3. Click View/Download next to the key.
    4. You’ll see the option to convert the key to PPK format (if using PuTTY). Then, you have to choose the conversion if needed.
    5. Click on Download Key and save the private key securely on your local machine. This private key will be used for SSH login with your client program.

    Tips:

    • Make sure to keep your private key confidential and avoid sharing it with anyone.
    • Consult your SSH client’s documentation for specific instructions on using the private key for login.

    For a more detailed walkthrough, you can refer to resources like the cPanel documentation or tutorials from web hosting providers.


    Cheap web Hosting


    How to Import From cPanel to Webuzo


    Cheap reseller Hosting


    Intro:

    This article will guide you on importing databases from cPanel to Webuzo.             

    Procedure:

    Move to Webuzo Enduser Panel > Server Utilities > Import From cPanel.  

    Find below screenshot from cPanel:

    Remote Import

    Steps:

    • Fill the form with the cPanel server, user, and password details.
    • Tab on Submit to Import the cPanel Account.

    A below-mentioned screen shot indicates Import process has started successfully.

    • Once completion is done then you’ll receive the email.
    • Import logs can be found at /usr/local/webuzo/includes/cli/cpanel_migration.log

    Local Backup File Import

    Steps

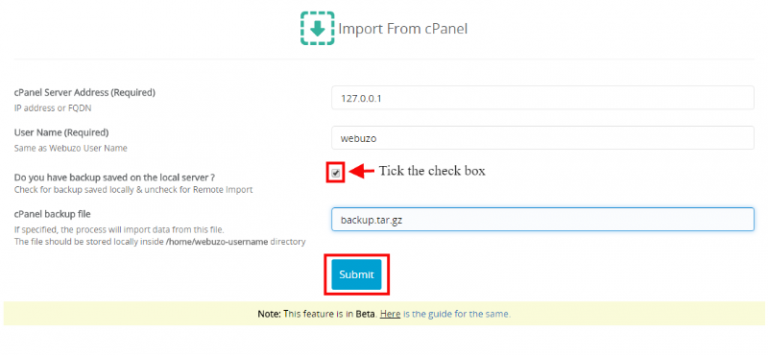
    • Circulate the Form with the cPanel Server, User, and backup file path details.
    • Click on Submit to Import the cPanel Account.

    A below-mentioned screenshot indicates Import process has started successfully.

    • On completion of the Import process, you will receive an email.
    • Import logs can be found at /usr/local/webuzo/includes/cli/cpanel_migration.log

    Important tip

    Note: This feature is available in the BETA stage as of now.  

    • You need to install a fresh Webuzo Server and the name of the Webuzo user should be the same as the cPanel Username
    • Import utility will overwrite all your Webuzo user data.
    • Your backup of cPanel must be stored at /home/webuzo_username/ directory.

    Once the import process has taken place then you can withdraw the archive.

    Domains, Databases, etc are generalized in the Webuzo account like cPanel.

    A random password is given to FTP users imported on the new Webuzo server. It is suggested to change the passwords of the FTP user’s account.

    Email notifications of the FTP accounts are also created.

    Import logs are generated at /usr/local/webuzo/includes/cli/cpanel_migration.log

    Import Email accounts if any are not imported

    • Once completion is done then you’ll receive the email.
    • Import logs can be found at /usr/local/webuzo/includes/cli/cpanel_migration.log

    Required Inputs

    • cPanel Server Address: IP address or FQDN of your cPanel account.
    • User name – cPanel Username same as Webuzo username.
    • Password – cPanel user password
    • cPanel backup file – Full cPanel backup file name stored on Webuzo machine e.g. backup.tar.gz

    Cheap web Hosting


    How to Convert cPanel to Webuzo


    Cheap reseller Hosting


    Intro:

    This guide will help you to convert your cPanel server to Webuzo. This tool performs many tasks like converting your cPanel server itself uninstalls cPanel, installing Webuzo, and converting all cPanel data to Webuzo. Everything works smoothly and all your users’ websites, domains, databases, emails, FTP accounts, and SSL certificates remain as it is.

    Note:  Please ensure you’ve fully backed up your VPS / Server. For the safer side, you need to restore the VPS backup as cPanel will be uninstalled from the server.

    Commands

    The conversion will monitor the requirements and ask for confirmation. It is advised to type yes and press enter to proceed with the conversion.  

    Later, you can check converter logs at:

    /root/webuzo_convert/cpanel-webuzo-convert.log

    The required time is 5 minutes to 30 minutes based on the resources available on the server and the network connection speed.

    Since this takes time, we suggest implementing the above commands using tmux or session, so if your machine disconnects due to an internet connection issue on your desktop the command still runs in the background.  

    WHMCS Converter

    Webuzo comes with a converter script that helps to convert the WHMCS cPanel hosting accounts to Webuzo. Please refer to the guide.

    What Data will be Migrated?

    The converter will move the following data:

    1) All Domains – Addon, Parked, Sub-domain.
    2) MultiPHP preferences per domain
    3) All Databases and Database Users
    4) FTP Accounts
    5) It covers all email-related data like accounts, forwarders, and autoresponders.

    6) DNS records
    7) SSL Certificates
    8) Cron Jobs
    9) ACL Packages
    10) Users and Resellers with appropriate ownership
    11) IP allocation to users and resellers
    12) For All plans installed on the cPanel server the same version will be installed on Webuzo.
    13) All other data needed for accessing the control panel.


    Understand the difference between Converter and Importer?

    The converter is responsible for converting the data on the cPanel server itself and doesn’t need a new server. Hence, no IPs are changed. As compared to importer as it does not need to transfer the files across servers. It needs a full backup of the server if in case you need to revert it for restore purposes from the backup.

    An importer is required to set up a new server with Webuzo and data is moved from the cPanel server to Webuzo. Further, IPs need to be changed to run the cPanel server compared to cPanel and Webuzo. If you prefer to import the sites instead of in-place converter you can refer to this guide.  


    Cheap web Hosting


    How to Install CloudLinux OS with Webuzo Control Panel


    Cheap reseller Hosting


    Learn how to install CloudLinux OS with Webuzo Control Panel. It is an operating system for multi–tenancy of shared servers. Each customer gets a unique environment, which partitions, allocates, and limits server resources like memory CPU, and connections for each tenant.

    Steps to Install CloudLinux OS

    Supported CloudLinux versions: CloudLinux 8.x, CloudLinux 9.x

    You need to install CloudLinux OS and the guide to follow the instructions:

    https://docs.cloudlinux.com/cloudlinux_installation/

    Note: Don’t forget to reboot the OS once CloudLinux is installed.

    Step to Install CloudLinux Plugin

    After rebooting the CloudLinux OS, the next is to install the CloudLinux plugin in Webuzo. To get the installed plugin, you have to run the following command.  

    wget -N https://files.webuzo.com/plugins/cloudlinux/cloudlinux.sh
    chmod +x cloudlinux.sh
    ./cloudlinux.sh

    Install the CloudLinux plugin in Webuzo and allow users and admins to check the CloudLinux utilities.

    Note: To eliminate the error showing “reboot the server in the correct kernel in Webuzo Tasks, then opt for right kernel for CloudLinux OS with ‘Ive’ in the name. 

    Admin Panel Screenshot

    Enduser Panel Screenshot


    Cheap web Hosting


    List of System Requirements to Install Webuzo


    Cheap reseller Hosting


    Webuzo is a control panel software designed to simplify the process of website and application management on servers. It provides a graphical user interface (GUI) that allows users to easily deploy and manage various web applications, including content management systems (CMS), blogs, forums, e-commerce platforms, and more.

    Webuzo is often used in the context of web hosting services, where it allows users to install and configure popular web applications with just a few clicks. It supports a wide range of applications, including WordPress, Joomla, Drupal, Magento, and many others. With Webuzo, users can quickly set up and manage their websites without needing extensive technical knowledge.

    Key features of Webuzo include:

    Application Library: Webuzo offers a comprehensive library of applications that can be installed with ease. It provides one-click installation for popular CMS, e-commerce, and other web applications.

    Automated Updates: It simplifies the process of keeping applications up to date by providing automated updates for installed applications. Users can easily manage updates for multiple applications from the Webuzo control panel.

    System Monitoring: Webuzo includes monitoring tools to keep track of system resources, such as CPU, memory, and disk usage. This helps users optimize their server performance and ensure efficient operation.

    Backup and Restore: It allows users to create backups of their applications and databases, providing an added layer of data protection. In case of any issues, users can restore their applications and data from these backups.

    Domain Management: Webuzo enables users to manage their domains and DNS settings from the control panel. It simplifies tasks like adding domains, creating subdomains, and managing DNS records.

    Webuzo is compatible with various Linux distributions, including CentOS, Ubuntu, and Debian. It is primarily aimed at users who prefer a user-friendly interface for managing their web applications and server resources, making it a popular choice among beginners and individuals who want to simplify their hosting experience.

    Here you’ll get a list of System Requirements for operating the Webuzo

    Supported Linux Operating System (x86_64) // Should be a FRESH installation

    CentOS 7.x / 8.x

    AlmaLinux 8.x / 9.x

    Ubuntu LTS 18.04 / 20.04 / 22.04

    Red Hat Enterprise Linux 7.x / 8.x

    Scientific Linux 7.x / 8.x

    Rocky Linux 8.x

    CloudLinux 8.x / 9.x

    • They offer packages like yum, apt-get, tar, wget.
    • You need RAM of 1GB (we suggest 10GB for best performance)
    • You need disk space of a minimum 5 GB (we suggest 10GB for best performance)

    Compulsory Note:

    • PHP, Apache, MySQL should not be installed by default on the server.
    • To match the compatibility with Webuzo you need to disable SELinux.
    •  Allow access to the following domains to your firewall as these are the mirror servers used to download the script plans or apps.

    api.softaculous.com (IP : 192.198.80.3)

    s1.softaculous.com (IP : 158.69.6.246)

    s2.softaculous.com (IP : 192.200.108.99)

    s3.softaculous.com (IP : 178.32.158.97)

    s4.softaculous.com (IP : 138.201.24.83)

    s7.softaculous.com (IP : 167.114.200.240

    Virtualization Supported

    VMware

    Parallels

    VirtualBox

    Xen PV or HVM

    Linux-KVM

    OpenVZ

    LXC

    Azure


    Cheap web Hosting


    How to install MediaWiki from Softaculous


    Cheap reseller Hosting


    To Install MediaWiki from Softaculous

    MediaWiki can easily be installed by using Softaculous in the cPanel Software / Services. This tutorial will explain how to install MediaWiki using Softaculous. Please follow the steps and install it.

    How to install MediaWiki from Softaculous


    Step 1 : Log into cPanel.

    Step 2 : Find the Softaculous icon located in the Software Services section.

    Step 3 : To locate MediaWiki you can either type mediawiki in the search box in the top right corner.

    Step 4 : Click on Wikis in the left column.

    Step 5 : When you click on the MediaWiki link, you will be taken to the home page for the MediaWiki package.

    Step 6 : Click on the Install tab.

    You will be asked to fill in the details of the installation.

    Step 7 : If you have multiple domains associated with this account, you can select where to install it.

    Step 8 :  The next two boxes require a Directory and Database Name, neither of which should exist on the server.

    Step 9 : Under Site config, enter a Wiki Name and Email.

    These can be changed later on from the application’s admin panel.

    Step 10 : Type the desired Admin Username and Password that should be used.

    Step 11 : Click Install.

    After a moment, the software will be installed.

    Step 12 : Once finished, you can view your new site by clicking this link.

    You will be able to access your newly-installed MediaWiki by following the links on the page.


    That’s it! 🙂 🙂


    Cheap web Hosting


    How to turn off the bandwidth monitoring module in cPanel


    Cheap reseller Hosting


    In this article Hostripples will give you how to turn off the bandwidth monitoring module in cPanel, Please do the following steps:

    monitoring module in cPanel

    Step 1 : Go to WHM.

    Step 2 : In Service Configuration Section, Click on Service Manager.

    Step 3 : Search for cPBandwd.

    Step 4 : You will see a check box unchecked that.

    Step 5 : Click save the settings.

    That should be it !!


    Cheap web Hosting


    1 2 3