Malware Infection Breaking WordPress Websites


Cheap reseller Hosting


Malware Infection Breaking WordPress Websites

There is a known malware infection caused by a serious vulnerability in the MailPoet WordPress plugin. This malicious attack attempts to slyly inject Spam into the hacked site, which is causing websites to break, and focuses predominantly on WordPress sites with outdated plugins or weak admin passwords.


Malware Infection


  • The infected PHP code is very buggy and is corrupting legitimate website files, as well as themes and plugin files, which causes PHP errors to be displayed instead of website content:

Parse error: syntax error, unexpected ‘)’ in /home/user/public_html/site/wp-config.php on line 91


  • After removing the infecting malware, the only way to remedy the issues is to restore the corrupted files from a backup. This is what the malware code looks like:

< ?php $pblquldqei = ’5c%x7824-%x5c%x7824*!|!%x5c%x7824-%x5c%x7824%x5c%x785c%x5c%x7825j^%xq%x5c%x7825%x5?c%x7827Y%x5c%x78256<.msv%x5c%x7860ftsbqA7>q7825)3?of:opjudovg< ~%x5c%x7824!%x5c%x782421787825!|!*!***b%x5c%x7825)…


  • If you are running MailPoet, we recommend upgrading it to the latest version.

Note : If you do not have a firewall on your website, you have to upgrade the plugin or remove it altogether to avoid more issues.


Cheap web Hosting


How to Enable Apache SpamAssassin in Cpanel


Cheap reseller Hosting


Spam Assassin 

                 Apache SpamAssassin is the Open Source anti-spam platform giving system administrators a filter to classify email and block spam (unsolicited bulk email). It uses a robust scoring framework and plug-ins to integrate a wide range of advanced heuristic and statistical analysis tests on email headers and body text including text analysis, Bayesian filtering, DNS blocklists, and collaborative filtering databases.

To Enable Apache SpamAssassin in Cpanel

Following  steps to enable Apache SpamAssassin

1) Log into cPanel

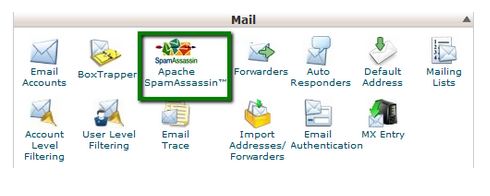
2) Navigate to Mail Section

3) Click on Apache SpamAssassin™ option

See Following Screenshot

apache spamassassin


4) Click on Enable Apache SpamAssassin™ button

See Following Screenshot

Enable Apache

.

.

.

Apache SpamAssassin is Enable!


Cheap web Hosting


How to setup Backup & Migrate Module on Drupal


Cheap reseller Hosting


Setup Backup & Migrate Module

Backup and Migrate makes the task of backing up your Drupal database and migrating data from one Drupal install to another easier. It provides a function to backup the entire database to file or download, and to restore from a previous backup. You can also schedule the backup operation. Compression of backup files is also supported. The database backup files created with this module can be imported into this or any other Drupal installation with the restore feature, or you can use a database tool such as phpMyAdmin.

Migrate Module

Add private file system path

1) Navigate to Backup and Migrate

Configuration » System » Backup and Migrate

2) Click on the link file system settings

3) Enter a path to the directory where you are saving the private files.

sites/default/files/private

4) Save configuration

==============================

Backup database in local folder

You can download the current Drupal Site to your local folder.

1) Select the configuration

2) Click on Backup now button
.
.
.
The download will start instantly.

=============================

Backup to Server

You can save the current Drupal Install to the server itself

1) Select the configuration

2) Click on Backup now button
.
.
An archived file will be saved in the server.

(You can see the saved backups under SAVED BACKUP tab)

=============================

Restore from a Backup & Migrate Archive from your local folder on Drupal

1) Go to Restore tab

2) Select the radio button Restore from an uploaded file

3) Click Choose File button

4) Select the compressed file

5) Click on Restore now button
.
.
.
The Drupal site will be restored

=============================

Restore a Drupal site from a Saved backup (saved in server) on Drupal

1) Go to Restore tab

2) Select the radio button Restore from saved backup

3) Select a archive which you want to restore

4) Click on Restore now button.
.
.
.
The database will be restored

=============================

Set up Automatic Scheduled Backups

1) Got to Schedules tab

2) Click the link Add Schedule button

3) You will be taken to the schedule configuration page.

4) Rename the schedule

5) Select Backup Source as Default Database

6) Select Enabled check box

7) Select the radio button Run using Drupal’s cron

8) Select to backup either every hour or daily or weekly

9) Select the whether to delete old backup file during the current schedule process

10) Click on Save Schedule button.

11) You can see the saved schedule under Schedules tab

12) You can also edit settings for a particular schedule by using the edit button.


Cheap web Hosting


Install Mytop in Linux and Cpanel


Cheap reseller Hosting


How to install mytop in linux and cpanel


MySQL is one of the most important programs on a server, unfortunately it is also pretty resource intensive. One a  server it is not uncommon for a single user or even a query to take up the bulk of the servers CPU cycles. Mytop is a very useful program to see what queries a server is currently processing as well as which user is executing them. Think of mytop as top for mysql. If you see a lot from a user that means they are probably the hog. Mytop can also be useful for figuring out exactly which queries are causing the problem in the case of a self-designed website.


install mytop


The following commands use  how to install mytop on the server and run it.

1) To Install Term Read Key:

cd /usr/local/src

wget http://search.cpan.org/CPAN/authors/id/J/JS/JSTOWE/TermReadKey-2.30.tar.gz

tar -zxf TermReadKey-2.30.tar.gz

cd TermRead*

perl Makefile.PL

make test

make

make install

cd ..


2) Now,To Install DBI:

wget http://search.cpan.org/CPAN/authors/id/T/TI/TIMB/DBI-1.48.tar.gz

tar -zxf DBI-1.48.tar.gz

cd DBI*

perl Makefile.PL

make test

make

make install

cd ..


3) Finally  To Install MYTOP:

wget http://jeremy.zawodny.com/mysql/mytop/mytop-1.4.tar.gz

tar -zxf mytop-1.4.tar.gz

cd mytop*

perl Makefile.PL

make test

make

make install


NOTE: You may get following error in CentOS 5.3

Error in option spec: “long|!”

Search for the line in Makefile.PL

“long|!” => \$config{long_nums},

Change it to by commenting using #

#”long|!” => \$config{long_nums},


Cheap web Hosting


How to Back Up Your Drupal Website


Cheap reseller Hosting


database


Back Up Your Drupal Website

 Drupal Website backing up involves backing up both the site’s database and its files. Just for taking file backup doesn’t help. Always take database and files backup whenever you take Drupal Website backup.


Drupal_website_Backup


Step 1. To Back Up Your Files

1) Download all files pertaining to your Drupal website using an FTP client.

2) The illustration below shows a Drupal website installed in a sub-directory called “drupal” 

2) The FTP client FileZilla is used to download the files.

Step 2. To Back Up Your Database

1) Log in to your hosting account’s cPanel

2) Click on “phpMyAdmin” in the Databases section

3) Then click on Databases

4) Select your Drupal website’s database

5) Then click Export

6) In the following page, click Go

7) Save the file to your desired location.

.

.

.


Congratulations! You have now backed up your Drupal website.


Cheap web Hosting


How to Export Database using PHPMyAdmin


Cheap reseller Hosting


Export Deatabase


phpMyAdmin makes the task of managing your MySQL databases easier and more efficient, and it allows you to manage those available databases from anywhere. With phpMyAdmin, you can create, edit, back up, Import, export, and delete databases, as well as manage database tables. When you export a database, you are creating a backup file of the database. This backup file is usually a .sql file (a text file), and can be used to copy and import the database onto another server

Export Database using PHPMyAdmin

1) Log into phpMyAdmin

2) Click the database you are working with.

3) Click Export Button

4) Under the Export heading, Selected SQL option

5) Under the Options heading, ensure that you have selected, Add DROP TABLE / VIEW / PROCEDURE / FUNCTION

6) Ensure the Save as file option is checked.

7)  Click Go Button

8) You will be prompted to either open or save the file. Select the option to save the file and then save the somewhere you’ll remember.

.

.

.


Congratulations, you have just exported a copy of your database!


Cheap web Hosting


How to Import Database using PHPMyAdmin


Cheap reseller Hosting


Import Deatabase

phpMyAdmin makes the task of managing your MySQL databases easier and more efficient, and it allows you to manage those available databases from anywhere. With phpMyAdmin, you can create, edit, back up, import, export, and delete databases, as well as manage database tables.

Import Database using PHPMyAdmin

1) Login to cPanel

2) Open phpMyAdmin and click the phpMyAdmin icon

3) Select the database that you need to Import

4) Click Import Button

5) Under File to Import, click Browse Button

6) Select the backup file you previously created (it will be either a .sql .zip or .tar.gz file).

7) Click Go Button

8) When the database has been imported successfully, you will see the message to: Import has been successfully finished, ## queries executed.

.

.

.


Congratulations, you have just imported a database!


Cheap web Hosting


Install Easy Hosting Control Panel


Cheap reseller Hosting


EHCP

Easy Hosting Control Panel


                 EHCP (Easy Hosting Control Panel) is an open source hosting control panel for administrators who want to sell hosting or set up hosting servers. EHCP is compatible with a server running a Debian-based system such as Debian Squeeze, Ubuntu, Linux Mint, etc. Ehcp is a Hosting Control Panel (hcp). hcp is a tool in a server to facilate the process of hosting domains, emails, adding domains, ftp users and so on.


EHCP Features:

EHCP has many unique features compared to other control panels.

General Features:

* Full php, full opensource, easily modifiable, customazible, ehcp templates
* Unlimited “resellers, panel users, domains, ftp users, emails, mysqls”
* Domains, subdomains, ftp, mysql, dns (automatic), email etc. management
* password protected domains,
* Email forwarding, autoreply, catch-all emails
* Web-stats (webalizer)
* web-ftp (net2ftp)
* Easy Install Scripts (scripts easily downloaded and copied by means of server)
* Disk quota control,
* Custom http, custom dns, domain aliases, domain redirect,
* Ssl support
* Different languages, templates support, a few lang/templates included,
* Different Menus/pages for Server Admin, Reseller, domain admin, email user (4 level)
* server backup/restore (files+db)
* domain transfer to another ehcp user
* simple, light, fast, host hundreds of domains in it.
* supports Ubuntu 6-9.10, debian 4,5, all debian based linux’es
* Any server related program may be installed with Ubuntu’s apt-get command
* Almost all programs are always up-to-date when you update your server, with Ubuntu’s: apt-get update ; apt-get upgrade
* Opensource, GPL, free, full php, object oriented, modular, easily modifiable/extendable design..
* More features that I forgot to write..

New with 0.29.12:

* Customizable, templates
* add domain to my ftp
* add ftp with any directory under home
* add ftp with subdomain
* add ftp with subdirectory under domainname
* list related/similar functions in ehcp
* edit dns/apache template for a domain
* domain aliases
* email forwardings
* catch all email
* default domain settable for ehcp gui
* “fix apache configuration” link in options
* “fix email (postfix) configuration” link in options
* apache ssl support
* new default theme: xp5-z7
* more “easy install scripts”, a total of 30 scripts
* disk quota support
* smtp auth support
* more options for ehcp
* bulk add domain feature
* multi server intro: separate mysql server support
* improved installer


EHCP


How to Install Easy Hosting Control Panel (EHCP) In Ubuntu 14.04 ?


1) Login as root user using ssh and download the EHCP installation script using the following command:


# wget http://www.ehcp.net/ehcp_latest.tgz


2) Extract the downloaded file using tar command:


# tar -zxvf ehcp_latest.tgz


3) Switch to the extracted folder and run the installation script using the following commands:


# cd ehcp
# ./install.sh


Follow installation wizard and read the instructions carefully, the install script will install all required packages including Apache, MySql and Postfix. You will need to provide some information to configure the services and set the admin passwords.

When the installer is finished. you will be provided with the ehcp login page in your Web browser window, if you are on your local machine, otherwise, you need to connect to your new web Server by entering the IP address of you server.


http://hostripples.com/vhosts/ehcp


Your default admin username: admin
Default admin pass: 1234


Cheap web Hosting


How to install and configure Nginx on cPanel servers


Cheap reseller Hosting


nginx


Nginx is a free, open-source, high-performance HTTP server and reverse proxy, as well as an IMAP/POP3 proxy server.

How to set up Nginx?


Follow the steps to install nginx as reverse proxy in a cPanel server:


1) SSH to server as root.
2) Change the directory to “/usr/local/src”


# cd /usr/local/src


Download & Install Nginx on cPanel servers


#wget http://nginxcp.com/latest/nginxadmin.tar
#tar xf nginxadmin.tar
#cd publicnginx
#./nginxinstaller install


In WHM, now Nginx Admin plugin will be available under plugins section. After installing make sure Nginx process is running on the server


1) You can chcek this by using the following command.


# ps aux | grep nginx


2) If it is not showing any process, then kill httpd and restart httpd


#killall -9 httpd
#/etc/init.d/httpd restart


3) Nginx Admin Uninstall instruction:


#cd /usr/local/src
#wget http://nginxcp.com/latest/nginxadmin.tar
#tar xf nginxadmin.tar
#cd publicnginx
#./nginxinstaller uninstall


Make sure that the Nginx is running on port 80 and Apache on different port (like 8080).

Also open the new port the server firewall.

.

.

That’s it!


Cheap web Hosting


How to Install Zamfoo


Cheap reseller Hosting


What is Zamfoo ?

zamfoo

Zamfoo is a plugin which provides additional features to a Reseller and makes his work a bit easy. Zamfoo plugin needs to be installed on the server and can be integrated with Reseller center. The OS recommended for Zamfoo is Cent OS, as its the most compatible OS for cPanel/WHM. Altough there are few limitations to use the this with WHM reseller.


Zamfoo_ashishkale.in


To Install Zamfoo 

Run the following commands in SSH:

cd/

Use of this commands : This will take you to the root directory of your server.


wget http://www.zamfoo.com/downloads/zamfoo_installer.tar

Use of this commands : This command will download zafoo on your server.


tar -xvf zamfoo_installer.tar

Use of this commands : This command will extract contents on the server.


chmod 755 runme.cgi

Use of this commands : This command will modify the permissions to make it executable.


./runme.cgi

Use of this commands : This command will run the installer.


After firing all these commands,

You will have to enter the license key here:-

$license=”License key”

Once enter the License key
press CTRL + X

then Save it.

.

.

.

.

 Zamfoo will be installed on your Linux server.


Cheap web Hosting


1 6 7 8 9 10