How to force www or non-www in your .htaccess file in cPanel


Cheap reseller Hosting


Force www or non-www in your .htaccess file in cPanel

Step 1:  Log into your cPanel.

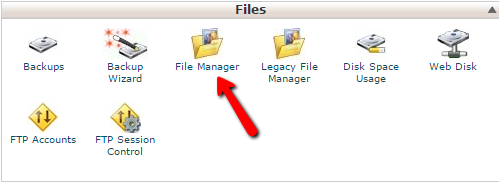
Step 2: Find the Files category and click on the File Manager icon.
  

Fail_Manager

Step 3 : A popup box will appear. For the primary domain, click on the Web Root radio button. For addon domains, click on the dropdown and find your desired addon domain name. Be sure the checkbox next to Show Hidden Files is checked.

Step 4 : Click the Go button to enter the File Manager.

Step 5 : You should now be in the root folder of the domain you chose. Look for the .htaccess file and right click on it. This brings up a menu.

Step 6 : Find and click on the Edit option. If you get a popup box, simply find and click the Edit button in the lower right corner to continue to the editor.

 Step 7 : You are now in the text editor. Place either selection of code in the file and click on the Save Changes button at the top right corner of the screen. Be sure to replace ‘example.com‘ with your actual domain name.

NOTE: Do not place both selections of code in the file as it will cause an error.

    #Force www:
    RewriteEngine on
    RewriteCond %{HTTP_HOST} ^example.com [NC]
    RewriteRule ^(.*)$ http://www.example.com/$1 [L,R=301,NC]

    #Force non-www:
    RewriteEngine on
    RewriteCond %{HTTP_HOST} ^www\.example\.com [NC]
    RewriteRule ^(.*)$ http://example.com/$1 [L,R=301]

 Step 8 : Once you insert the code, click on the Save Changes button in the upper right corner to save the code change. You can now type your domain name either with or without the www and it will display in the address bar in the format you have set the code for.


Cheap web Hosting


Redirect domain to subdirectory without changing URL


Cheap reseller Hosting


The simple way to redirect your primary domain to a sub folder without change the URL

Redirect_Domain

A)  Redirect and keep everything after the URL

Show all of the same content on one URL as you would another.

Example, if you just changed your domain to DomainB.com, but you still have plenty of visitors coming to DomainA.com, you would use this to show them all of the existing content that is located on the new domain, without the need to update both websites.

You would modify your .htaccess file for the domain that your users will go to, and insert these lines of code:

RewriteCond %{HTTP_HOST} ^DomainA.com
RewriteRule ^(.*) http://DomainB.com/$1 [P]

If you are using the file manager in cPanel, be sure that you have the option to show hidden files selected.

What does the above redirect do?

Adding this line into your .htaccess file, you will be able to go to DomainA.com/YourPage and it will show the content from DomainB.com/YourPage

B) Redirect a domain to a specific url

If you want visitors to go to DomainA.com with a specific page in mind when doing so, you may use this code:

RewriteCond %{HTTP_HOST} ^DomainA.com
RewriteRule ^(.*) http://DomainB.com/PathToPageHere [P]

Example, you had an external blog such as one on blogspot.com or maybe a shopping cart on etsy.com that you want people to visit your domain without fully hosting the domain there. Now, visitors can access your site using your domain, but see the content of an external URL.

C)  Re-directing an IP address

The following code shows how this can be done in the .htaccess file.

# Redirect all IP address (replace the ## with the IP address numerals) to same http://domain_name.com
RewriteCond %{HTTP_HOST} ^##\.##\.##\.##
RewriteRule (.*) http://domain_name.com/$1 [R=301,L]
Stipulations / Please read

Note: If using the first option, search engines such as Google or Bing will see multiple sites with the same content and can cause ranking drops in one, or both of the sites. From an SEO standpoint, your best option is to create 301 redirects instead.


Cheap web Hosting


How to transfer website from cPanel server to CWP (CentOS Web Panel server)?


Cheap reseller Hosting


centos-web-panelFirst Install CWP on your VPS or Dedicated server : Installation Process


Configuration of CentosWebPanel
– Setup nameservers (CWP *- > DNS Functions -*> Edit Nameservers IPs)
– Setup shared ip (CWP –> WebPanel Settings – -> WebPanel Settings)
– Setup at least one hosting package (CWP –> Accounts –> Add a Package)
– Setup root email (CWP –> WebPanel Settings – -> WebPanel Settings)

How to Setup NameServers?
You can setup your own nameserver but then you need to have at least two IPs or you can use FreeDNS:

You can use one of the Free DNS server providers like:

http://freedns.centos-webpanel.com/
http://freedns.afraid.org/

When you register on Free DNS providers site there you will get Nameservers that you can use for yours domains.
Nameservers you need to add in: CWP – > DNS Functions -> Edit Nameservers IPs
* This nameservers you enter here will be used in all configs and account setups

If you are using FreeDNS service than you will need to point yours domain to nameservers that you get on FreeDNS  website.
On FreeDNS Website you need to point domain to your server IP address.
This changes will need up to 24 hours to be visible for you.

Create New Account
– Accounts –> New Account
– SQL Services –> MySQL Manager (New Database & User)

Download Data from cPanel server
– Download all files from yours cPanel servers /home/username/public_html folder
– Download MySQL Database with phpMyAdmin from cPanel server

Upload Data to CWP server and import MySQL database

– with FTP or SSH uplaod all files to your CWP server in /home/username/public_html folder you created before with new account
– with phpMyAdmin on CWP import database you downloaded (with logins details of mysql user)
* You can zip .sql file and import it much faster

Edit yours config files that connects to MySQL database on CWP
eg. for wordpress /home/public_html/wp-config.php  (check: host, username, database and password)

and that is it, test your website.

If you use mod rewrite and .htaccess for your website than you will need to add this in your vhost file (change USERNAME)
/etc/httpd/conf/httpd_webpanel_vhosts.conf

<Directory "/home/USERNAME/public_html">
AllowOverride All
</Directory>

add this config beffore </VirtualHost> for your domain


Cheap web Hosting


How to check installed perl modules on a cPanel server ?


Cheap reseller Hosting


perl

Login to your Server via SSH with root login .

Run below command

instmodsh

root@ashishkale [~]# instmodsh
Available commands are:
   l            - List all installed modules
   m <module>   - Select a module
   q            - Quit the program
cmd? l
Installed modules are:
   CPAN
   Compress::Raw::Bzip2
   Compress::Raw::Zlib
   Crypt::PasswdMD5
   DBI
   Digest::SHA1
   Encode::Locale
   Expect
   ExtUtils::MakeMaker
   File::Listing
   Filesys::Df
   GnuPG
   HTTP::Cookies
   HTTP::Daemon
   HTTP::Date
   HTTP::Message
   HTTP::Negotiate
   IO::Compress
   IO::HTML
   IO::Tty
   LWP
   LWP::MediaTypes
   Module::Build
   Module::Metadata
   Net::HTTP
   Perl
   Perl::OSType
   Regexp::Assemble
   Test::Deep
   Test::NoWarnings
   Test::Tester
   URI
   WWW::RobotRules
   local::lib
   version
cmd?

Cheap web Hosting


remote_smtp defer (99): Cannot assign requested address


Cheap reseller Hosting


exim


Error Code :

1YjCse-0006Hn-2M == email@domainname.com R=lookuphost T=remote_smtp defer (99): Cannot assign requested address


Resolution:

Make sure that your exim server is configured with correct mail IP address you can verify it with file located at /etc/mailips also make sure the permissions are correct


-rw-r—– 1 root mail 3652 Apr 18 06:51 /etc/mailips


Cheap web Hosting


Exim : retry time not reached for any host after a long failure period


Cheap reseller Hosting


exim

Exim : retry time not reached for any host after a long failure period.

The issue is because of the corrupted exim db files.

Go to /var/spool/exim/db and delete files: retry , retry.lockfile , wait-remote_smtp, wait-remote_smtp.lockfile

#cd /var/spool/exim/

#rm retry retry.lockfile wait-remote_smtp wait-remote_smtp.lockfile

After that restart the exim service.

#/etc/init.d/exim restart


Cheap web Hosting


Unsuspending Bandwidth Limit Exceeded user/domain


Cheap reseller Hosting


Hello,

If domain is giving the error of “Bandwidth Limit Exceeded” you can unsuspend it from WHM or terminal as well.

From WHM :

To bring the website back online or un-suspend the bandwidth exceed-er, use the option
WHM >> Account Functions >> Unsuspend Bandwidth Exceeders >> click “Proceed”.

This will reset the bandwidth usage to zero for the account. To increase the bandwidth limit for the account, use the option

WHM >> Account Information >> “View Bandwidth Usage”

From Shell :

vi /var/cpanel/users/USERNAME
change BWLIMIT (Increase the value)
/scripts/updateuserdomains
cd /var/cpanel/bwlimited/

remove the files related to that user or domain 
OR
rename the fies with suffix _bk
e.g.; 
user_bk
domainname.com_bk
www.domainname.com_bk

This will bring the website back online..

Cheap web Hosting


How to reset bandwidth for a domain in WHM/CPANEL using Shell !!!


Cheap reseller Hosting


You can follow below steps to reset bandwidth of a Domain in cpanel server through Shell :

************************************************

    ssh to your server
    cd /var/cpanel/bandwidth.cache/
    vi domainname.com and/or vi username
    replace contents with 0
    save and quit

************************************************

Cheap web Hosting


How to install BIND .


Cheap reseller Hosting


[Root @ example ~] # yum -y install BIND BIND-utils
It is set assuming that the global address [192.16.0.80/29], private address [10.0.0.0/24], the following settings in the domain name, and [server.world]: Setting BIND. Please replace to suit your environment. (192.16.0.80/29 is actually the address for private)

[Root @ example ~] # echo ‘OPTIONS = “-4″‘ >> / etc / sysconfig / named # If you do not want to use the IPv6 (you will not be set if used) set [Root @ example ~] # vi / etc / named.conf / / / / Named.conf / / / / Provided by Red Hat bind package to configure the ISC BIND named (8) DNS / / Server as a caching only nameserver (as a localhost DNS resolver only). / / / / See / usr / share / doc / bind * / sample / for example named configuration files. / /

options { # (Listens to port 53 on all interfaces of the server) Comment # listen-on port 53 {127.0.0.1;}; # (If you do not want to use the IPv6) change listen-on-v6 {None;}; directory “/ Var / named”; dump-file “/ Var / named / data / cache_dump.db”; statistics-file “/ Var / named / data / named_stats.txt”; memstatistics-file “/ Var / named / data / named_mem_stats.txt”; # (Where the internal network, etc.) to allow range queries allow-query {Localhost; 10.0.0.0/24; }; # (Range / the place if there is a secondary DNS) range to allow the transfer of information zone allow-transfer {localhost; 10.0.0.0/24;}; recursion yes; dnssec-enable yes; dnssec-validation yes; dnssec-lookaside auto; / * Path to ISC DLV key * / bindkeys-file “/ etc / named.iscdlv.key”; }; logging { channel default_debug { file “data / named.run”; severity dynamic; }; };

# Change the following line from all view “internal” { match-clients { localhost; 10.0.0.0/24; }; zone “.” IN { type hint; file “named.ca”; }; zone “server.world” IN { type master; file “server.world.lan”; allow-update {none;}; }; zone “0.0.10.in-addr.arpa” IN { type master; file “0.0.10.db”; allow-update {none;}; }; include “/ etc/named.rfc1912.zones”; }; view “external” { match-clients {any;}; allow-query {any;}; recursion no; zone “server.world” IN { type master; file “server.world.wan”; allow-update {none;}; }; zone “80.0.16.172.in-addr.arpa” IN { type master; file “80.0.16.172.db”; allow-update {none;}; }; };

# Allow-query ⇒ (specify the internal network, etc.) to allow range queries # Allow-transfer ⇒ (range / the place if there is a secondary DNS) range to allow the transfer of information zone # Recursion ⇒ Whether you are allowed to retrieve comeback # View “internal” {~}; ⇒ describes the definition for internal # View “external” {~}; ⇒ describes the definition for the external
# *. *. *. *. Place of in-addr.arpa is about to enter what was to reverse the network address # If the 10.0.0.0/24 # Network Address ⇒ 10.0.0.0 # Range of network ⇒ 10.0.0.0 – 10.0.0.255 # How to specify ⇒ 0.0.10.in-addr.arpa

# If 192.16.0.80/29 # Network Address ⇒ 192.16.0.80 # Range of network ⇒ 192.16.0.80 – 192.16.0.87 # How to specify ⇒ 80.0.16.172.in-addr.arpa


Cheap web Hosting


1 2 3 4 5 6