Steps to Install ClamAV on Webuzo


Cheap reseller Hosting


Intro

Clam AntiVirus is nothing but a free software, cross–platform antimalware toolkit that helps to find various malware including viruses.  

Install ClamAV

You can install ClamAV from the apps page. To go to the apps page, click on Installing an App under Apps in the admin panel.

Admin Panel Screenshot

After installing the ClamAV, you’ll be redirected to the admin panel of ClamAV.

Over there, you’ll see the options like;

Scan the Entire Home Directory

Scan Mail

Scan Public FTP Space

Scan Public Web Space

You have to click on the Save Changes button.

Enduser Panel Screenshot

Next, is the security section in which you’ll get various alternatives those are:

Change Password

IP Block

SSH Access

Directory Privacy

ClamAV

Imnunify360

From the above options, you have to click on the ClamAV option.

Next,

Scan Entire Home Directory — Scans your server’s home directory.

Scan Mail — Scans all of your server’s mail folders.

Scan Public FTP Space — Scans all folders that FTP users can access.

Scan Public Web Space — Scans all folders that web visitors can access.

From the above-mentioned options, you’ve to click on all options and start the scanning.  

ClamAV cron job

After configuring ClamAV, it’s suggested to schedule a root cron job to access the daily routine during off–peak hours. The following example shows a command that scans the server’s accounts.

find /home/ -mindepth 1 -maxdepth 1 -type d! -user root -exec /usr/bin/clamscan -i -r {} \; > /root/scan_results.txt

You are allowed to set up the CPU limit to a specific percentage for clamscan process.  

Note: It is compulsory to have a limit installed in your OS.

To install CPUlimit, run the below command:

For Ubuntu:

apt-get install CPUlimit

For Centos/Almalinux:

yum install cpulimit

Note: It needs CPU resources for scanning. If you decrease the CPU limit then it will consume more time to complete the scanning.

Once CPUlimit is installed then you are allowed to set the cronjob for clamscan with CPUlimit. For example, the below set command of the CPUlimit > Clamscan process is up to 80%

cpulimit -l 80 -e clamscan & id=$!; find /home/ -mindepth 1 -maxdepth 1 -type d ! -user root -exec /usr/bin/clamscan -i -r {} \; > /root/scan_results.txt; kill $id


Cheap web Hosting


How to Install CXS on the Webuzo Control Panel


Cheap reseller Hosting


Introduction

This article will help you to learn the steps of installing Config Exploit Scanner (CXS) which safeguards your server from malware and compromise.

What is CXS?

The ConfigServer eXploit Scanner (cxs) is a server malware, exploit, and anti-virus scanner that can protect cPanel and DirectAdmin servers from security threats. It performs active scanning of files as they are uploaded to the server, and it can also scan for outdated scripts and plugins that may be vulnerable to attacks.

cxs is a commercial product that is available from ConfigServer. It is licensed on a per-server basis, and there are no monthly fees. cxs is easy to install and use, and it can be configured to scan for a wide variety of malware, exploits, and viruses. If you are looking for a way to protect your cPanel or DirectAdmin server from security threats, then CXS is a good option to consider.

Here are some of the benefits of using CXS:

Protects your server from malware, exploits, and viruses.

Scan files as they are uploaded to the server.

Scan for outdated scripts and plugins.

Easy to install and use.

No monthly fees.

Here are some of the features of CXS:

Real-time scanning of uploaded files.

Scanning of existing files.

Scheduled scanning.

Email notifications for potential threats.

Quarantine of infected files.

Requirements

You need a valid CXS license for the app to run.

Click on Install App

You need to login to your Webuzo admin panel > go to Install an App page. Now, you must look for CXS in the right menu > CXS install page.

Install CXS

After clicking on the CXS Install page, hit the tab on the install button to start the installation process.

Within a second, when CXS is installed you’ll see the success message as shown in the screenshot below.

Access CXS Panel

Once CXS is installed you can operate the CXS panel by searching it from the left menu as shown in the screenshot.  


Cheap web Hosting


Steps to Convert WHMCS cPanel Hosting Account to Webuzo


Cheap reseller Hosting


Overview

This tutorial will help you to convert your WHMCS hosting accounts from cPanel to Webuzo once you’ve done with the cPanel server to Webuzo server after running the cPanel to Webuzo in – place converter.  

After conversion, the new UI will be displaced in WHMCS. Hence, this WHMCS converter works by converting one cPanel server’s hosting accounts at a time. Further, you’ll get a choice to select a new product / service plan in WHMCS or create new ones as Webuzo and convert.

Note: Take a backup of the WHMCS Database before converting and disallow the WHMCS to create a new hosting account on the server being converted.  

Download

Download the cPanel to Webuzo WHMCS Converter from here

Develop a directory cpanel_converter in your /path/to/whmcs/ Directory.


Next is to unzip the downloaded zip in the cpanel_converter directory that is created.


Take care of uploading and look after folder existence:
/path/to/whmcs/cpanel_converter

Run Converter

To access the converter, you need to access http(s)://ip-or-hostname/cpanel_converter

Note: At this moment, you should stop entertaining new orders and creating a backup of the WHMCS database.  


You can allow a converter to create the product. When this utility creates the Webuzo Product it will copy the cPanel product data along with its pricing. Similar cPanel configurable options will be used so that users can manage the same.

Whenever you run the converter, you’ll get the list of cPanel WHMCS servers. You need to select the server to which you wish to convert the hosting account.  

The converter can’t modify the cPanel products or server instead of it will modify the web hosting accounts of the cPanel server. Let’s start, you will see the cPanel servers listed.  After selecting the cPanel server to convert, click on load data. Now, you will be showcasing the list of cPanel servers. You only need to select cPanel server to convert

You will get three options to convert:

  • Do nothing i.e. the hosting accounts of that specific product will not be updated.
  • Select the existing Webuzo product that was created before
  • Allow this converter to create the Webuzo product for the cPanel product you’re importing.

You can select any option and start with the conversion.

Once the conversion of the account is done then those accounts will be displayed.

Update cPanel server to Webuzo

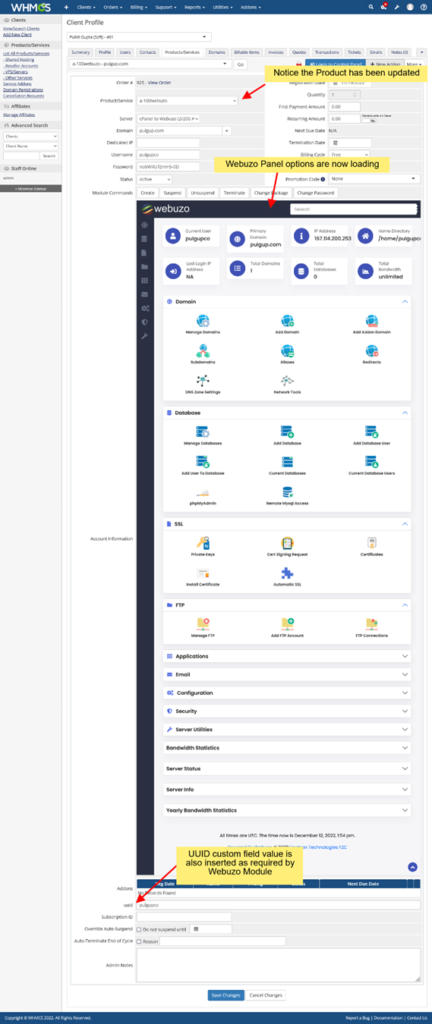
Update the cPanel server in WHMCS to use the Webuzo module. Shown image below is the real image of the cPanel server in Webuzo’s WHMCS installation.

It is necessary to update the above server to the following as per Webuzo module settings:

Once the test of connection is done save the server and all your hosting accounts converted should able to load the Webuzo Enduser Panel in WHMCS.  

Verify

Verify data that has been imported and start with a new cPanel i.e. Webuzo.

Support

Webuzo support team will help you to migrate smoothly. You can contact their support team for migrating purposes.


Cheap web Hosting


Steps to buy a license of Webuzo


Cheap reseller Hosting


Intro: It’s good to see you buying a Webuzo License for smooth working. Webuzo is full of features that make cPanel more worthy and handy than competitors’ software. Buying a license is like asking for comfort in the business and the best thing is it gets activated immediately. You can select the Type of License and find information on the pricing on our Pricing Page.

Steps to buy a license of Webuzo

Create an Account

Create an Account and log in: In the beginning, you’ve to create an account at the Softaculous Client Center and login to your account.

Get the License Key

Login to your control panel as root and click on Webuzo Admin Panel. In the Webuzo admin panel, you can search for the license key for your server.  

Adding a license

Move ahead to the Client Center: Please go to the Client Area and Login. If you’ve an existing license then search in the Webuzo Admin Panel of your server and fill in the License Key on the Add License page. After adding the license key, it will start showing in the client’s area.  A screenshot of the client’s area is given below:

Choose Type of License:

In the menu bar > left click on the purchase Webuzo link. Select the Type of License and fill out the form as per the requirement. In case of renewal of an existing license or making a free license to a premium License then enter the License IP Address of the server where Webuzo is going to be installed. Last click on the Purchase Webuzo button to complete the process.

Pay the Invoice

After clicking on the purchase button an Invoice is produced and you’ll redirected to the Invoice. Tap on the PayPal button that reads Check out with PayPal. You will redirect to the Paypal Payment Page which is a secured Gateway to pay.  

Payment is done successfully

After paying for the invoice PayPal will redirect you to the Softaculous Client Area. It will highlight the payment was made successfully and your License has been activated.


Cheap web Hosting


Migration from Another Webuzo Instance


Cheap reseller Hosting


Intro:

This guide will help you to Migrate from another Webuzo instance.

Requirement:

  1. It is compulsory to install on the new server.
  2. Keep the same username of the account as the one you’re migrating from the other Panel. For example; If the username is Jenny on the other panel, it must be Jenny on Webuzo also.

Build Domain Structure

Insert domains to the new server from the Webuzo Enduser Panel with the same details that you’ve used on the old server so as to speed up the migration process.   

Procedure

Move to Webuzo Enduser Panel > Server Utilities > Import from Webuzo

Find below the screenshot of the Import from Webuzo

Steps

  • Mentioned correct details in the form
  • Click on Submit to Import Webuzo details.
  • After submitting, you’ll get a message “Migration process is started. Check the logs for more info”

CLI

You can manually execute the commands below to import data from another Webuzo instance.

Migration from one Webuzo instance to another can be straightforward with these steps:

Backup Your Data:

It’s strictly suggested to take back up of all data on the old Webuzo instance. This backup includes website files, databases, email accounts, and other migration data. You can take the help of built–in backup and restore functionality to develop backups of the websites and databases.

Set Up the New Webuzo Instance:

Install a fresh Webuzo instance on your new server or hosting environment. Just copy the website file.  

Copy website files:

Transfer your website files from the old server to the new one.  To do this you can use FTP details or SCP. Ensure that file permissions and ownership are mentioned properly on the new server to match the old server.

Export and Import Databases:

Export databases from the old Webuzo instance using tools like phpMyAdmin or the command–-line. Import the database dumps into the new Webuzo instance, making sure to update your website’s configuration files to use the new database connection details.  

Update DNS Records:

If your domain is hosted on a different DNS provider then update your DNS records to point to the IP address of your new server. If your domain’s DNS is managed within Webuzo then update the DNS records in Webuzo accordingly.

Test your website:

Once data migration and DNS records are migrated, it’s time to test your website on the new Webuzo instance to ensure that all is well. Monitor broken links, missing files, and database connectivity issues.          

Email Configuration:

If your email accounts are linked with the domain, configure email settings on the new Webuzo instance to match the old setup. Also, make a copy of the email account data and settings.  

SSL Certificates:

If your website consists of an SSL Certificate on your websites, install and configure an SSL Certificate on the new server. You can use Let’s Encrypt or commercial SSL Certificate providers to avail of this.  

Monitor:

After completion of all steps keep a close eye on the new Webuzo instance for the next few days to make sure that everything is fine. The next step is to check the logs and error messages for any issues that have arisen. Keep in mind that the steps and tools you use may vary based on setup and requirements. It is important to plan and test thoroughly to minimize downtime and potential issues during the migration process.  

Move Webuzo Configurations

  • Insert the contents of the /var/webuzo/ directory on the OLD Server to an archive as follows:

root@host > cd /var/webuzo/

root@host > tar -pczvf wuser_conf.tar.gz *

  • Transfer the above archive to the NEW server as follows:

root@host > scp -p wuser_conf.tar.gz root@NEW_IP_ADDRESS:/var/webuzo/

  • Now SSH to your NEW Server as root user and extract the archive as follows:

root@host > tar -zxvf /var/webuzo/wuser_conf.tar.gz -C /var/webuzo  That’s it. You have successfully moved the Webuzo Configurations.

Move User Account

  • Include the contents of the /home/USER/ directory on the OLD Server to an archive as follows:

Note: Replace the USER with your Webuzo USERNAME. Transfer to the home directory of the user account.  

root@host > cd /home/USER/

root@host > tar -pczvf wuser_account_data.tar.gz *

  • Move the above archive to the NEW server as follows:

root@host > scp -p wuser_account_data.tar.gz root@NEW_IP_ADDRESS:/home/USER/

  • Now SSH to your New Server as root user and extract the archive as follows:

root@host > tar -zxvf /home/USER/wuser_account_data.tar.gz -C /home/USER

Move Databases

It is compulsory to install MySQL on the new server.  

  • Include the contents of the/var/lib/mysql/ directory on the OLD Server to an archive as follows:

root@host > cd /var/lib/mysql/ 

root@host > tar -pczvf wuser_mysql_data.tar.gz *

  • Move the above archive to the NEW server as follows:

root@host > scp -p wuser_mysql_data.tar.gz root@NEW_IP_ADDRESS:/var/lib/mysql/

  • Now SSH to your NEW Server as root user and extract the archive as follows:

root@host > cd /var/lib/mysql/ 

root@host > tar -zxvf wuser_mysql_data.tar.gz

Install SSL Certificates

  • In STEP 1, SSL Certificates and keys are moved.
  • Don’t miss to install individual certificates from the Webuzo Enduser Panel.

Move Emails

  • Include the contents of the /etc/vmail/ directory on the OLD Server to an archive as follows:

root@host > cd /etc/vmail

root@host > tar -pczvf wuser_email_accnts.tar.gz *

  • Move the above archive to the NEW server as follows:

root@host > scp -p wuser_email_accnts.tar.gz root@NEW_IP_ADDRESS:/etc/vmail/

  • Include the contents of the /var/local/vmail/ directory on the OLD Server to an archive as follows:

root@host > cd /var/local/vmail 

root@host > tar -pczvf wuser_email_data.tar.gz *

  • Move the above archive to the NEW server as follows:

root@host > scp -p wuser_email_data.tar.gz root@NEW_IP_ADDRESS:/var/local/vmail/

  • Now SSH to your NEW Server as root user and extract the archive as follows:

root@host > tar -zxvf /etc/vmail/wuser_email_accnts.tar.gz -C /etc/vmail/ 

root@host > tar -zxvf /var/local/vmail/wuser_email_data.tar.gz -C /var/local/vmail/

  • Done, you have successfully transferred your FTP accounts.

Contact Support: support@webuzo.com

Move FTP Users

Note: Change the url from /usr/local/apps/pureftpd/etc/pure-ftpd/ with /etc/pure-ftpd for Webuzo version 2.0.6 or lower

  • Include the contents of the /usr/local/apps/pureftpd/etc/ directory on the OLD Server to an archive as follows

root@host > cd /usr/local/apps/pureftpd/etc/

  root@host > tar -pczvf wuser_ftp_data.tar.gz *

  • Move the above archive to the New server as follows:

root@host > scp -p wuser_ftp_data.tar.gz root@NEW_IP_ADDRESS:/usr/local/apps/pureftpd/etc/

  • Now SSH to your NEW Server as root user and extract the archive as follows:

root@host > tar -zxvf /usr/local/apps/pureftpd/etc/wuser_ftp_data.tar.gz -C /usr/local/apps/pureftpd/etc/

  • Done, you have successfully transferred your FTP accounts.

Contact Support: support@webuzo.com


Cheap web Hosting


How to Import From cPanel to Webuzo


Cheap reseller Hosting


Intro:

This article will guide you on importing databases from cPanel to Webuzo.             

Procedure:

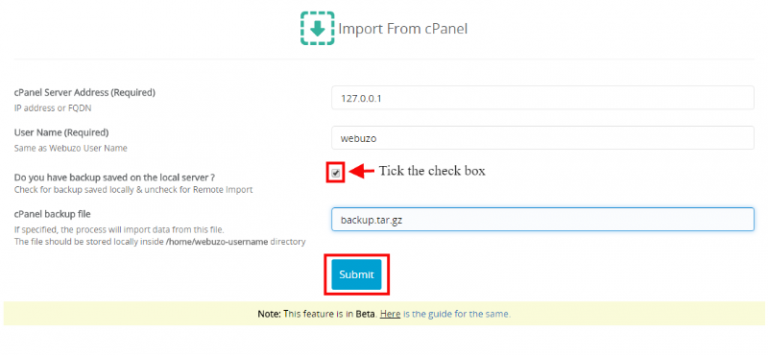
Move to Webuzo Enduser Panel > Server Utilities > Import From cPanel.  

Find below screenshot from cPanel:

Remote Import

Steps:

  • Fill the form with the cPanel server, user, and password details.
  • Tab on Submit to Import the cPanel Account.

A below-mentioned screen shot indicates Import process has started successfully.

  • Once completion is done then you’ll receive the email.
  • Import logs can be found at /usr/local/webuzo/includes/cli/cpanel_migration.log

Local Backup File Import

Steps

  • Circulate the Form with the cPanel Server, User, and backup file path details.
  • Click on Submit to Import the cPanel Account.

A below-mentioned screenshot indicates Import process has started successfully.

  • On completion of the Import process, you will receive an email.
  • Import logs can be found at /usr/local/webuzo/includes/cli/cpanel_migration.log

Important tip

Note: This feature is available in the BETA stage as of now.  

  • You need to install a fresh Webuzo Server and the name of the Webuzo user should be the same as the cPanel Username
  • Import utility will overwrite all your Webuzo user data.
  • Your backup of cPanel must be stored at /home/webuzo_username/ directory.

Once the import process has taken place then you can withdraw the archive.

Domains, Databases, etc are generalized in the Webuzo account like cPanel.

A random password is given to FTP users imported on the new Webuzo server. It is suggested to change the passwords of the FTP user’s account.

Email notifications of the FTP accounts are also created.

Import logs are generated at /usr/local/webuzo/includes/cli/cpanel_migration.log

Import Email accounts if any are not imported

  • Once completion is done then you’ll receive the email.
  • Import logs can be found at /usr/local/webuzo/includes/cli/cpanel_migration.log

Required Inputs

  • cPanel Server Address: IP address or FQDN of your cPanel account.
  • User name – cPanel Username same as Webuzo username.
  • Password – cPanel user password
  • cPanel backup file – Full cPanel backup file name stored on Webuzo machine e.g. backup.tar.gz

Cheap web Hosting


How to Convert cPanel to Webuzo


Cheap reseller Hosting


Intro:

This guide will help you to convert your cPanel server to Webuzo. This tool performs many tasks like converting your cPanel server itself uninstalls cPanel, installing Webuzo, and converting all cPanel data to Webuzo. Everything works smoothly and all your users’ websites, domains, databases, emails, FTP accounts, and SSL certificates remain as it is.

Note:  Please ensure you’ve fully backed up your VPS / Server. For the safer side, you need to restore the VPS backup as cPanel will be uninstalled from the server.

Commands

The conversion will monitor the requirements and ask for confirmation. It is advised to type yes and press enter to proceed with the conversion.  

Later, you can check converter logs at:

/root/webuzo_convert/cpanel-webuzo-convert.log

The required time is 5 minutes to 30 minutes based on the resources available on the server and the network connection speed.

Since this takes time, we suggest implementing the above commands using tmux or session, so if your machine disconnects due to an internet connection issue on your desktop the command still runs in the background.  

WHMCS Converter

Webuzo comes with a converter script that helps to convert the WHMCS cPanel hosting accounts to Webuzo. Please refer to the guide.

What Data will be Migrated?

The converter will move the following data:

1) All Domains – Addon, Parked, Sub-domain.
2) MultiPHP preferences per domain
3) All Databases and Database Users
4) FTP Accounts
5) It covers all email-related data like accounts, forwarders, and autoresponders.

6) DNS records
7) SSL Certificates
8) Cron Jobs
9) ACL Packages
10) Users and Resellers with appropriate ownership
11) IP allocation to users and resellers
12) For All plans installed on the cPanel server the same version will be installed on Webuzo.
13) All other data needed for accessing the control panel.


Understand the difference between Converter and Importer?

The converter is responsible for converting the data on the cPanel server itself and doesn’t need a new server. Hence, no IPs are changed. As compared to importer as it does not need to transfer the files across servers. It needs a full backup of the server if in case you need to revert it for restore purposes from the backup.

An importer is required to set up a new server with Webuzo and data is moved from the cPanel server to Webuzo. Further, IPs need to be changed to run the cPanel server compared to cPanel and Webuzo. If you prefer to import the sites instead of in-place converter you can refer to this guide.  


Cheap web Hosting


How to Install CloudLinux OS with Webuzo Control Panel


Cheap reseller Hosting


Learn how to install CloudLinux OS with Webuzo Control Panel. It is an operating system for multi–tenancy of shared servers. Each customer gets a unique environment, which partitions, allocates, and limits server resources like memory CPU, and connections for each tenant.

Steps to Install CloudLinux OS

Supported CloudLinux versions: CloudLinux 8.x, CloudLinux 9.x

You need to install CloudLinux OS and the guide to follow the instructions:

https://docs.cloudlinux.com/cloudlinux_installation/

Note: Don’t forget to reboot the OS once CloudLinux is installed.

Step to Install CloudLinux Plugin

After rebooting the CloudLinux OS, the next is to install the CloudLinux plugin in Webuzo. To get the installed plugin, you have to run the following command.  

wget -N https://files.webuzo.com/plugins/cloudlinux/cloudlinux.sh
chmod +x cloudlinux.sh
./cloudlinux.sh

Install the CloudLinux plugin in Webuzo and allow users and admins to check the CloudLinux utilities.

Note: To eliminate the error showing “reboot the server in the correct kernel in Webuzo Tasks, then opt for right kernel for CloudLinux OS with ‘Ive’ in the name. 

Admin Panel Screenshot

Enduser Panel Screenshot


Cheap web Hosting


List of System Requirements to Install Webuzo


Cheap reseller Hosting


Webuzo is a control panel software designed to simplify the process of website and application management on servers. It provides a graphical user interface (GUI) that allows users to easily deploy and manage various web applications, including content management systems (CMS), blogs, forums, e-commerce platforms, and more.

Webuzo is often used in the context of web hosting services, where it allows users to install and configure popular web applications with just a few clicks. It supports a wide range of applications, including WordPress, Joomla, Drupal, Magento, and many others. With Webuzo, users can quickly set up and manage their websites without needing extensive technical knowledge.

Key features of Webuzo include:

Application Library: Webuzo offers a comprehensive library of applications that can be installed with ease. It provides one-click installation for popular CMS, e-commerce, and other web applications.

Automated Updates: It simplifies the process of keeping applications up to date by providing automated updates for installed applications. Users can easily manage updates for multiple applications from the Webuzo control panel.

System Monitoring: Webuzo includes monitoring tools to keep track of system resources, such as CPU, memory, and disk usage. This helps users optimize their server performance and ensure efficient operation.

Backup and Restore: It allows users to create backups of their applications and databases, providing an added layer of data protection. In case of any issues, users can restore their applications and data from these backups.

Domain Management: Webuzo enables users to manage their domains and DNS settings from the control panel. It simplifies tasks like adding domains, creating subdomains, and managing DNS records.

Webuzo is compatible with various Linux distributions, including CentOS, Ubuntu, and Debian. It is primarily aimed at users who prefer a user-friendly interface for managing their web applications and server resources, making it a popular choice among beginners and individuals who want to simplify their hosting experience.

Here you’ll get a list of System Requirements for operating the Webuzo

Supported Linux Operating System (x86_64) // Should be a FRESH installation

CentOS 7.x / 8.x

AlmaLinux 8.x / 9.x

Ubuntu LTS 18.04 / 20.04 / 22.04

Red Hat Enterprise Linux 7.x / 8.x

Scientific Linux 7.x / 8.x

Rocky Linux 8.x

CloudLinux 8.x / 9.x

  • They offer packages like yum, apt-get, tar, wget.
  • You need RAM of 1GB (we suggest 10GB for best performance)
  • You need disk space of a minimum 5 GB (we suggest 10GB for best performance)

Compulsory Note:

  • PHP, Apache, MySQL should not be installed by default on the server.
  • To match the compatibility with Webuzo you need to disable SELinux.
  •  Allow access to the following domains to your firewall as these are the mirror servers used to download the script plans or apps.

api.softaculous.com (IP : 192.198.80.3)

s1.softaculous.com (IP : 158.69.6.246)

s2.softaculous.com (IP : 192.200.108.99)

s3.softaculous.com (IP : 178.32.158.97)

s4.softaculous.com (IP : 138.201.24.83)

s7.softaculous.com (IP : 167.114.200.240

Virtualization Supported

VMware

Parallels

VirtualBox

Xen PV or HVM

Linux-KVM

OpenVZ

LXC

Azure


Cheap web Hosting