How to create cron jobs on your Kloxo Panel


Cheap reseller Hosting


How to create cron jobs on your Kloxo Panel

Kloxo is a free control panel for managing your VPS hosting or dedicated server hosting. Cronjob is scheduling a task to run later. The task can be either command or a script. The background process(daemon) behind the cronjob is the crond. In the /etc folder there is a file called crontab where we can write the command or name of the script that is to be executed at as per our customized time. By using the control panel we can manage the Cron-jobs simply.

Here I am explaining the steps for creating cron-jobs via Kloxo panel.

Step 1 : Login to your Kloxo control panel.

Step 2 : Click on “Cron Scheduled Task” under the Domain area,  see the following screenshot:

cronjob

Step 3 : There are two option in your Kloxo, Simple and Standard

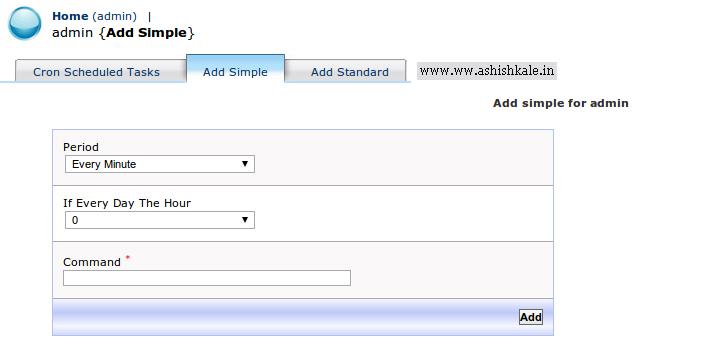
In simple section you can create simple cron jobs for every Minute, Hour or Day,  see the following screenshot:

Add Simple cron jobs ww.ashishkale.in

The standard section having the standard cronjob scheduling syntax.

You can create a standard Cron here, see the following screenshot:

add-standard-cronjob_ashish kale blog


That’s it!!


Cheap web Hosting


How to Install mod_cloudflare on cPanel


Cheap reseller Hosting


cloudflare

Installing mod_cloudflare on cPanel

CloudFlare is a performance and security service. The CloudFlare cPanel plugin makes it easy to integrate into your hosting control panel. The CloudFlare module automatically translates visitor IP addresses to reflect the visitor’s original IP address rather than the IP address of the CloudFlare proxy servers.

Installing mod_cloudflare on a cPanel server is very easy. Just follow 8 steps as below. 


Step 1 :

Download core file by using the following command : 

wget https://raw.githubusercontent.com/cloudflare/mod_cloudflare/master/mod_cloudflare.c


Step 2 :

Connect to your server through SSH and log in as root.


Step 3 :

Change directory to /usr/local/src by using the following command : 

cd /usr/local/src


Step 4 :

Get the source code for mod_cloudflare by using the following command :

wget –no-check-certificate https://raw.github.com/cloudflare/mod_cloudflare/master/mod_cloudflare.c CloudFlare-Tools/master/mod_cloudflare.c


Step 5 :

Build and install mod_cloudflare by using Apache Extension Tool by using the following command : 

apxs -a -i -c mod_cloudflare.c


Step 6 :

Restart the Apache Server daemon by using the following command : 

service httpd restart


Step 7 :

Update the Apache configuration data by using the following command : 

/usr/local/cpanel/bin/apache_conf_distiller –update


Step 8 :

Confirm the module is loaded properly by using the following command : 

httpd -M | grep cloud

cloudflare
.
.
.
.
.

Now,

Apache will log the visitors’ IP addresses instead of the CloudFlare IP’s.


Cheap web Hosting


How to Remove/Uninstall RVSkin from Cpanel/WHM Server ?


Cheap reseller Hosting


RVSkin

rvskin logo

RVSkin is a management software offered with cPanel server that provides a user with complete branding and skinning control over cPanel and Reseller accounts. In a short span of time you will be able to create impressive looking cPanel overlay skins for your end users that are customizable in accordance to your preferences.


Uninstall RVSkin from Cpanel


To Remove/Uninstall RVSkin from Cpanel/WHM Server

Follow the steps to uninstalling RVSkins from Cpanel/WHM Server

Step 1 : Login to Cpanel/WHM server via SSH

Step 2 : Run the following command as root on the server:

# perl /root/rvadmin/uninstall.pl

.

.

.

.

You will be completely Removed/Uninstall RVSkin from your Cpanel/WHM Server


And


If for some reason RVskin was installed in a different location, change the path accordingly.

Restart your cpanel by using following command: 

# /etc/rc.d/init.d/cpanel stop

# /etc/rc.d/init.d/cpanel start


Cheap web Hosting


How to Install MODx using Softaculous in cPanel


Cheap reseller Hosting


What is MODx?

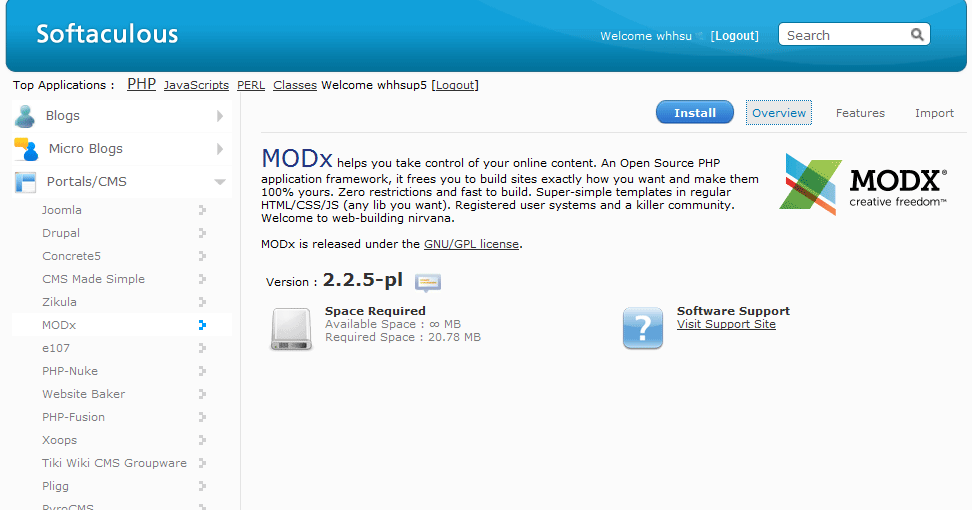
MODx is an open source Content Management System and Application Framework. Initially inspired by Etomite 0.6, MODx is an ongoing project written by Raymond Irving and a core team of contributors at the MODx Project. MODx is distributed under the GPL license and is now run by a professional team of developers from all over the world.

Install MODx

How to Install MODx using Softaculous in cPanel

Follow these steps to install MODx using Softaculous

1) Login to the Cpanel


cpanel-login-page


2) Click on the Softaculous icon in the Software/Services section of cPanel. The Softaculous installer page appears.


Install_Softaculous


3) Go to the top right corner and click on the Search field. type modx and then press Enter.

Search box

4) Go to the top right and click on the blue button labeled Install.


modx-install


5) Fill out all of information the boxes.

6) In Directory type the name of a new directory you would like created.


MoDx software setup


7) By default, the box will be left blank to install the software into your main directory.

8) When you are finished, Click Install.


MODx Installed successfully


9) Then you will get a Confirmation page of your installation.


Cheap web Hosting


How to Enable Apache SpamAssassin in Cpanel


Cheap reseller Hosting


Spam Assassin 

                 Apache SpamAssassin is the Open Source anti-spam platform giving system administrators a filter to classify email and block spam (unsolicited bulk email). It uses a robust scoring framework and plug-ins to integrate a wide range of advanced heuristic and statistical analysis tests on email headers and body text including text analysis, Bayesian filtering, DNS blocklists, and collaborative filtering databases.

To Enable Apache SpamAssassin in Cpanel

Following  steps to enable Apache SpamAssassin

1) Log into cPanel

2) Navigate to Mail Section

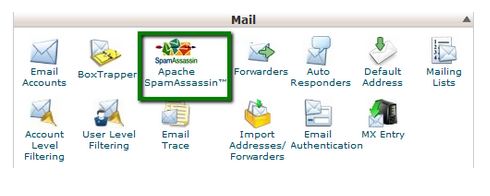
3) Click on Apache SpamAssassin™ option

See Following Screenshot

apache spamassassin


4) Click on Enable Apache SpamAssassin™ button

See Following Screenshot

Enable Apache

.

.

.

Apache SpamAssassin is Enable!


Cheap web Hosting


Install Mytop in Linux and Cpanel


Cheap reseller Hosting


How to install mytop in linux and cpanel


MySQL is one of the most important programs on a server, unfortunately it is also pretty resource intensive. One a  server it is not uncommon for a single user or even a query to take up the bulk of the servers CPU cycles. Mytop is a very useful program to see what queries a server is currently processing as well as which user is executing them. Think of mytop as top for mysql. If you see a lot from a user that means they are probably the hog. Mytop can also be useful for figuring out exactly which queries are causing the problem in the case of a self-designed website.


install mytop


The following commands use  how to install mytop on the server and run it.

1) To Install Term Read Key:

cd /usr/local/src

wget http://search.cpan.org/CPAN/authors/id/J/JS/JSTOWE/TermReadKey-2.30.tar.gz

tar -zxf TermReadKey-2.30.tar.gz

cd TermRead*

perl Makefile.PL

make test

make

make install

cd ..


2) Now,To Install DBI:

wget http://search.cpan.org/CPAN/authors/id/T/TI/TIMB/DBI-1.48.tar.gz

tar -zxf DBI-1.48.tar.gz

cd DBI*

perl Makefile.PL

make test

make

make install

cd ..


3) Finally  To Install MYTOP:

wget http://jeremy.zawodny.com/mysql/mytop/mytop-1.4.tar.gz

tar -zxf mytop-1.4.tar.gz

cd mytop*

perl Makefile.PL

make test

make

make install


NOTE: You may get following error in CentOS 5.3

Error in option spec: “long|!”

Search for the line in Makefile.PL

“long|!” => \$config{long_nums},

Change it to by commenting using #

#”long|!” => \$config{long_nums},


Cheap web Hosting


How to Import Database using PHPMyAdmin


Cheap reseller Hosting


Import Deatabase

phpMyAdmin makes the task of managing your MySQL databases easier and more efficient, and it allows you to manage those available databases from anywhere. With phpMyAdmin, you can create, edit, back up, import, export, and delete databases, as well as manage database tables.

Import Database using PHPMyAdmin

1) Login to cPanel

2) Open phpMyAdmin and click the phpMyAdmin icon

3) Select the database that you need to Import

4) Click Import Button

5) Under File to Import, click Browse Button

6) Select the backup file you previously created (it will be either a .sql .zip or .tar.gz file).

7) Click Go Button

8) When the database has been imported successfully, you will see the message to: Import has been successfully finished, ## queries executed.

.

.

.


Congratulations, you have just imported a database!


Cheap web Hosting


Important cPanel Scripts


Cheap reseller Hosting


cpanel

WHM / cPanel Scripts are located in /scripts/

/scripts/adddns – Adds a DNS zone.
/scripts/addnetmaskips – Add the netmask 255.255.255.0 to all IPs that have no netmask.
/scripts/addnobodygrp – Adds the group nobody and activates security.
/scripts/addpop – Add a Pop Account.
/scripts/addservlets – Add JSP support to an account (requires tomcat).
/scripts/adduser – Add a user to the system.
/scripts/betaexim – Installs the latest version of exim.
/scripts/biglogcheck – looks for logs nearing 2 gigabytes in size
/scripts/bsdcryptoinstall – Installs crypto on FreeBSD.
/scripts/bsdldconfig – Configures the proper lib directories in FreeBSD.
/scripts/bsdpkgpingtest – Tests the connection speed for downloading FreeBSD packages.
/scripts/buildeximconf – Rebuilds exim.conf.
/scripts/buildpostgrebsd-dev – Installs postgresql on FreeBSD.
/scripts/checkbadconf – Checks /usr/local/apache/conf/httpd.conf for bad users.
/scripts/checkbsdgroups – Checks and repairs proftpd ownership on FreeBSD.
/scripts/checkccompiler – Checks to make sure the C compiler works on your system.
/scripts/checkfpkey – Checks for the FrontPage suid key
/scripts/checkgd – Checks to see if GD is built.
/scripts/checkinterchange – (Internal use).
/scripts/checklibssl – Checks to make sure the proper libssl symlinks exist.
/scripts/checkmaxclients – Checks to see if apache has reached the maximum clients allowed.
/scripts/checkoldperl – Checks to see if the version of Perl on your system is old.
/scripts/checkrsync – Checks to make sure rsync is up to date.
/scripts/checksuexecpatch – Checks to see if mailman has been patched for suexec.
/scripts/checksuspendpages – Checks to see if suspend pages are properly named.
/scripts/checkup2date – Makes sure up2date is set up properly (RedHat)
/scripts/checkyum – Makes sure yum is set up properly.
/scripts/chkpaths – Makes sure /usr/sbin/chown has a symlink to /bin/chown
/scripts/chownpublichtmls – Change ownership of all users web space to them, which is useful for converting to
suexec. Files owned by nobody are deleted.
/scripts/ckillall – Allows you to kill a process (used like killall).
/scripts/cleanbw – Cleans up old bandwidth logs.
/scripts/cleandns8 – Clean up named.conf.
/scripts/cleangd – Cleans up old GD installs and reinstalls GD
/scripts/cleanmd5 – Fix CPAN md5 problems.
/scripts/cleanmsglog – cleans exim’s msglog
/scripts/cleanupmysqlprivs – Cleans up improper mySQL privileges.
/scripts/compilers – Disables the usage of compilers for unprivileged users.
/scripts/convert2maildir – Converts mail from mbox to maildir format and installs courier impap and pop (cpimap is
removed).
/scripts/cpbackup – Runs backups.
/scripts/distupgrade – Upgrades RedHat to the newest version (for testing only)
/scripts/dnscluster – Enables DNS clustering.
/scripts/dnstransfer – Only if the server has a DNS master (sync with DNS master).
/scripts/downgradefp – Downgrades FrontPage Extensions (to 5.0-0)
/scripts/dropmysqldb – Drops a mySQL database.
/scripts/easyapache – Upgrade Apache
/scripts/editquota – Change a users quota.
/scripts/enablechkservdwebmail – Enable service checking of webmaild.
/scripts/enablefileprotect – Protects home directories if file protection is built in apache.
/scripts/ensurepkg – Installs a FreeBSD package.
/scripts/ensurerpm – Installs a rpm.
/scripts/exim3 – Installs exim 3.
/scripts/exim4 – Installs exim 4.
/scripts/eximlocalsend – Enables/Disables exim local sending.
/scripts/eximup – Installs/Updates exim.
/scripts/findhacks – Search for common Trojan Horses.
/scripts/findoddrootprocesses – Lists root processes that may need to be checked out.
/scripts/findphpversion – Check to see if your php version file is up to date.
/scripts/fixallcartswithsuexec – Fixes permissions on carts when using suexec.
/scripts/fixbinpath – Makes sure all bin file paths are correct.
/scripts/fixbuggynamed – Updates bind to solve any problems with bugs.
/scripts/fixcommonproblems – Attempt to fix the most common problems.
/scripts/fixetchosts – Fixes problems with /etc/hosts
/scripts/fixeverything – Fix common problems and quotas.
/scripts/fixinterchange – Reinstall interchange Perl modules.
/scripts/fixinterchangeperm – fix permissions on a user’s interchange cart.
/scripts/fixlocalhostwithphp – Change /etc/hosts to work better with PHP 4.2.0 + MySQL.
/scripts/fixmailman – Updates and restarts mailman.
/scripts/fixmysql – Fixes problems with mySQL.
/scripts/fixmysqlbsd – Fixes problesm with mySQL on FreeBSD.
/scripts/fixnamed – Updates bind to handle many DNS zones (more than 512).
/scripts/fixpop – Fix a POP account and reset password.
/scripts/fixproftpdconf – Fixes problems with /usr/local/etc/proftpd.conf
/scripts/fixproftpddupes – Updates proftpd.
/scripts/fixquotas – Fix quotas.
/scripts/fixrndc – Fixes named.conf to prevent rndc staus failed.
/scripts/fixsubdomainlogs – Run if subdomain logs don’t show up in cPanel.
/scripts/fixsuexeccgiscripts – Fix CGI scripts that are broken after suexec installed.
/scripts/fixvaliases – Fix permisions on valiases.
/scripts/fixwebalizer – Repair a Webalizer that has stopped updating.
/scripts/fpanonuserpatch – Updates FrontPage extensions to include the anonymous user patch.
/scripts/ftpquaotacheck – Runs quota checking for all ftp users.
/scripts/ftpup – Updates your ftp server.
/scripts/fullhordereset – Resets Horde and displays the current Horde password.
/scripts/gcc3 – Installs gcc-3.3.3
/scripts/gencrt – Generate a .crt and .csr file.
/scripts/initfpsuexec – Enable FrontPage suexec support.
/scripts/initquotas – Turn on quota support on new drives.
/scripts/initsslhttpd – Make sure HTTP starts with SSL.
/scripts/initsuexec – Turn on suexec support if suexec is installed.
/scripts/installfpfreebsd – Installs FrontPage 5 Extensions on FreeBSD.
/scripts/installfpgentoo – Installs FrontPage on Gentoo.
/scripts/installgd – Builds GD.
/scripts/installpkg – Installs a FreeBSD package.
/scripts/installpostgres – Installs PostrgeSQL.
/scripts/installzendopt – Install zend optimzer.
/scripts/installzendopt-freebsd – Install zend optimizer on a freebsd machine.
/scripts/isdedicatedip – Checks an ip to see if it is dedicated.
/scripts/killacct – Delete an account.
/scripts/killdns – Delete a DNS zone.
/scripts/killpvhost – Removes a virtual host from proftpd.conf.
/scripts/killspamkeys – Removes a spam key.
/scripts/killsslvhost – Removes a SSL entry for a virtual host.
/scripts/killvhost – Delete a vhost.
/scripts/listcheck – Checks mailing lists for issues.
/scripts/listproblems – Lists common problems.
/scripts/listsubdomains – List subdomains.
/scripts/mailperm – Fix almost any mail permission problem.
/scripts/mailscannerupdate – Updates MailScanner
/scripts/makecpphp – Installs php.
/scripts/manualupcp – Updates cPanel manually.
/scripts/md5crypt – Encrypts a password into MD5.
/scripts/mysqladduserdb – Create a MySQL databse and user.
/scripts/mysqlconnectioncheck – Attempts to connect to MySQL, restarts SQL if necessary.
/scripts/mysqldeluserdb – Delete a MySQL database and user.
/scripts/mysqlpasswd – Change MySQL password.
/scripts/mysqlup – Updates mySQL.
/scripts/newexim – Installs the latest version of exim.
/scripts/nofsck – Make fsck always use -y
/scripts/nomodattach – Removes mod_attach from httpd.conf.
/scripts/nomodauthmysql -Removes mod_auth_mysql from httpd.conf.
/scripts/nomodbwprotect – Removes mod_bwportect from httpd.conf.
/scripts/nomodgzipconfmods – Removes mod_gzip from httpd.conf.
/scripts/nomodperl – Removes mod_perl from httpd.conf.
/scripts/park – Parks a domain.
/scripts/patcheximconf – Fixes exim.conf.
/scripts/perlinstaller – Installs perl.
/scripts/phpini – Create a php.ini file.
/scripts/proftpd128 – Installs proftpd-1.2.8.
/scripts/quickkernel – Updates your kernel.
/scripts/quicksecure – Quickly kill useless services.
/scripts/rebuildcpanelsslcrt – Rebuilds the cPanel SSL Certificate.
/scripts/rebuildcpusers – Rebuilds /var/cpanel/users.
/scripts/rebuildetcpasswd – Rebuilds /etc/passwd.
/scripts/rebuildeximbsd – Rebuilds exim on FreeBSD.
/scripts/rebuildhttpdconffromproftpd – Rebuild httpd.conf from the proftpd.conf file.
/scripts/rebuildnamedconf – Restore named.conf from files in /var/named.
/scripts/rebuildproftpd – Restore proftpd.conf from httpd.conf.
/scripts/reinstallmailman – Reinstalls mailman.
/scripts/reseteximtodefaults – Resets exim’s default settings.
/scripts/resetimappasswds – Resets all imap passwords.
/scripts/restartsrv – Restart a service.
/scripts/restartsrv_apache – Restart apache.
/scripts/restartsrv_bind – Restart bind.
/scripts/restartsrv_clamd – Restart clamd.
/scripts/restartsrv_courier – Restart courier imap.
/scripts/restartsrv_cppop – Restart cppop.
/scripts/restartsrv_entropychat – Restart entropy chat.
/scripts/restartsrv_exim – Restart exim.
/scripts/restartsrv_eximstats – Restart exim statistics.
/scripts/restartsrv_ftpserver – Restart your ftp server.
/scripts/restartsrv_httpd – Restart httpd.
/scripts/restartsrv_imap – Restart impad.
/scripts/restartsrv_inetd – Restart inetd.
/scripts/restartsrv_interchange – Restart Interchange Shopping Cart.
/scripts/restartsrv_melange – Restart melange chat.
/scripts/restartsrv_mysql – Restart mysqld.
/scripts/restartsrv_named – Restart named.
/scripts/restartsrv_postgres – Restart postgresql.
/scripts/restartsrv_postgresql – Restart postgresql.
/scripts/restartsrv_proftpd – Restart proftpd.
/scripts/restartsrv_pureftpd – Restart pure-ftpd.
/scripts/restartsrv_spamd – Restart spamd.
/scripts/restartsrv_sshd – Restart sshd.
/scripts/restartsrv_syslogd – Restart syslogd.
/scripts/restartsrv_tomcat – Restart tomcat.
/scripts/restartsrv_xinetd – Restart xinetd.
/scripts/restoremail – Restores a user’s mail.
/scripts/runstatsonce – Runs statistics (should be used from the crontab).
/scripts/runweblogs – Run analog/webalizer/etc. for a user.
/scripts/safeyum – Runs yum safely.
/scripts/setupfp – Install FrontPage 3 on an account.
/scripts/setupfp4 – Install FrontPage 4 (2000) installer on an account.
/scripts/setupfp5 – Install FrontPage 5 (2002) installer on an account.
/scripts/setupfp5.nosueuxec – Install FrontPage 5 (2002) installer on an account when not using suexec.
/scripts/unsetupfp4 – Removes FrontPage 4 or 5 from an account.
/scripts/unsuspendacct – Unsuspends an account.
/scripts/upcp – Updates cPanel.
/scripts/whoowns – Finds out who owns a domain.
/scripts/wwwacct – Creates an account.


Cheap web Hosting


How to install WebCalendar using Fantastico


Cheap reseller Hosting


Install WebCalendar

1) Open your control panel. then Login to cPanel

2) Click on Fantastico

3) Click on WebCalendar from the list

4) Click on Install to begin the installation process

5) Choose the domain name from the drop down menu

6) Choose the directory you want WebCalendar to reside under

7) Fill in the admin username and the password

8) Choose the nickname under which you’ll be posting and fill in your email address

9) Fill in all other necessary fields

10) Click install – on the next screen click finish installation and you’re done.

11) After the installation completes, you can click on the link to visit your WebCalendar installation.

12)  you’ll see this error:

My Calendar Error
Error removing temporary file.
The permissions for the following directory do not support the db_cachedir option in includes/settings.php:
/tmp

The setting for db_cachedir will be set to /tmp by default:

db_cachedir: /tmp

You’ll want to change this to your cPanel user’s /tmp directory by editing this value to:

db_cachedir: /home/userna5/tmp

13) Then just click Save

14) Now try to access your WebCalendar install again, you should see the month display by default.


Cheap web Hosting


1 2 3