The post How High RAM VPS Can Lower Bounce Rates Effectively? first appeared on Web Hosting Stuff.
]]>While many factors contribute to a high bounce rate, one of the most impactful, yet often overlooked, is website performance, particularly the amount of RAM available to your hosting server. This introduction explores how investing in a high-RAM Virtual Private Server (VPS) can significantly enhance website speed and responsiveness, thereby effectively lowering your bounce rate and fostering a more positive user journey.
State the killer reasons for Slow Website Performance
Bloated Code: Excessive, unoptimized HTML, CSS, and JavaScript.
Large Images/Media: Uncompressed or oversized images, videos, and other media files.
Too Many HTTP Requests: Numerous external scripts, stylesheets, and images requiring separate downloads.
Poor Hosting: Inadequate server resources, slow network, or shared hosting with overloaded servers.
Lack of Caching: No browser caching, server-side caching, or CDN implementation.
Unoptimized Database: Slow database queries, large unindexed tables, or inefficient database design.
External Script Issues: Slow-loading third-party scripts (ads, analytics, social widgets).
Server Location/Latency: The Server is physically far from users, causing high latency.
Render-Blocking Resources: CSS or JavaScript that blocks the page from rendering until fully loaded.
Excessive Redirects: Multiple redirects before reaching the final page.
Read: How can I redesign my website without affecting SEO?
What Are the Advantages of High RAM VPS Hosting?
Superior Performance and Speed:
Faster Data Access: RAM is the fastest form of memory. With more RAM, your server can store a larger amount of frequently accessed data, applications, and database queries directly in memory. This means your website loads much quicker, and applications respond almost instantly, as the server doesn’t have to retrieve data from slower storage like SSDs or HDDs as frequently.
- Reduced Lag and Bottlenecks: When a server runs out of RAM, it resorts to using “swap space” on the hard drive, which drastically slows down operations. Ample RAM prevents this, ensuring smooth, consistent performance even under heavy loads.
- Enhanced Stability and Reliability:
- Handles High Traffic Spikes: A high RAM VPS can gracefully handle sudden surges in website traffic (e.g., during a marketing campaign, sale, or viral content). It prevents your site from slowing down, freezing, or crashing, ensuring a seamless user experience and preventing lost revenue or engagement.
- “Noisy Neighbor” Prevention: Unlike shared hosting, where one website’s resource consumption can affect others on the same server, a VPS provides isolated resources. High RAM in your VPS means you’re guaranteed that memory allocation, safeguarding your site’s stability from other users.
- Improved User Experience (UX):
- Lower Bounce Rates: Fast-loading websites lead to happier users. Visitors are more likely to stay, explore, and convert if pages load quickly. High RAM directly contributes to this by speeding up all aspects of your site.
- Smoother Navigation: For dynamic websites, e-commerce stores, or applications with many interactive elements, high RAM ensures that transitions, searches, and real-time functions are fluid and responsive.
- Optimized for Resource-Intensive Applications:
- Large Databases: Essential for e-commerce sites, content management systems (CMS), and other data-heavy applications that require quick retrieval and processing of information.
- Complex Web Applications: Ideal for applications built with frameworks like Node.js, Ruby on Rails, Django, or Java, which often require significant memory to run efficiently.
- Development and Staging Environments: Provides the isolated and powerful environment needed for developers to build, test, and deploy applications without impacting live sites.
- Real-time Applications: Supports chat applications, online gaming servers, and other real-time services that depend on immediate data processing.
- Greater Scalability and Flexibility:
- Easy Upgrades: As your website or application grows, you can easily upgrade your VPS plan to allocate more RAM (along with CPU and storage) without needing to migrate to a completely new server. This makes scaling straightforward and often without downtime.
- Customization and Control: With root access, you have full control over your server environment. You can install custom software, configure settings, and optimize your server precisely to your application’s needs, which often includes fine-tuning memory usage.
- Better SEO Performance:
- Google Prioritization: Search engines like Google favor fast-loading websites in their rankings. By improving your site’s speed with high RAM, you can positively impact your SEO and gain better visibility.
- Google Prioritization: Search engines like Google favor fast-loading websites in their rankings. By improving your site’s speed with high RAM, you can positively impact your SEO and gain better visibility.
- Enhanced Security:
- Resource for Security Tools: Modern security measures like real-time malware scanning, intrusion detection systems, and advanced firewalls can be resource-intensive. A high RAM VPS ensures these tools can run effectively without compromising your site’s performance.
- Isolated Environment: While not directly tied to RAM, the isolated nature of a VPS (where your virtual server is separate from others on the physical machine) inherently offers better security than shared hosting.
In summary, a high RAM VPS is a powerful solution for anyone whose online presence has outgrown shared hosting. It provides the necessary horsepower to deliver a fast, stable, and reliable experience for users, while also offering the control and scalability needed for future growth.
Read: All About: Understanding the Importance of Secure Shell (SSH)
5 Ways High RAM Lowers Bounce Rates Effectively
Lightning-Fast Page Load Times: This is the most direct and impactful way. When a user clicks a link to your site, high RAM allows your server to retrieve and process all necessary data (HTML, CSS, JavaScript, images, database queries) almost instantaneously. Pages render quickly, often within 1-2 seconds. In contrast, slow-loading pages due to insufficient RAM cause frustration, and users are highly likely to hit the back button before the page even fully loads. Google’s research shows that even a 1-second delay in mobile page load can decrease conversions by up to 20%.
Smooth and Responsive User Interactions: Beyond initial page loads, high RAM ensures that dynamic elements, interactive features, and internal navigation (like filtering products, switching tabs, submitting forms, or playing embedded media) respond instantly. If a user clicks a button and there’s a noticeable delay, or if a form submission hangs, they’re likely to abandon the action and leave. High RAM provides the memory buffer needed for complex JavaScript operations, API calls, and real-time updates to execute without lag.
Enhanced Stability During Traffic Spikes: Websites often experience fluctuating traffic. During peak hours, marketing campaigns, or viral content, a site with low RAM can quickly become overwhelmed, leading to slow performance, errors, or even server crashes. High RAM provides the capacity to handle these sudden surges gracefully, ensuring that all concurrent users receive a consistent, fast experience. If your site consistently performs well under load, users won’t get a “broken” or sluggish impression that makes them bounce.
Efficient Database Queries and Content Delivery: Many websites, especially e-commerce stores, blogs, and content-rich platforms, rely heavily on databases. High RAM allows the database to cache more frequently accessed data and execute complex queries much faster. This means product listings load quicker, search results appear instantly, and dynamic content is delivered without delay. If a user has to wait for product categories to load or search results to populate, they’re more prone to frustration and abandoning the site.
Improved Overall User Experience (UX) Perception: While the technical benefits are clear, the combined effect of fast loading, smooth interactions, and consistent performance creates a subconscious positive perception for the user. They feel that the website is professional, reliable, and trustworthy. This positive feeling encourages them to explore further, engage with content, and complete desired actions, rather than leaving prematurely due to a perceived “clunky” or inefficient site. A bad UX, often rooted in slow performance from inadequate RAM, directly contributes to high bounce rates.
Conclusion
High RAM VPS solutions significantly enhance website performance, leading to faster load times and improved user experience, which in turn effectively reduces bounce rates and fosters greater visitor engagement. Investing in such technology is crucial for businesses aiming to retain users and optimize their online presence.
The post How High RAM VPS Can Lower Bounce Rates Effectively? first appeared on Web Hosting Stuff.
]]>The post How to Fix the Error While Starting a New VPS? first appeared on Web Hosting Stuff.
]]>Part I
- Identify the culprit:
Error message: The first step is to examine any error messages displayed during startup. These messages often pinpoint the problem area.
- Resource limitations:
Check resource allocation: Make sure your VPS has enough CPU, RAM, and disk space to run the chosen operating system and applications. You can usually adjust resource allocation through your VPS provider’s control panel. If resources are limited, consider an upgrade or optimizing resource usage.
- Network blues:
Inspect network configuration: Verify that your VPS has the correct network settings, including IP address, subnet mask, gateway, and DNS servers. However, incorrect settings can prevent the VPS from starting properly.
- Delving deeper:
- Access console (if available): Some providers offer a console where you can see detailed boot logs that might reveal the startup issue.
- Examine logs: System logs often contain valuable information about errors during startup. The specific location may vary depending on your provider and operating system, but commonly they reside in the /var/log/ directory.
- Seeking help:
Contact VPS provider: If the above steps don’t solve the problem, contact your VPS provider’s support team. They have access to specific details about your VPS configuration and can offer tailored guidance.
Remember, these are general steps. The specific troubleshooting process might differ depending on the error message and your VPS provider’s setup.
Part II
While working with this process you will come across an error as mentioned below- “setlocale: No such file or directory error: failed to connect to the hypervisor error- Failed to connect socket to ‘/var/run/libvirt/libvirt-sock’: No such file or directory”
Follow the steps mentioned below to overcome the error:
- Firstly, you have to monitor the server status.
2. Then, run the below command to monitor the server status:
systemctl status libvirtd.service
3. If the server fails or stops, the below status will be seen:
<strong><em>systemctl start libvirtd.service</em></strong>
4. After running this command, you have to start the VPS server from the admin panel and you will see the error has been eliminated.
In conclusion, troubleshooting steps can be taken to resolve errors encountered when starting a new VPS, ensuring a smooth and successful setup process.
The post How to Fix the Error While Starting a New VPS? first appeared on Web Hosting Stuff.
]]>The post How to Reboot a VPS/Dedicated Server via WHM? first appeared on Web Hosting Stuff.
]]>There are various other reasons you need to reboot the server, for example, for software installation or configuration purposes. Still, we suggest you only restart your server when necessary, as frequent rebooting can lead to other complications.
Steps to reboot the VPS/Dedicated Server
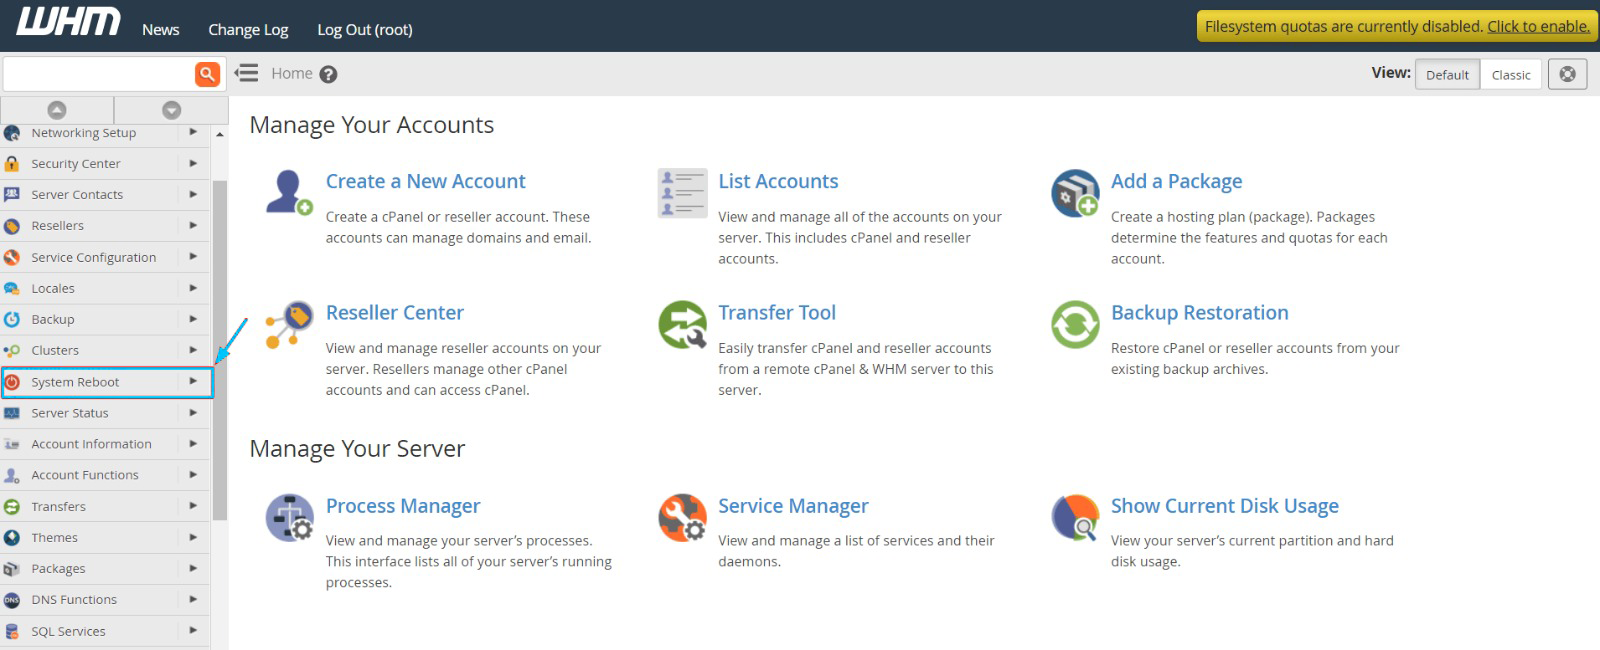
- You have to log in to your WHM panel’s root account.
- Find and select the System Reboot option from the navigation menu.
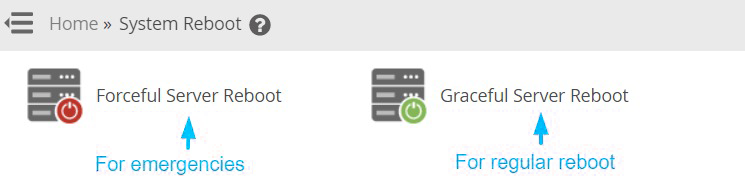
There are two choices that you can start with, Graceful Server Reboot and Forceful Server Reboot. In severe emergencies like a hacker attack, you should select the running applications. However, there is a risk of corruption of application files because of forceful termination.
Or, you can opt for choosing the Graceful Server Reboot as it will help running processes to end before closing. Although the process may take a long time, it’s the safer option of the two:
3. Select the two options as per the requirements:
4. Click on the Proceed button.

The post How to Reboot a VPS/Dedicated Server via WHM? first appeared on Web Hosting Stuff.
]]>The post How to use the Exim Mail Queue Manager in WHM first appeared on Web Hosting Stuff.
]]>Exim is the mail software that runs on your server to control email delivery, there are mail queue management options you can use with Exim directly via the command line.

In this article Hostripples will show you how you can manage your Exim mail queue on your VPS or dedicated server in WHM.
Step 1 : Log into WHM.
tep 2 : Find the Email menu.
Step 3 : Go to Mail Queue Manager.
Step 4 : In the Search box type in user@hostripples.com.
Step 5 : From the Select Query drop-down and select Search Recipients.
Step 6 : In Search Type Click on Begins With.
Step 7 : Click on the calendar icon and Specify the Start Date and End Date.
Step 8 : Next, specify the Start Time and End Time.
Step 9 : Then, click on Run Report.
Step 10 : We can see that our messages to user@hostripples.com are Frozen.
This means that Exim has detected an error trying to deliver the message, and it is going to hold the message and try again later.
Step 11 : Click on the magnifying glass icon to view the message in a new window.
In this message we can see that it’s not delivering to user@hostripples.com because their mail server is giving us back the error of Mailbox quota exceeded.
Step 12 : At the top of the message you can choose to Delete Message which will completely remove it from the mail queue.
Or
you can choose to Deliver Message Now which will attempt to send the message again, in this case if the user has freed up some space on their email account it should go through successfully now.
That’s it !! 
The post How to use the Exim Mail Queue Manager in WHM first appeared on Web Hosting Stuff.
]]>The post How to Connect Remote Desktop of a VPS/Dedicated Server first appeared on Web Hosting Stuff.
]]>
In this article Hostripples are showing the steps to connect your windows pc to the dedicated server using Microsoft Remote Desktop Connection Application.

Step 1 : Go to Start menu
Step 2 : Select all programs.
Step 3 : Click run.
Step 4 : Type mstsc.exe to access remote desktop.
Step 5 : Type your server IP address.
Step 6 : Then click on connect.
Step 7 : Enter your user name and password.

The post How to Connect Remote Desktop of a VPS/Dedicated Server first appeared on Web Hosting Stuff.
]]>The post How to Solve Application Error in Windows vzpp first appeared on Web Hosting Stuff.
]]>“Application Error
The server encountered an internal error or misconfiguration.”

Solution :
This is usually caused by VPS hitting its memory parameters , the QOS alerts can be checked from vzmc/pmc to confirm this.
A temporary solution would be restart the the vps to release the memory resource. You want to fix it permanent solution make sure to check how frequent the QOS parameters are hitting their limit and what is causing this high usage and resolve that accordingly.
After restarting virtual private servers , make sure to check it in new browser window about the Plesk login information.
The post How to Solve Application Error in Windows vzpp first appeared on Web Hosting Stuff.
]]>The post How to Install Minecraft Server on CentOS VPS first appeared on Web Hosting Stuff.
]]>

- First, Installing Java-JDK by using following command:
yum install java-1.6.0-openjdk
- If have check Java was installed then you can use following command:
which java
- The following command will be displayed if it was properly installed:
/usr/bin/java
- Switch to the root directory by using following command:
cd
- Create a Minecraft directory, using following command:
mkdir Minecraft
- Now, Enter the directory:
cd Minecraft
- Download Minecraft:
wget http://minecraft.net/download/minecraft_server.jar
.
.
.
.
Minecraft is now installed.
- You’ll now need to install “screen” to keep the Minecraft server running after the SSH session is closed, you can use following command.
yum install screen
- Use the screen and run Minecraft. Enter screen:
screen
- Start up Minecraft
java -Xmx1024M -Xms1024M -jar minecraft_server.jar nogui
===========================================
- To get back to the normal screen, press these keys:
Control+A+D
- To get back to the screen where Minecraft is running:
screen -r
The post How to Install Minecraft Server on CentOS VPS first appeared on Web Hosting Stuff.
]]>The post How to RDP connect to windows server / VPS ? first appeared on Web Hosting Stuff.
]]>
Connecting to a remote Windows server or Windows VPS from your Windows 7 PC is easy with Microsoft’s own Remote Desktop Connection (RDC) program. It is included with most versions of Windows.
To launch RDC
Enter the following:
1) Open the Start menu of your computer
2) Search for “Remote Desktop Connection”.
Note (If you can’t find it, you can start it manually with Start > Run > mstsc.exe).
3) Enter your Windows VPS details as follows:
Computer: [IP address of your RDP VPS or Windows Server.]

4) Click Connect button
You see a message like the following.

5) Select “Don’t ask me again.”
6) Click Connect button
RDC will prompt for your password
Enter the following:
1) Type Username: Administrator
2) Type Password: Password is supplied by your Windows VPS provider.

3) Click Ok button
You should now be connected to your server’s desktop. Please take care to update your Administrator password right away!
The post How to RDP connect to windows server / VPS ? first appeared on Web Hosting Stuff.
]]>The post Benefits of Using a Virtual Private Server first appeared on Web Hosting Stuff.
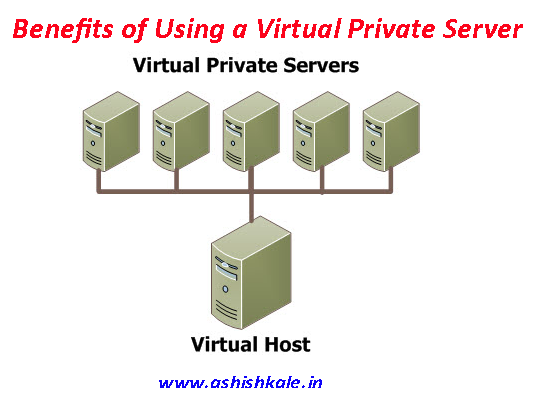
]]>VPS hosting is a web hosting solution where in virtualized servers are deployed to give user a grass root-level access over their servers, while sharing bandwidth, CPU, and RAM with other users. Virtual private servers provide the performance of a dedicated server running on a machine located in a shared environment. Through root access, customers get the full control of the server just like a dedicated server.
1) Shorter deployment time for new servers:
– No procurement of hardware
– Resources virtual server pool are allocated
– Multiple servers created from same image
– Reduced staffing time required to deploy a new service
– Server deployment time shortened to less than a day
2) Scalability and Flexibility:
– Virtual resources can be quickly added to increase the capacity
– You buy only what you need
– Adding vCPUs and RAM is as simple as a reboot
– Additional disk space can frequently be added on the fly
– Move data from a slow storage tier to a faster one without disruption to services
– Reduced need to over-build a server “just to be safe”, saving money and power.
3) Simplifies Development and Testing Environments:
– Virtualization reduces the costs of running separate development, staging and production environments
– Development servers may be created from production images with no downtime
– Quickly modify, test and deploy images into production, speeding up the development cycle
– Decommission development and staging environments when no longer needed, further reducing costs.
3) It’s Green – Save on Power, Space, and Cooling:
– Virtual server units dramatically reduce the physical space, power, and cooling compared to their physical counterparts
– Reduced consumption of power and cooling and saves money too.
4) No physical server upgrades and maintenance:
– No scheduled downtime to perform hardware upgrades, replace failing components or replace aging hardware
– Seamlessly migrate to a different server , perform preventative maintenance and even completely refresh the hardware.
5) Hardware Fault Tolerance:
– Virtual infrastructure is built with fault tolerant components (redundant power supplies, storage and network connections), in the event a host should fail, virtual servers are automatically migrated and restarted using spare capacity in the data center.
6) Simplified Disaster Recovery and Business Continuity:
– Virtualization software can replicate virtual machines to a remote data center
– Disaster recovery and business continuity plans are relatively standard and do not require custom engineering for each physical system and application.
7) Leverage other benefits of the data center:
– 24×7 staffing, precision power and cooling, enhanced security and encrypted tape backups.
The post Benefits of Using a Virtual Private Server first appeared on Web Hosting Stuff.
]]>The post How to Choose the Best VPS Hosting? first appeared on Web Hosting Stuff.
]]>Virtual private server ( VPS )is a single server that uses a single hard drive various hard drives that has been divided for specific users. Every VPS user has different OSs allowing changes to be made without influencing other users file and data.

1) Ram: RAM is most important factor when it comes to choosing VPS hosting. Even some people consider RAM as the only factor when it comes to determine the best VPS hosting. Because in VPS hosting your RAM will be used to run your operating system and as well as your server – it means that you’ll be using more RAM for your website as compared to shared hosting.
2) Managed or Unmanaged: VPS hosting comes with both managed and unmanaged tags. In shared hosting, you don’t get root access to the server and hence the question of managing the server does not arise.But when it comes to VPS hosting, the whole virtual server is handed over to you. So, there needs to be somebody to look after it and monitor its performance. If this is taken care of by your VPS provider, then it is called managed VPS, whereas in unmanaged VPS you need to take the responsibility of your server all by yourself.
3) Bandwidth: Bandwidth is always in our list when it comes to choose web hosting for our websites. Every web hosting service providers offer unlimited bandwidth, so it is very important to find out what unlimited really means.
4) Price: VPS hosting is considered to be a very affordable option, if you are looking for quality. When you are looking for long term success then you’ve to cut your pockets. Because quality always comes with higher price.
The post How to Choose the Best VPS Hosting? first appeared on Web Hosting Stuff.
]]>