The post How to Set Up and Rank Your Google Business Profile in 2026? first appeared on Web Hosting Stuff.
]]>The good news? You don’t need a giant budget to improve your visibility.
The better news? If you set it up correctly and keep it active, your profile can help you to appear in Google Search, Google Maps, and even the local 3-pack—that prime set of map results that gets the most clicks.
This guide will show you exactly how to set up and rank your Google Business Profile in 2026, step by step, in plain English.
What is a Google Business Profile and why does it matter in 2026?
A Google Business Profile is your business listing on Google Search and Google Maps. It shows important information such as:
- Business name
- Phone number
- Address
- Website
- Hours
- Reviews
- Photos
- Services
- Updates
Think of it like your digital storefront.
In 2026, local search is more competitive than ever. People search with strong buying intent, like:
- “dentist near me”
- “best café in Mumbai”
- “Plumber open now.”
- “SEO agency near me”
When your profile is complete, active, and trusted, it can help your business to show up when customers are ready to act.
Google says local ranking is mainly based on relevance, distance, and prominence. That means ranking well is not just about stuffing keywords—it’s about building a useful, accurate, and trustworthy profile.
Who Should Create a Google Business Profile?
A Google Business Profile is ideal for:
- Local businesses with a storefront
- Service-area businesses like electricians, plumbers, cleaners, and consultants
- Clinics, salons, gyms, and restaurants
- Multi-location brands
- Freelancers who meet clients in person
- Hybrid businesses that serve customers at both a location and off-site
However, not every business is eligible. Google generally expects businesses to make in-person contact with customers during stated hours. Purely online businesses without in-person service usually don’t qualify.
So yes—if your business serves real customers in a real area, you should probably have one.
What You Need Before You Start?
Before setting up your profile, get these ready:
Checklist
- A Google account you’ll keep long term
- Your exact business name
- Your correct address (if customers visit you)
- Your service areas (if you travel to customers)
- Main business category
- Business phone number
- Website URL
- Opening hours
- Logo and business photos
- A short business description
- Proof that you manage the business (for verification)
This prep work saves time and helps you avoid mistakes later.
How to Set Up Your Google Business Profile Step by Step?
Now let’s get into the practical part.
Step 1: Sign in With the Right Google Account
Use a business-owned Google account, not your cousin’s Gmail, your ex-employee’s email, or an agency account you don’t control.
This matters because ownership issues can become a nightmare later.
Best practice:
- Use a company email if possible
- Add managers later instead of sharing one login
- Keep admin access documented internally
Step 2: Add or Claim Your Business
Search your business name on Google or Google Maps.
You’ll usually find one of these situations:
Case A: Your business already exists
If a listing is already there, click “Own this business?” or request access.
Case B: Your business doesn’t exist yet
You’ll need to create a brand-new listing.
Google allows you to either add or claim a business, depending on what already exists in its system.
Pro tip: Before creating a new profile, make sure there isn’t already a duplicate listing.
Step 3: Enter Your Business Name Correctly
This is where many businesses go wrong.
Use your real-world business name only.
Correct Example
Bright Smile Dental Clinic
Wrong Example
Bright Smile Dental Clinic | Best Dentist in Mumbai | Root Canal | Teeth Whitening
That second version may look “SEO smart,” but it can trigger spam issues or suspensions.
Your name should match what appears on:
- Signage
- Website
- Legal docs
- Business directories
- Customer-facing branding
Keep it clean and real.
Step 4: Choose the Best Primary Category
Your primary category is one of the biggest local ranking signals.
Google itself states that categories help to connect your business to relevant searches. Choosing a specific category is better than choosing something overly broad.
Examples
- Good: Orthodontist
- Less ideal: Doctor
- Good: Italian Restaurant
- Less ideal: Restaurant
- Good: Digital Marketing Agency
- Less ideal: Marketing
Best Practice
- Pick one primary category that best describes your main service
- Add secondary categories only if they are genuinely relevant
- Don’t overdo it
This step directly affects what searches you can rank for.
Step 5: Add Your Address or Service Area
This depends on your business model.
If customers visit your location
Add your physical address.
If you go to customers
Set up a service-area business and hide your street address if appropriate.
If you do both
Use the hybrid option if available and accurate.
Make sure your business information follows Google’s location guidelines and reflects how your business actually operates.
Examples of Service Areas
- Andheri
- Bandra
- Navi Mumbai
- Thane
Use real service areas—not every city in your country just because you want more reach.
Step 6: Add Contact Details and Website
Now fill in the practical details:
- Primary phone number
- Website
- Booking link (if relevant)
- Appointment URL
- Messaging options (if available in your region)
Important Rule
Use the business’s main official phone number and website.
Don’t add:
- Tracking numbers are your main number unless handled properly
- Thin doorway pages
- Broken links
- Random social profile links as your main website
Consistency matters a lot here.
Step 7: Complete Verification
Verification is required to get full control over your listing and access to features like edits, performance insights, and more. Google says verification methods are determined automatically and can include video recording, phone/text, email, live video call, or mail, depending on the business. Verification review can take up to 5 business days in some cases.
Common Verification Methods in 2026
- Video verification
- Phone or SMS
- Live video call
- Mail (when available)
Important Tip
If Google asks for video verification, be ready to show:
- Exterior signage
- Nearby street signs
- Tools or equipment
- Workspace access
- Proof you manage the business
For video verification, Google notes that the video should be unedited, at least 30 seconds long, and recorded on a mobile device through your profile flow.
Read: Subdomains in SEO: Benefits, Risks & Best Practices
How to Optimize Your Google Business Profile for Rankings?
Setting it up is only the beginning.
If you want to rank, you need to optimize it.
Fill Out Every Core Field
A half-complete profile won’t do much for you.
Google recommends keeping your business info complete and accurate because it helps your profile to appear for relevant searches.
Complete These Fields
- Business name
- Category
- Address/service area
- Phone number
- Website
- Hours
- Special hours
- Description
- Services
- Products
- Attributes
- Opening date
- Photos
- Questions & answers
The more complete your profile is, the better your chances of competing.
Write a Strong Business Description
Your business description won’t magically rank you by itself—but it helps customers to understand what you do.
Good Description Formula
Who you help + what you offer + where you serve + what makes you different?
Example
ABC Home Cleaning provides professional residential and office cleaning services in Mumbai, Navi Mumbai, and Thane. We specialize in deep cleaning, move-in/move-out cleaning, and weekly maintenance plans with trained staff and eco-friendly products.
Tips
- Keep it natural
- Mention core services
- Mention the location naturally
- Avoid keyword stuffing
- Focus on clarity and trust
Upload High-Quality Photos and Videos
Photos help people to trust your business—and they can improve engagement.
Google recommends uploading business-specific images and says verified businesses can add photos and videos that follow their content guidelines. They also recommend JPG or PNG files between 10 KB and 5 MB for photos.
Upload These First
- Logo
- Cover photo
- Exterior shots
- Interior shots
- Team photos
- Product photos
- Service process photos
- Before/after images (if relevant and allowed)
Best Practice
Add fresh images every month.
That tells Google—and users—that your business is active.
Use Products, Services, and Attributes
This section is underrated.
It helps Google to understand what your business actually offers.
Examples
If you run a salon, list:
- Haircut
- Hair coloring
- Keratin treatment
- Bridal makeup
If you run a dental clinic, list:
- Teeth cleaning
- Root canal
- Dental implants
- Invisalign
Also, add useful attributes when relevant, such as:
- Wheelchair accessible
- Women-led
- Appointment required
- Online appointments
- Free Wi-Fi
These details improve both relevance and user experience.
Publish Google Posts Consistently
Google allows businesses to publish updates, offers, events, and announcements directly on their Business Profile. These posts can appear in the Updates/Overview areas and help customers make decisions.
Post Ideas
- New service launches
- Limited-time offers
- Holiday hours
- Customer success stories
- Event promotions
- Seasonal specials
- Tips and FAQs
Simple Posting Schedule
Post once per week or 2–4 times per month.
Consistency beats random bursts.
Read: WordPress Admin Login Problems: 7 Professional Recovery Techniques
How Google Business Profile Rankings Work?
Now let’s talk about ranking.
Google has been pretty clear here: local rankings are mostly influenced by three factors.
1) Relevance
How closely your profile matches what someone is searching for.
Improved by:
- Correct categories
- Complete services
- Accurate business description
- Relevant content and website support
2) Distance
How close your business is to the searcher or search location.
You can’t fully control this—but you can improve how clearly Google understands where you serve.
Improved by:
- Accurate address or service area
- Location pages
- Local citations
- Geographic relevance on your website
3) Prominence
How well-known and trusted your business appears online.
Improved by:
- Reviews
- Citations
- Backlinks
- Press mentions
- Brand searches
- Strong website SEO
This ranking framework comes directly from Google’s local ranking guidance.
How to Get More Reviews Without Breaking the Rules?
Reviews are huge.
They influence:
- Trust
- Click-through rate
- Conversions
- Local prominence
But here’s the catch: don’t game the system.
Best Ways to Get Reviews
- Ask happy customers right after service
- Send a simple review link via WhatsApp or email
- Add a QR code at checkout
- Train staff to ask politely
- Follow up once, not ten times
What to Avoid
- Buying reviews
- Gating reviews
- Offering rewards for reviews
- Asking only for 5-star reviews
- Using fake accounts
Reply to Every Review
This matters more than many businesses realize.
Reply to:
- Positive reviews
- Neutral reviews
- Negative reviews
Simple Review Reply Formula
Thank them + mention the service + keep it human
Example
Thanks for visiting us, Priya! We’re glad you loved the teeth whitening treatment. We appreciate your support and look forward to seeing you again.
That’s simple, natural, and trust-building.
Local SEO Tips to Help Your Profile Rank Higher
Your Google Business Profile does not rank in isolation. It works best when your entire local SEO ecosystem supports it.
Keep NAP Consistent Across the Web
NAP = Name, Address, Phone Number
Your business details should match across:
- Website
- Social profiles
- Directories
- Industry listings
- Local citations
Why This Matters
If one listing says:
- “Suite 302”
and another says: - “3rd Floor”
…it may not kill your rankings, but too many inconsistencies create confusion.
Keep it standardized.
Create Location Pages on Your Website
If you serve multiple areas, build dedicated pages for each major location.
Example
- /Mumbai Dental Clinic
- /bandra-teeth-whitening
- /thane-root-canal
Each page should include:
- Unique local content
- Services offered
- Local proof
- Reviews/testimonials
- FAQs
- Embedded map
- Contact info
This helps your website reinforce your Google Business Profile.
Build Local Citations and Mentions
Citations are mentions of your business info on third-party websites.
Examples
- Justdial
- Sulekha
- IndiaMART
- Yelp
- Bing Places
- Apple Business Connect
- Niche industry directories
These mentions strengthen your local presence and help Google trust your business details.
Earn Local Backlinks
Backlinks still matter.
Some of the best local links come from:
- Local blogs
- Newspapers
- Business associations
- Chamber of Commerce sites
- Sponsorship pages
- Event websites
- Community partnerships
Even a few strong local links can move the needle.
Common Google Business Profile Mistakes to Avoid
Here’s where businesses shoot themselves in the foot.
Top Mistakes
- Keyword stuffing the business name
- Choosing the wrong category
- Using a fake address
- Creating duplicate profiles
- Ignoring reviews
- Never posting updates
- Uploading low-quality photos
- Using an inconsistent NAP
- Leaving old hours live
- Forgetting to add services
- Letting an agency own the listing instead of the business
Big One: Don’t Set and Forget
A dead profile sends a bad signal.
If your last update was 18 months ago and your newest photo is from 2022… that’s not ideal.
Stay active.
Read: Private Cloud vs Bare Metal Servers – What Should You Choose in 2026?
Google Business Profile FAQs
1) Is Google Business Profile free?
Yes. Creating and managing a Google Business Profile is free.
2) How long does verification take?
It depends on the method. In some cases, it’s instant, but Google notes reviews can take up to 5 business days after verification steps are completed.
3) Can I rank without a website?
Yes, but it’s much harder. A strong website helps support relevance, trust, and conversions.
4) How often should I update my Google Business Profile?
At minimum:
- Check weekly
- Post monthly or weekly
- Add photos monthly
- Reply to reviews regularly
- Update hours immediately when they change
5) Do reviews help rankings?
They strongly support trust and prominence. They also improve click-through and conversion rates.
6) What is the best category for my business?
The one that most accurately describes your main service. Be as specific as possible.
7) Can I use a virtual office address?
Usually, no—at least not if it doesn’t meet Google’s guidelines for a legitimate customer-facing presence. That can lead to suspensions.
8) How many photos should I upload?
There’s no perfect number, but you should aim to build a robust visual profile and keep adding fresh images over time.
Conclusion
If you want to win more local customers in 2026, your Google Business Profile needs more than a quick setup and a logo upload.
To truly compete, you need to:
- Set it up correctly
- Verify it properly
- Choose the right category
- Complete every field
- Add strong photos
- Publish regular updates
- Earn real reviews
- Support it with local SEO
That’s the real formula.
So, if you’ve been wondering how to set up and rank your Google Business Profile in 2026, the answer is simple:
Accuracy + activity + trust + local relevance.
Do those four things better than your competitors, and you’ll be in a much stronger position to rank, get clicks, and turn local searches into real business.
The post How to Set Up and Rank Your Google Business Profile in 2026? first appeared on Web Hosting Stuff.
]]>The post Thinking of Using Laravel? Here’s What You Should Know first appeared on Web Hosting Stuff.
]]>Laravel has become one of the most trusted and widely used PHP frameworks in modern web development. Known for its elegant syntax, built-in tools, and powerful architecture, it helps developers build fast, secure, and scalable applications with ease. Whether you’re creating a simple website or a large enterprise system, Laravel provides everything you need to develop efficiently.
What Is Laravel?
Laravel is an open-source PHP framework designed to simplify and speed up web application development. It follows the MVC (Model–View–Controller) architecture, which keeps your application organized, clean, and easy to maintain. With Laravel, you get a complete toolbox—from routing and templating to authentication and caching—ready to use right out of the box.
Why Laravel Has Become a Developer Favorite?
1. Clean and Modern Syntax
Laravel is built with a developer-first approach. The syntax is expressive, easy to read, and reduces repetitive code.
2. Built-In Authentication & Security
Login systems, user permissions, password hashing, CSRF protection, and encryption are already included.
3. Eloquent ORM (Database Made Easy)
Laravel’s ORM allows developers to interact with the database using simple PHP code instead of complex SQL queries.
4. Blade Templating Engine
Blade helps build dynamic, responsive, and reusable front-end layouts without writing complicated HTML or PHP.
5. Powerful Routing System
Laravel’s routing makes it easy to define clean URLs and connect them with controllers, making development more structured.
6. Artisan CLI (Command Line Tool)
Laravel includes a command-line tool named Artisan that automates tasks such as: Creating controllers, Running migrations, Managing queues, Seeding databases.
7. Scalable Architecture
From small projects to large apps with millions of users, Laravel can scale easily using queues, caching, job scheduling, and microservices.
Read: How Can I Create a WordPress Plugin as a Beginner?
What Can You Build with Laravel?
Laravel is versatile and used across industries for building:
- Business websites
- Admin dashboards
- E-commerce platforms
- Content Management Systems (CMS)
- Customer portals
- HRMS, CRM, and ERP systems
- API backends for mobile apps
- SaaS products
- Multi-vendor marketplaces
Its flexibility makes it suitable for projects of any size.
Key Features That Make Laravel Stand Out
 MVC Architecture
Separates logic from presentation, making the code clean and manageable.
Database Migrations
Version-control your database like code—no more manual SQL edits.
Queues & Background Jobs
Run heavy tasks (emails, imports, notifications) in the background for smooth performance.
Caching Support
Optimizes application speed with built-in caching for Redis, Memcached, and more.
API-Ready Framework
Laravel offers built-in tools for API development, including Laravel Sanctum and Laravel Passport.
Testing-Friendly
Laravel supports PHPUnit and has built-in testing features to ensure application reliability.
How Laravel Simplifies Real-World Development?
Laravel reduces development time by providing:
- Pre-built modules
- Reusable components
- Automated tools
- Standardized code structure
This leads to faster delivery, fewer bugs, and better security.
Benefits of Using Laravel for Businesses
 Faster Development
Laravel’s tools and structure significantly reduce development time.
- Cost-Effective
Reusable components and efficient workflows save time and cost.
- Highly Secure
Built-in protection against SQL injection, CSRF, XSS, and more.
- Future-Ready
Laravel is continually updated, making it relevant for upcoming technologies and trends.
- Easy to Scale
Perfect for startups today and enterprise applications tomorrow.
Read: How to Make Money on Instagram in 2025: A Step-by-Step Guide
Conclusion
Laravel is more than just a PHP framework—it’s a complete ecosystem designed to support modern web development. With clean code, built-in security, fast performance, and a massive community, Laravel continues to power thousands of web applications worldwide. Whether you’re a beginner or a seasoned developer, Laravel provides all the tools needed to build reliable, scalable, and future-ready applications.
The post Thinking of Using Laravel? Here’s What You Should Know first appeared on Web Hosting Stuff.
]]>The post How to Create a Contact Us Page for Business Websites? first appeared on Web Hosting Stuff.
]]>A well-designed Contact Us page is one of the most important elements of any business website. It acts as a direct bridge between you and your customers—helping them to get support, ask questions, request quotes, or connect for partnership opportunities. Yet, many businesses overlook this page and miss out on valuable leads simply because their contact section is incomplete, confusing, or hard to find.
In this guide, you’ll learn how to create a clean, user-friendly, and conversion-focused Contact Us page that builds trust and encourages action. Whether you run a small business, an e-commerce store, a service-based brand, or a local company, the steps outlined here will help you design a page that not only looks professional but also enhances customer engagement and strengthens your online credibility.
10 Essential Steps
1. Keep Your Page Simple & Clear
Your visitors shouldn’t struggle to find the right way to reach you. Make your Contact Us page easy to understand with:
- Clear heading (“Contact Us” or “Get in Touch”)
- Short description of what assistance you offer
- Clean layout with well-spaced sections
Tip: Avoid clutter and keep the design minimal.
2. Add Multiple Contact Methods
Different users prefer different communication channels. Include:
 Phone number
 Email address
 Office address or map location
 Live chat link / WhatsApp link
 Social media icons
This variety boosts accessibility and trust.
3. Use a Well-Designed Contact Form
A simple, short form increases the chances of getting more leads.
Essential fields include:
- Name
- Phone number (optional)
- Message box
- Subject/Inquiry type dropdown
- Best Practices:
- Keep fields minimal
- Add placeholder text
- Use proper validation
- Display success/error messages clearly
4. Add a Call-to-Action (CTA)
A CTA helps guide visitors toward the next step.
Examples:
- “Send Message”
- “Request a Callback”
- “Ask a Question”
- “Get Free Support”
Ensure the button is bold and easily visible.
5. Include a Map or Location Section
If your business has a physical office, embed a Google Map. It fosters trust and makes navigation easier.
6. Add Business Hours
Show the exact timing when you’re available.
Example:
Mon–Sat: 9 AM to 7 PM
Sunday: Closed
This small detail avoids misunderstandings and improves customer satisfaction.
7. Make the Page Mobile-Friendly
More than 60% of users access websites through mobile.
Your Contact Us page must load fast, look clean, and be easy to use on small screens.
8. Add FAQs Related to Contact
This helps reduce unnecessary queries and solves quick questions.
Example FAQs:
- How soon will you respond?
- Do you offer phone support?
- Can I request a demo or a quote?
9. Ensure Spam Protection
To avoid spam messages:
- Add Google reCAPTCHA
- Enable form validation
- Use server-side filtering
10. Test Before Publishing
Check:
- All links
- Email delivery
- Form submissions
- Mobile responsiveness
- Button clicks
Make sure every detail works smoothly.
Conclusion
A great Contact Us page fosters trust, enhances user experience, and increases customer engagement. By keeping it simple, adding multiple communication options, and designing a user-friendly form, you can make it easier for visitors to contact your business—and ultimately drive more conversions.
FAQ
1. Why is a Contact Us page important?
It provides customers with an easy way to reach you, improving trust, leads, and conversions.
2. What should I include on a Contact Us page?
Form, phone number, email, address, map, business hours, and social links.
3. Do all business websites needs a Contact Us page?
Yes—whether you run a local shop, service agency, or online store, communication is essential.
4. How many fields should a contact form have?
Keep it minimal: Name, email, and message are usually enough.
5. Can I add WhatsApp or live chat to my Contact Us page?
Absolutely. Modern customers prefer real-time support.
6. How do I make my Contact Us page more trustworthy?
Include your business address, map, phone number, company registration details, and social media links to show authenticity and transparency.
7. Should I use a contact form or show my email directly?
Use both. A contact form prevents spam, while displaying your email helps users who prefer sending detailed messages through their mailboxes.
8. How fast should I respond to inquiries submitted through the Contact Us form?
Ideally, within 24 hours. Quick responses improve customer satisfaction and conversion rates.
9. Can I automate replies from the Contact Us page?
Yes, you can set up:
- Auto-reply confirmation email
- Ticket system integration
- Chatbot suggestions
This assures users that their message was received.
10. Should I add department-wise contact options?
Yes, especially for medium to large-sized businesses.
Example:
- Sales
- Support
- Billing
- Partnerships
It ensures the inquiry reaches the right team quickly.
11. How can I reduce spam submissions?
Use:
- Google reCAPTCHA
- Honeypot fields
- Email verification
- IP blocking for repeated spammers
12. Is it necessary to include social media links on the Contact Us page?
Not mandatory but highly recommended. Social links provide an alternate communication channel and boost engagement.
13. Can I track the performance of my Contact Us page?
Yes, using tools like:
- Google Analytics
- Form submission tracking
- UTM tags on CTA buttons
This helps to measure conversion rates and user behavior.
14. Should I add an FAQ section directly on my Contact Us page?
Yes, a small FAQ section helps answer common questions and reduces the number of unnecessary inquiries.
15. What if I receive too many irrelevant inquiries?
You can:
- Add a dropdown for inquiry types
- Provide redirect links to relevant support pages
- Add clear instructions about what the form is for
16. Can I include file uploads in the contact form?
Yes, if your business requires documents like screenshots, ID proofs, or invoices. Always ensure file type and size restrictions
17. How do I improve the design of my Contact Us page?
Use:
- Good spacing
- Clean layout
- Icons for each contact method
- A simple color pattern matching your brand
- Bold CTA buttons
18. Should I add a testimonial or trust badge?
If your business deals with services, adding:
- Customer testimonials
- Ratings
- Certifications
This will increase credibility.
19. Is SEO important for a Contact Us page?
Yes. Optimizing it helps search engines display your business for queries like: “[Business name] contact number”, “support”, “location”, etc.
20. Can I embed WhatsApp Click-to-Chat on the page?
Absolutely. It increases real-time engagement, especially for local or small businesses.
The post How to Create a Contact Us Page for Business Websites? first appeared on Web Hosting Stuff.
]]>The post How High RAM VPS Can Lower Bounce Rates Effectively? first appeared on Web Hosting Stuff.
]]>While many factors contribute to a high bounce rate, one of the most impactful, yet often overlooked, is website performance, particularly the amount of RAM available to your hosting server. This introduction explores how investing in a high-RAM Virtual Private Server (VPS) can significantly enhance website speed and responsiveness, thereby effectively lowering your bounce rate and fostering a more positive user journey.
State the killer reasons for Slow Website Performance
Bloated Code: Excessive, unoptimized HTML, CSS, and JavaScript.
Large Images/Media: Uncompressed or oversized images, videos, and other media files.
Too Many HTTP Requests: Numerous external scripts, stylesheets, and images requiring separate downloads.
Poor Hosting: Inadequate server resources, slow network, or shared hosting with overloaded servers.
Lack of Caching: No browser caching, server-side caching, or CDN implementation.
Unoptimized Database: Slow database queries, large unindexed tables, or inefficient database design.
External Script Issues: Slow-loading third-party scripts (ads, analytics, social widgets).
Server Location/Latency: The Server is physically far from users, causing high latency.
Render-Blocking Resources: CSS or JavaScript that blocks the page from rendering until fully loaded.
Excessive Redirects: Multiple redirects before reaching the final page.
Read: How can I redesign my website without affecting SEO?
What Are the Advantages of High RAM VPS Hosting?
Superior Performance and Speed:
Faster Data Access: RAM is the fastest form of memory. With more RAM, your server can store a larger amount of frequently accessed data, applications, and database queries directly in memory. This means your website loads much quicker, and applications respond almost instantly, as the server doesn’t have to retrieve data from slower storage like SSDs or HDDs as frequently.
- Reduced Lag and Bottlenecks: When a server runs out of RAM, it resorts to using “swap space” on the hard drive, which drastically slows down operations. Ample RAM prevents this, ensuring smooth, consistent performance even under heavy loads.
- Enhanced Stability and Reliability:
- Handles High Traffic Spikes: A high RAM VPS can gracefully handle sudden surges in website traffic (e.g., during a marketing campaign, sale, or viral content). It prevents your site from slowing down, freezing, or crashing, ensuring a seamless user experience and preventing lost revenue or engagement.
- “Noisy Neighbor” Prevention: Unlike shared hosting, where one website’s resource consumption can affect others on the same server, a VPS provides isolated resources. High RAM in your VPS means you’re guaranteed that memory allocation, safeguarding your site’s stability from other users.
- Improved User Experience (UX):
- Lower Bounce Rates: Fast-loading websites lead to happier users. Visitors are more likely to stay, explore, and convert if pages load quickly. High RAM directly contributes to this by speeding up all aspects of your site.
- Smoother Navigation: For dynamic websites, e-commerce stores, or applications with many interactive elements, high RAM ensures that transitions, searches, and real-time functions are fluid and responsive.
- Optimized for Resource-Intensive Applications:
- Large Databases: Essential for e-commerce sites, content management systems (CMS), and other data-heavy applications that require quick retrieval and processing of information.
- Complex Web Applications: Ideal for applications built with frameworks like Node.js, Ruby on Rails, Django, or Java, which often require significant memory to run efficiently.
- Development and Staging Environments: Provides the isolated and powerful environment needed for developers to build, test, and deploy applications without impacting live sites.
- Real-time Applications: Supports chat applications, online gaming servers, and other real-time services that depend on immediate data processing.
- Greater Scalability and Flexibility:
- Easy Upgrades: As your website or application grows, you can easily upgrade your VPS plan to allocate more RAM (along with CPU and storage) without needing to migrate to a completely new server. This makes scaling straightforward and often without downtime.
- Customization and Control: With root access, you have full control over your server environment. You can install custom software, configure settings, and optimize your server precisely to your application’s needs, which often includes fine-tuning memory usage.
- Better SEO Performance:
- Google Prioritization: Search engines like Google favor fast-loading websites in their rankings. By improving your site’s speed with high RAM, you can positively impact your SEO and gain better visibility.
- Google Prioritization: Search engines like Google favor fast-loading websites in their rankings. By improving your site’s speed with high RAM, you can positively impact your SEO and gain better visibility.
- Enhanced Security:
- Resource for Security Tools: Modern security measures like real-time malware scanning, intrusion detection systems, and advanced firewalls can be resource-intensive. A high RAM VPS ensures these tools can run effectively without compromising your site’s performance.
- Isolated Environment: While not directly tied to RAM, the isolated nature of a VPS (where your virtual server is separate from others on the physical machine) inherently offers better security than shared hosting.
In summary, a high RAM VPS is a powerful solution for anyone whose online presence has outgrown shared hosting. It provides the necessary horsepower to deliver a fast, stable, and reliable experience for users, while also offering the control and scalability needed for future growth.
Read: All About: Understanding the Importance of Secure Shell (SSH)
5 Ways High RAM Lowers Bounce Rates Effectively
Lightning-Fast Page Load Times: This is the most direct and impactful way. When a user clicks a link to your site, high RAM allows your server to retrieve and process all necessary data (HTML, CSS, JavaScript, images, database queries) almost instantaneously. Pages render quickly, often within 1-2 seconds. In contrast, slow-loading pages due to insufficient RAM cause frustration, and users are highly likely to hit the back button before the page even fully loads. Google’s research shows that even a 1-second delay in mobile page load can decrease conversions by up to 20%.
Smooth and Responsive User Interactions: Beyond initial page loads, high RAM ensures that dynamic elements, interactive features, and internal navigation (like filtering products, switching tabs, submitting forms, or playing embedded media) respond instantly. If a user clicks a button and there’s a noticeable delay, or if a form submission hangs, they’re likely to abandon the action and leave. High RAM provides the memory buffer needed for complex JavaScript operations, API calls, and real-time updates to execute without lag.
Enhanced Stability During Traffic Spikes: Websites often experience fluctuating traffic. During peak hours, marketing campaigns, or viral content, a site with low RAM can quickly become overwhelmed, leading to slow performance, errors, or even server crashes. High RAM provides the capacity to handle these sudden surges gracefully, ensuring that all concurrent users receive a consistent, fast experience. If your site consistently performs well under load, users won’t get a “broken” or sluggish impression that makes them bounce.
Efficient Database Queries and Content Delivery: Many websites, especially e-commerce stores, blogs, and content-rich platforms, rely heavily on databases. High RAM allows the database to cache more frequently accessed data and execute complex queries much faster. This means product listings load quicker, search results appear instantly, and dynamic content is delivered without delay. If a user has to wait for product categories to load or search results to populate, they’re more prone to frustration and abandoning the site.
Improved Overall User Experience (UX) Perception: While the technical benefits are clear, the combined effect of fast loading, smooth interactions, and consistent performance creates a subconscious positive perception for the user. They feel that the website is professional, reliable, and trustworthy. This positive feeling encourages them to explore further, engage with content, and complete desired actions, rather than leaving prematurely due to a perceived “clunky” or inefficient site. A bad UX, often rooted in slow performance from inadequate RAM, directly contributes to high bounce rates.
Conclusion
High RAM VPS solutions significantly enhance website performance, leading to faster load times and improved user experience, which in turn effectively reduces bounce rates and fosters greater visitor engagement. Investing in such technology is crucial for businesses aiming to retain users and optimize their online presence.
The post How High RAM VPS Can Lower Bounce Rates Effectively? first appeared on Web Hosting Stuff.
]]>The post All About: Understanding the Importance of Secure Shell (SSH) first appeared on Web Hosting Stuff.
]]>“SSH is like having a secure, invisible tunnel between computers, allowing you to perform magic from miles away!”
In today’s interconnected world, where remote work and server management are becoming the norm, understanding SSH isn’t just a nice-to-have skill – it’s essential! Whether you’re a budding developer, system administrator, or just someone curious about tech, SSH is your gateway to:
* Securely accessing remote systems
* Managing servers like a pro
* Transferring files safely
* Running commands from anywhere
Get ready to dive into the exciting world of Secure Shell (SSH) and discover how this powerful tool can transform how you interact with remote systems. Trust me, once you master SSH, you’ll wonder how you ever lived without it!
What Is Secure Shell (SSH)?
Secure Shell (SSH) is a cryptographic network protocol developed to protect access and manage devices over an unsecured network. It makes sure that all communication between your computer and a remote server is encrypted, safeguarding sensitive information like login credentials and commands.
It is mostly used for:
- Remote server management
- Secure file transfers
- Automating tasks through scripting
- Tunneling other protocols securely
Key Features of SSH
Core Security Features:
- Encryption: It is transmitted data between the client and the server, avoiding confidentiality and preventing eavesdropping. This protects sensitive information like passwords and data from being intercepted.
- Authentication: SSH offers strong authentication methods, primarily through:
- Public-key cryptography: This method uses key pairs (public and private keys) to authenticate users, providing a more secure alternative to password-based authentication.
- This method greatly mitigates the risk of brute force attacks.
- Data Integrity: SSH ensures that data remains unaltered during transmission, preventing tampering and maintaining data integrity.
- Port Forwarding: It helps users to forward the network traffic safely via encrypted tunnels. This feature also protects data transmitted over unprotected networks and enables access to all resources.
- Remote Command Execution: SSH helps users to implement commands on remote servers directly from their local machines. This function is crucial for server administration, debugging, and managing applications.
- Session Resumption: SSH sessions resume automatically after the network interruption, ensuring uninterrupted work.
- Configurable Security Settings: It comes with the flexibility to set multiple security options like cipher suites, maximum authentication attempts, timeout, etc.
Read: Exploring the Future of Server Clustering Technology
Secure Shell SSH Authentication Methods
Authentication is the important aspects of SSH, making sure that only authorized users can operate the remote servers. It supports various authentication methods, each with its strengths and use cases. Below is the overview of the most common methods available for protecting the secure shell connections:
- Password-based:
- User enters username and password.
- Simple, but less secure.
- Public key-based:
- Uses key pairs (public and private).
- It is a more secure, recommended method.
- The private key stays on the client side, and the public key goes on the server.
- Certificate-based:
- Uses digital certificates signed by a Certificate Authority (CA).
- Highest security, used in large environments.
- Adds a layer of verification on top of public key authentication.
In short: passwords are easy but risky, keys are better, and certificates are best for large scale.
SSH Shell vs Shell Access: Key Differences
To clarify the distinction between “SSH shell” and “shell access,” here’s a concise breakdown:
- Shell Access:
- This is a general term referring to the ability to interact with a computer’s operating system through a command-line interface (CLI).
- It allows users to execute commands, manage files, and perform administrative tasks.
- Shell access can be local (directly on the computer) or remote.
- SSH Shell:
- This specifically refers to securely accessing a remote computer’s shell using the SSH protocol.
- SSH encrypts the communication, protecting sensitive data during transmission.
- Therefore, an SSH shell is a secure remote shell access.
In essence:
- “Shell access” is the broad concept of using a command line.
- “SSH shell” is a specific, secure method of achieving remote shell access.
Therefore, all SSH shell access is shell access, but not all shell access is SSH shell access.
Check 3 Steps to Access Your Server Using SSH
Accessing your server via SSH is a fundamental skill for anyone managing remote systems.
1. Obtain Server Credentials:
- IP Address/Hostname:
- You’ll need the server’s IP address (e.g., 192.168.1.100) or its hostname (e.g., myserver.com).
- Username:
- This is the account you’ll use to log in (e.g., root, user).
- Authentication:
- This could be a:
- Password.
- SSH private key (recommended for better security).
- This could be a:
2. Open Your SSH Client:
- Linux/macOS:
- Open your terminal. SSH is typically built-in.
- Windows:
- You can use:
- Windows Terminal or PowerShell (with OpenSSH installed).
- PuTTY (a free, popular SSH client).
- You can use:
3. Connect to the Server:
- Using the SSH command (Linux/macOS/Windows Terminal/PowerShell):
- Basic command: ssh username@server_ip_address
- Example: ssh john@192.168.1.100
- If you are using a nonstandard SSH port, you can add “-p portnumber” to the end of the command.
- Example: ssh john@192.168.1.100 -p 2222
- If using a private key: ssh -i /path/to/private/key username@server_ip_address
- Using PuTTY:
- Enter the server’s IP address or hostname.
- Specify the port (usually 22).
- If using a private key, load it in the “SSH” -> “Auth” section.
- Click “Open.”
- Authentication Prompt:
- You’ll be prompted to enter your password or, if using a key, the passphrase for your private key.
- You’ll be prompted to enter your password or, if using a key, the passphrase for your private key.
- Successful Connection:
- If the credentials are correct, you’ll gain access to the server’s command-line interface.
The post All About: Understanding the Importance of Secure Shell (SSH) first appeared on Web Hosting Stuff.
]]>The post A Quick Guide to Install Control Web Panel (CWP) first appeared on Web Hosting Stuff.
]]>Prerequisites:
- CentOS/RHEL 7 or 8 server
- Root or sudo privileges
Installation Steps:
Update the system:
yum update -y
- Install required packages:
yum install wget curl php php-mysqlnd php-gd php-curl php-json php-zip -y
- Download the CWP installation script:
- Make the script executable:
chmod +x cwp.sh
- Run the installation script:
./cwp.sh
Follow the on-screen prompts to configure CWP. You’ll be asked to enter your server’s IP address, desired username and password for the CWP admin account, and other settings.
- Access the CWP panel:
Once the installation is complete, you can access the CWP panel by visiting
https://your_server_ip:2030. Replaceyour_server_ip
with the actual IP address of your server.
Additional Notes:
- Firewall: It required to configure firewall as per mentioned guidelines.
- Security: Always keep your CWP installation updated and follow best security practices to protect your server.
- Customization: CWP offers various customization options to tailor the panel to your specific needs. Take a look at settings and features to customize the experience.
The post A Quick Guide to Install Control Web Panel (CWP) first appeared on Web Hosting Stuff.
]]>The post Navigating the eCommerce Landscape: A Starter’s Guide first appeared on Web Hosting Stuff.
]]>Starting an online store can be a profitable venture and is relatively easy to set up once you have the basic factors: a well-searched web hosting provider, a quality hosting plan, the best domain name, and an eCommerce platform.
In the article, we will discuss the basic, yet crucial factors of starting an eCommerce website, and the top of it with the basic items that your store will need to run a smooth online venture.
What is an eCommerce business?
E-commerce (electronic commerce) is the buying and selling of goods and services using the internet. It’s a broad term that encompasses online retail, online auctions, online banking, and many other types of commercial transactions.
Key characteristics of e-commerce:
- Online: Transactions occur over the internet, often using websites or mobile apps.
- Digital: Products or services are often digital or virtual, but can also be physical goods.
- Global reach: E-commerce can connect buyers and sellers from around the world.
- Convenience: It offers convenience and accessibility for both consumers and businesses.
Examples of e-commerce:
- Online retailers: Amazon, eBay, Walmart.com
- Online marketplaces: Etsy, Alibaba
- Digital marketplaces: iTunes, Google Play Store
- Online banking: Online portals offered by banks
- Online travel agencies: Expedia, Booking.com
Read: Protect Your WordPress Site from Brute Force Attacks: A Comprehensive Guide
Steps to start an eCommerce business:
E-commerce has revolutionized the way we shop, offering convenience, accessibility, and a vast array of products. If you’re considering starting your online store, here’s a basic guide to help you navigate the eCommerce landscape.
1. Choose Your Niche
- Identify your passion: What are you knowledgeable about or interested in?
- Research market demand: Is there a market for your chosen niche?
- Assess competition: How competitive is the market for your product or service?
2. Select an eCommerce Platform
- Open-source platforms: Offer greater flexibility and customization (e.g., WooCommerce, Magento).
- SaaS platforms: Easier to set up and manage (e.g., Shopify, BigCommerce).
- Consider factors: Cost, scalability, features, and ease of use.
3. Design Your Online Store
- User experience: Create a clean, intuitive, and mobile-friendly design.
- Branding: Consistent branding helps build trust and recognition.
- Product photography: High-quality images are essential for product promotion.
4. Set Up Your Payment Gateway
- Choose a reliable gateway: Consider factors like fees, security, and integration with your platform.
- Offer multiple payment options: Provide options like credit cards, digital wallets, and local payment methods.
5. Optimize for Search Engines (SEO)
- Keyword research: Point out suitable keywords for listing your products or services.
- On-page optimization: Don’t forget to optimize your website’s content, meta tags, and headings.
- Off-page optimization: Build backlinks from other reputable websites.
6. Market Your Online Store
- Social media marketing: Start communicating with your potential customers via platforms like Facebook, Instagram, and Twitter.
- Content marketing: Create valuable content (e.g., blog posts, videos) to attract and retain customers.
- Email marketing: Develop an email list to send essential promotions/deals or add-ons on the website.
- Paid advertising: Check platforms like Google Ads and social media advertising.
7. Fulfillment and Shipping
- Inventory management: Efficiently manage your stock to avoid stockouts or overstocking.
- Shipping options: Offer a variety of shipping methods to meet customer needs.
- Shipping costs: Calculate shipping costs accurately and transparently.
8. Customer Service
- Responsiveness: You should respond to promptly coming customer inquiries and concerns.
- Support channels: It provides various channels for customer support like email, live chat, and phone.
- Returns and refunds: Have a clear returns policy and process refunds efficiently.
Note: Developing a victorious eCommerce business leads to a long journey and effort. It is necessary to check the performance daily adopt the market trends, and categorize customer satisfaction.
How is web hosting useful for starting an eCommerce website?
Web hosting is essential for starting an eCommerce website because it provides the foundation for your online store. Here’s how web hosting works in this context:
- Storage: Your website’s files, images, and data are stored on a server, which is a powerful computer connected to the internet.
- Accessibility: When a customer visits your website, their browser sends a request to the server, which then delivers the necessary files to display the page.
- Security: A reliable web hosting provider ensures that your website and customer data are protected from cyber threats.
- Performance: A fast and reliable server is crucial for providing a positive user experience.
- Scalability: As your business grows, your hosting provider can help you scale your website to accommodate increased traffic and data.
In essence, web hosting is like renting a space on the internet for your eCommerce store. Without it, you wouldn’t be able to make your website accessible to customers.
Read: 10 Steps to Unlocking the Benefits of Cloud Hosting
Conclusion
The eCommerce landscape presents numerous opportunities for newcomers, emphasizing the importance of understanding market dynamics and consumer behavior to achieve success. A strategic approach and continuous learning are essential for thriving in this competitive environment.
The post Navigating the eCommerce Landscape: A Starter’s Guide first appeared on Web Hosting Stuff.
]]>The post How to Fix the Error While Starting a New VPS? first appeared on Web Hosting Stuff.
]]>Part I
- Identify the culprit:
Error message: The first step is to examine any error messages displayed during startup. These messages often pinpoint the problem area.
- Resource limitations:
Check resource allocation: Make sure your VPS has enough CPU, RAM, and disk space to run the chosen operating system and applications. You can usually adjust resource allocation through your VPS provider’s control panel. If resources are limited, consider an upgrade or optimizing resource usage.
- Network blues:
Inspect network configuration: Verify that your VPS has the correct network settings, including IP address, subnet mask, gateway, and DNS servers. However, incorrect settings can prevent the VPS from starting properly.
- Delving deeper:
- Access console (if available): Some providers offer a console where you can see detailed boot logs that might reveal the startup issue.
- Examine logs: System logs often contain valuable information about errors during startup. The specific location may vary depending on your provider and operating system, but commonly they reside in the /var/log/ directory.
- Seeking help:
Contact VPS provider: If the above steps don’t solve the problem, contact your VPS provider’s support team. They have access to specific details about your VPS configuration and can offer tailored guidance.
Remember, these are general steps. The specific troubleshooting process might differ depending on the error message and your VPS provider’s setup.
Part II
While working with this process you will come across an error as mentioned below- “setlocale: No such file or directory error: failed to connect to the hypervisor error- Failed to connect socket to ‘/var/run/libvirt/libvirt-sock’: No such file or directory”
Follow the steps mentioned below to overcome the error:
- Firstly, you have to monitor the server status.
2. Then, run the below command to monitor the server status:
systemctl status libvirtd.service
3. If the server fails or stops, the below status will be seen:
<strong><em>systemctl start libvirtd.service</em></strong>
4. After running this command, you have to start the VPS server from the admin panel and you will see the error has been eliminated.
In conclusion, troubleshooting steps can be taken to resolve errors encountered when starting a new VPS, ensuring a smooth and successful setup process.
The post How to Fix the Error While Starting a New VPS? first appeared on Web Hosting Stuff.
]]>The post How to Move Users Between Resellers via DirectAdmin? first appeared on Web Hosting Stuff.
]]>Moving users between resellers in DirectAdmin is a straightforward process that can be done through the admin interface. Here’s how:
Steps:
- Log in to your DirectAdmin account with administrator privileges.
- Navigate to the Account Manager section.
- Look for the option Move Users between Resellers and click on it.
- You’ll see a list of all user accounts currently under various resellers.
- Select the users you want to transfer by ticking the checkbox next to their names.
- From the dropdown menu, choose the reseller who will receive these users.
- Once you’ve selected everything, click the button MOVE USERS.
Confirmation:
DirectAdmin will display a confirmation message once the transfer is complete. You should also see the updated list reflecting the changes in reseller assignments for the chosen users.
Additional Notes:
- This process only works for the admin user account. Resellers cannot move users between themselves.
- It’s recommended to back up your data before making any significant changes within DirectAdmin.
The post How to Move Users Between Resellers via DirectAdmin? first appeared on Web Hosting Stuff.
]]>The post How to Reboot a VPS/Dedicated Server via WHM? first appeared on Web Hosting Stuff.
]]>There are various other reasons you need to reboot the server, for example, for software installation or configuration purposes. Still, we suggest you only restart your server when necessary, as frequent rebooting can lead to other complications.
Steps to reboot the VPS/Dedicated Server
- You have to log in to your WHM panel’s root account.
- Find and select the System Reboot option from the navigation menu.
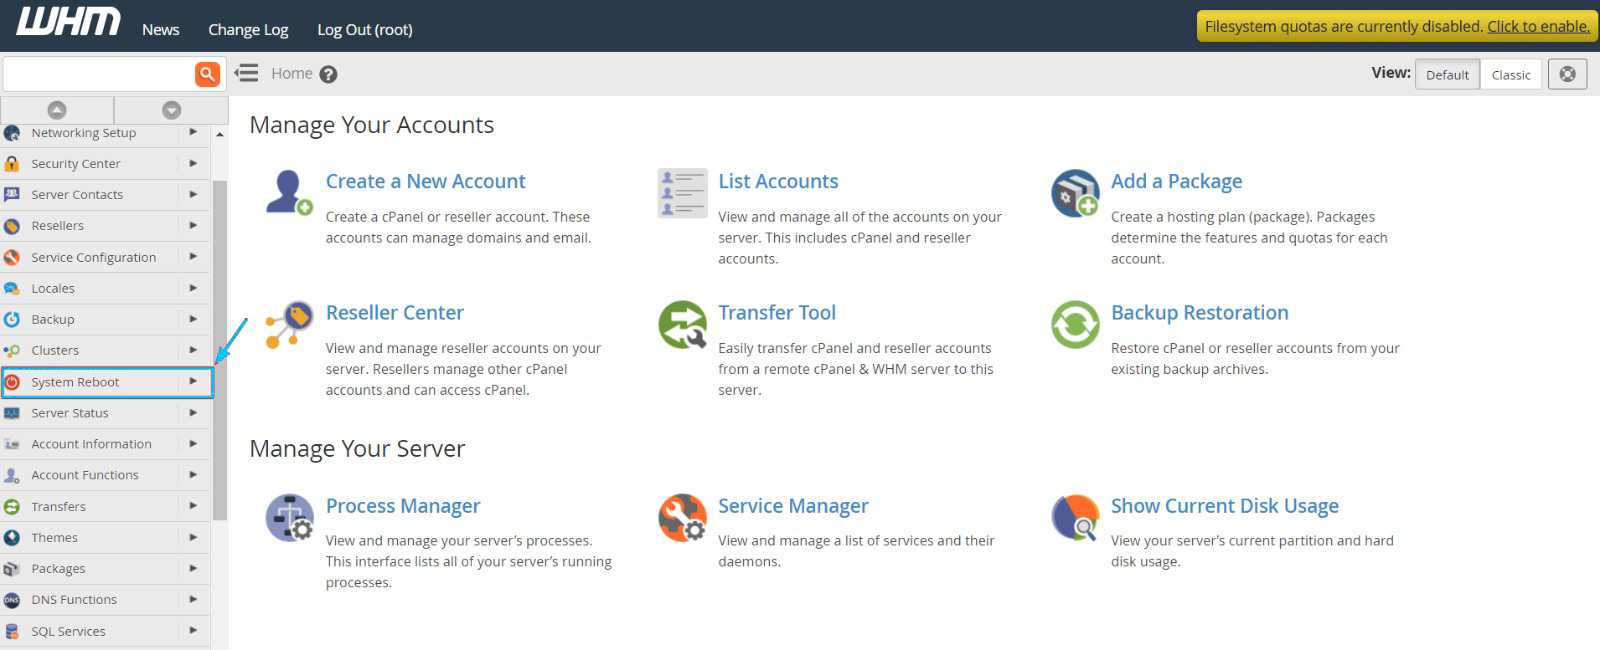
There are two choices that you can start with, Graceful Server Reboot and Forceful Server Reboot. In severe emergencies like a hacker attack, you should select the running applications. However, there is a risk of corruption of application files because of forceful termination.
Or, you can opt for choosing the Graceful Server Reboot as it will help running processes to end before closing. Although the process may take a long time, it’s the safer option of the two:
3. Select the two options as per the requirements:
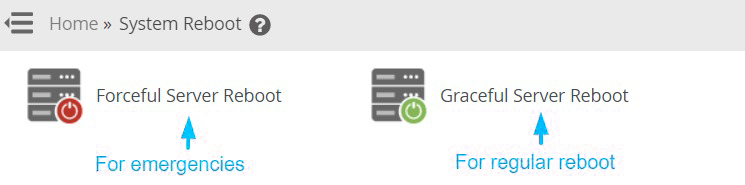
4. Click on the Proceed button.

The post How to Reboot a VPS/Dedicated Server via WHM? first appeared on Web Hosting Stuff.
]]>