The post How to Delete Certificate Signing Request (CSR) in Webuzo? first appeared on Web Hosting Stuff.
]]>Here’s a step-by-step guide on how to delete a CSR in Webuzo:
- Log in to your Webuzo account.
- Navigate to the SSL section.
- Click on the “Security” section in the Webuzo dashboard.
- Select “SSL Certificates.”
- Locate the CSR to delete.
- In the “Certificate Signing Request” subsection, you’ll see a list of all generated CSRs.
- Identify the specific CSR you want to remove.
- Delete the CSR.
- Click on the “X” icon under the “OPTION” column for the desired CSR.
- A confirmation window will appear.
- Click “Yes” to confirm the deletion.
Read: Delete an FTP User Account in Webuzo: A Quick and Easy Tutorial
Important Notes:
- Backups: Before deleting any CSR, it’s highly recommended to back up your current SSL configurations and any important data to prevent data loss.
- Repercussions: Deleting a CSR might impact the security of your website if it’s associated with an active SSL certificate. Ensure you have a replacement plan before proceeding.
By following these steps, you can effectively delete a CSR in Webuzo and manage your SSL certificates efficiently.
The post How to Delete Certificate Signing Request (CSR) in Webuzo? first appeared on Web Hosting Stuff.
]]>The post Delete an FTP User Account in Webuzo: A Quick and Easy Tutorial first appeared on Web Hosting Stuff.
]]>Delete an FTP User Account in Webuzo
You have to log in to your Webuzo user account.
Next, click on FTP and click on Manager FTP.

You’ll get a list of existing FTP accounts in the form of a table.
Now, you can click on the icon key displayed in the options column of the FTP accounts to delete it.

You will get a warning window asking for confirmation and the option to delete the home directory.

Tick or untick the box indicating Select the checkbox to delete the FTP home directory.
Click on Yes.
The post Delete an FTP User Account in Webuzo: A Quick and Easy Tutorial first appeared on Web Hosting Stuff.
]]>The post How to Add and Delete MX Records in Webuzo? first appeared on Web Hosting Stuff.
]]>Adding an MX Record:
Login to your Webuzo user account.
Navigate to the Email section and click on MX Entry. This will display a list of existing MX records for your domain.

Click the Add Record button. This will open a window for adding a new MX record.

In the Domain field, select the domain for which you want to create the MX record.
Enter the Priority for the MX record. Priority determines the order in which mail servers are attempted during email delivery. Lower numbers indicate higher priority.
In the Destination field, specify the hostname or domain name of the mail server that will receive emails for your domain.
Enter the details in the specified fields and click on Add Record.

You will see the success message as the record is added to the list.

Click Ok to move on.
Here are some additional points to consider:
- You can add multiple MX records with different priorities to ensure redundancy in email delivery.
- The MX record information, including priority and destination, is usually provided by your email service provider.
Deleting an MX Record:
Follow steps 1 and 2 from the Adding an MX Record section above to access the list of MX entries.
Locate the MX record you want to delete and click on the corresponding trash icon.

A confirmation window will pop up. Click Yes to confirm the deletion.

The post How to Add and Delete MX Records in Webuzo? first appeared on Web Hosting Stuff.
]]>The post Steps to Install ClamAV on Webuzo first appeared on Web Hosting Stuff.
]]>Clam AntiVirus is nothing but a free software, cross–platform antimalware toolkit that helps to find various malware including viruses.
Install ClamAV
You can install ClamAV from the apps page. To go to the apps page, click on Installing an App under Apps in the admin panel.
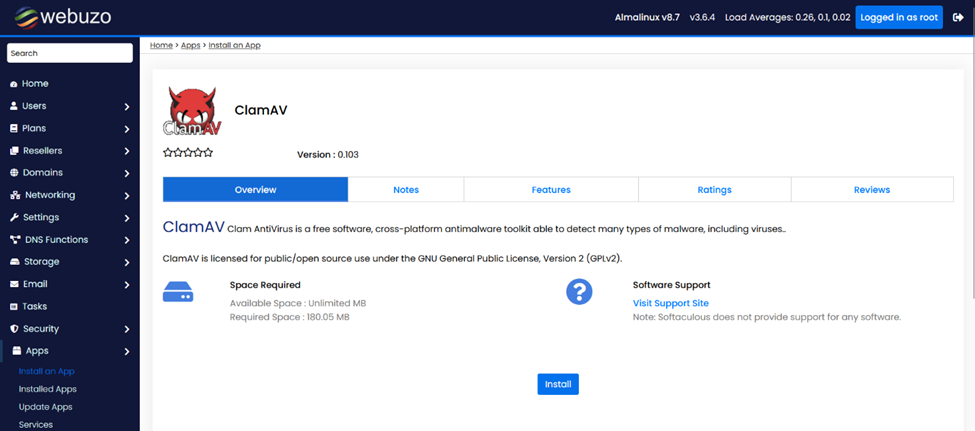
Admin Panel Screenshot
After installing the ClamAV, you’ll be redirected to the admin panel of ClamAV.
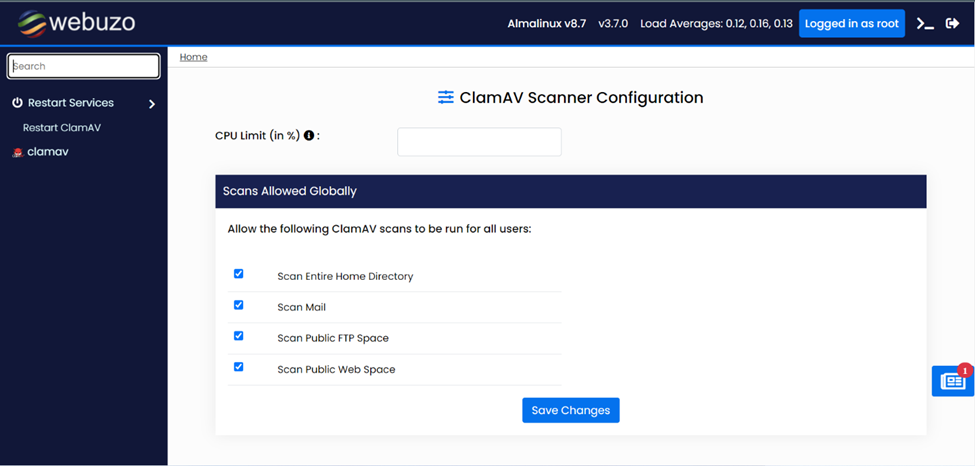
Over there, you’ll see the options like;
Scan the Entire Home Directory
Scan Mail
Scan Public FTP Space
Scan Public Web Space
You have to click on the Save Changes button.
Enduser Panel Screenshot
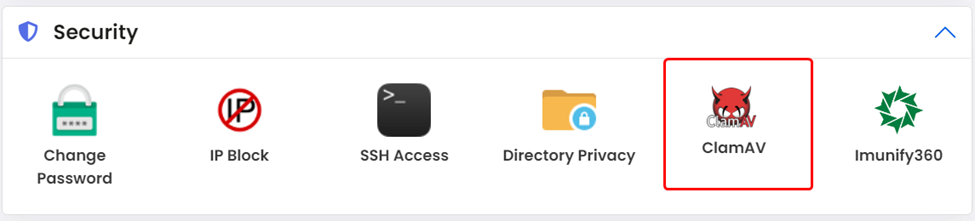
Next, is the security section in which you’ll get various alternatives those are:
Change Password
IP Block
SSH Access
Directory Privacy
ClamAV
Imnunify360
From the above options, you have to click on the ClamAV option.
Next,
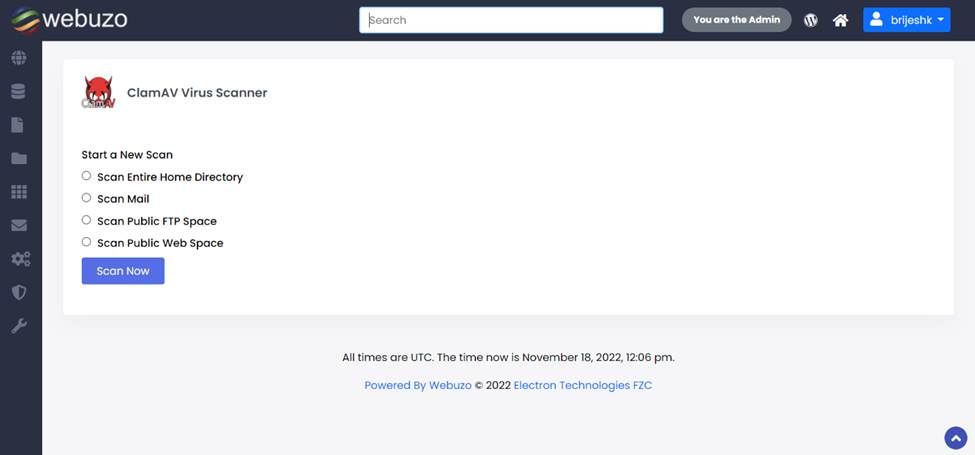
Scan Entire Home Directory — Scans your server’s home directory.
Scan Mail — Scans all of your server’s mail folders.
Scan Public FTP Space — Scans all folders that FTP users can access.
Scan Public Web Space — Scans all folders that web visitors can access.
From the above-mentioned options, you’ve to click on all options and start the scanning.
ClamAV cron job
After configuring ClamAV, it’s suggested to schedule a root cron job to access the daily routine during off–peak hours. The following example shows a command that scans the server’s accounts.
find /home/ -mindepth 1 -maxdepth 1 -type d! -user root -exec /usr/bin/clamscan -i -r {} \; > /root/scan_results.txt
You are allowed to set up the CPU limit to a specific percentage for clamscan process.
Note: It is compulsory to have a limit installed in your OS.
To install CPUlimit, run the below command:
For Ubuntu:
apt-get install CPUlimit
For Centos/Almalinux:
yum install cpulimit
Note: It needs CPU resources for scanning. If you decrease the CPU limit then it will consume more time to complete the scanning.
Once CPUlimit is installed then you are allowed to set the cronjob for clamscan with CPUlimit. For example, the below set command of the CPUlimit > Clamscan process is up to 80%
cpulimit -l 80 -e clamscan & id=$!; find /home/ -mindepth 1 -maxdepth 1 -type d ! -user root -exec /usr/bin/clamscan -i -r {} \; > /root/scan_results.txt; kill $id
The post Steps to Install ClamAV on Webuzo first appeared on Web Hosting Stuff.
]]>The post How to Install CXS on the Webuzo Control Panel first appeared on Web Hosting Stuff.
]]>This article will help you to learn the steps of installing Config Exploit Scanner (CXS) which safeguards your server from malware and compromise.
What is CXS?
The ConfigServer eXploit Scanner (cxs) is a server malware, exploit, and anti-virus scanner that can protect cPanel and DirectAdmin servers from security threats. It performs active scanning of files as they are uploaded to the server, and it can also scan for outdated scripts and plugins that may be vulnerable to attacks.
cxs is a commercial product that is available from ConfigServer. It is licensed on a per-server basis, and there are no monthly fees. cxs is easy to install and use, and it can be configured to scan for a wide variety of malware, exploits, and viruses. If you are looking for a way to protect your cPanel or DirectAdmin server from security threats, then CXS is a good option to consider.
Here are some of the benefits of using CXS:
Protects your server from malware, exploits, and viruses.
Scan files as they are uploaded to the server.
Scan for outdated scripts and plugins.
Easy to install and use.
No monthly fees.
Here are some of the features of CXS:
Real-time scanning of uploaded files.
Scanning of existing files.
Scheduled scanning.
Email notifications for potential threats.
Quarantine of infected files.
Requirements
You need a valid CXS license for the app to run.
Click on Install App
You need to login to your Webuzo admin panel > go to Install an App page. Now, you must look for CXS in the right menu > CXS install page.
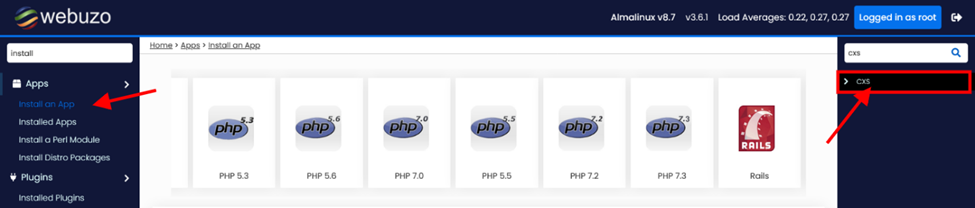
Install CXS
After clicking on the CXS Install page, hit the tab on the install button to start the installation process.
Within a second, when CXS is installed you’ll see the success message as shown in the screenshot below.
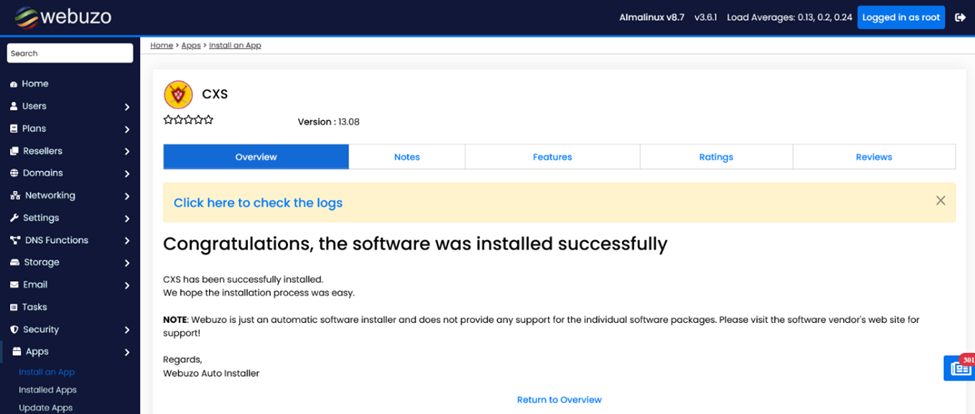
Access CXS Panel
Once CXS is installed you can operate the CXS panel by searching it from the left menu as shown in the screenshot.
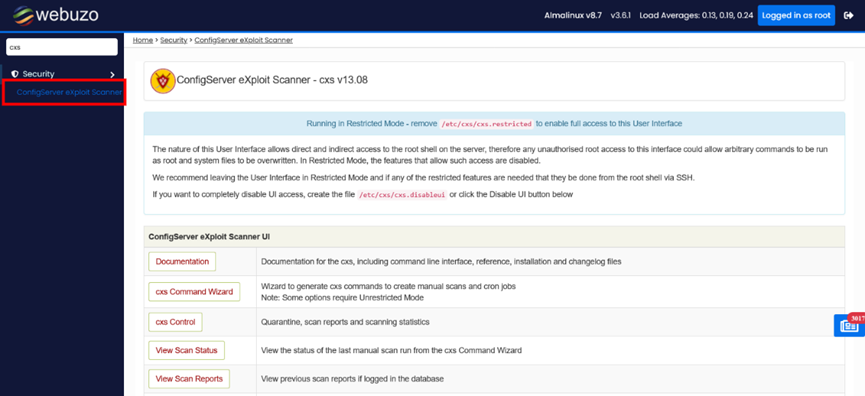
The post How to Install CXS on the Webuzo Control Panel first appeared on Web Hosting Stuff.
]]>The post Steps to Convert WHMCS cPanel Hosting Account to Webuzo first appeared on Web Hosting Stuff.
]]>This tutorial will help you to convert your WHMCS hosting accounts from cPanel to Webuzo once you’ve done with the cPanel server to Webuzo server after running the cPanel to Webuzo in – place converter.
After conversion, the new UI will be displaced in WHMCS. Hence, this WHMCS converter works by converting one cPanel server’s hosting accounts at a time. Further, you’ll get a choice to select a new product / service plan in WHMCS or create new ones as Webuzo and convert.
Note: Take a backup of the WHMCS Database before converting and disallow the WHMCS to create a new hosting account on the server being converted.
Download
Download the cPanel to Webuzo WHMCS Converter from here
Develop a directory cpanel_converter in your /path/to/whmcs/ Directory.
Next is to unzip the downloaded zip in the cpanel_converter directory that is created.
Take care of uploading and look after folder existence:
/path/to/whmcs/cpanel_converter
Run Converter
To access the converter, you need to access http(s)://ip-or-hostname/cpanel_converter
Note: At this moment, you should stop entertaining new orders and creating a backup of the WHMCS database.
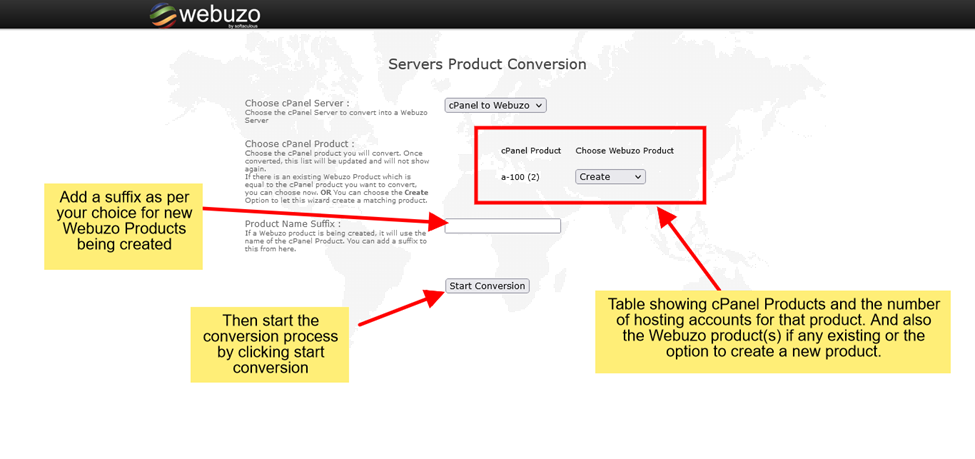
You can allow a converter to create the product. When this utility creates the Webuzo Product it will copy the cPanel product data along with its pricing. Similar cPanel configurable options will be used so that users can manage the same.
Whenever you run the converter, you’ll get the list of cPanel WHMCS servers. You need to select the server to which you wish to convert the hosting account.
The converter can’t modify the cPanel products or server instead of it will modify the web hosting accounts of the cPanel server. Let’s start, you will see the cPanel servers listed. After selecting the cPanel server to convert, click on load data. Now, you will be showcasing the list of cPanel servers. You only need to select cPanel server to convert
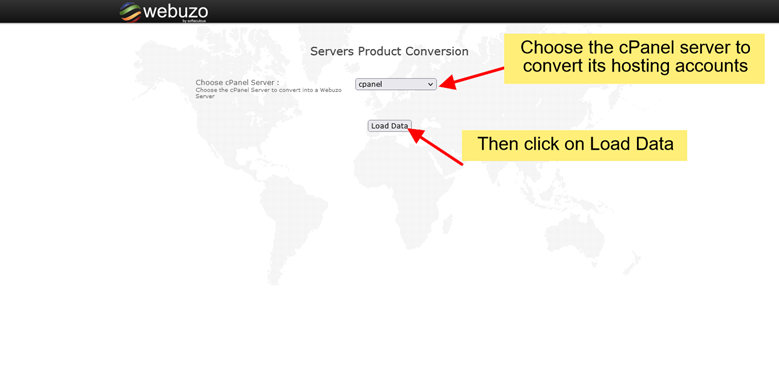
You will get three options to convert:
- Do nothing i.e. the hosting accounts of that specific product will not be updated.
- Select the existing Webuzo product that was created before
- Allow this converter to create the Webuzo product for the cPanel product you’re importing.
You can select any option and start with the conversion.
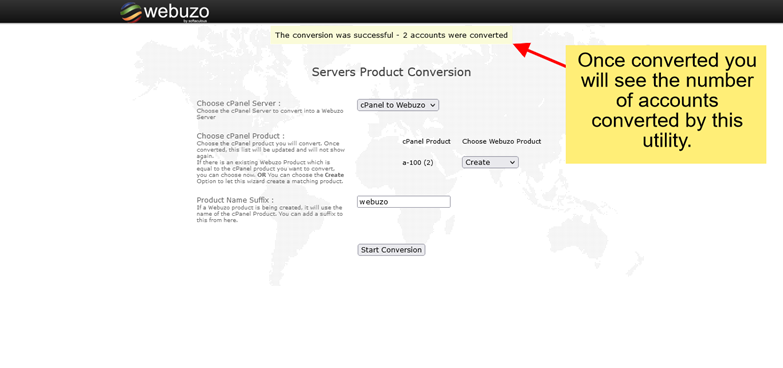
Once the conversion of the account is done then those accounts will be displayed.
Update cPanel server to Webuzo
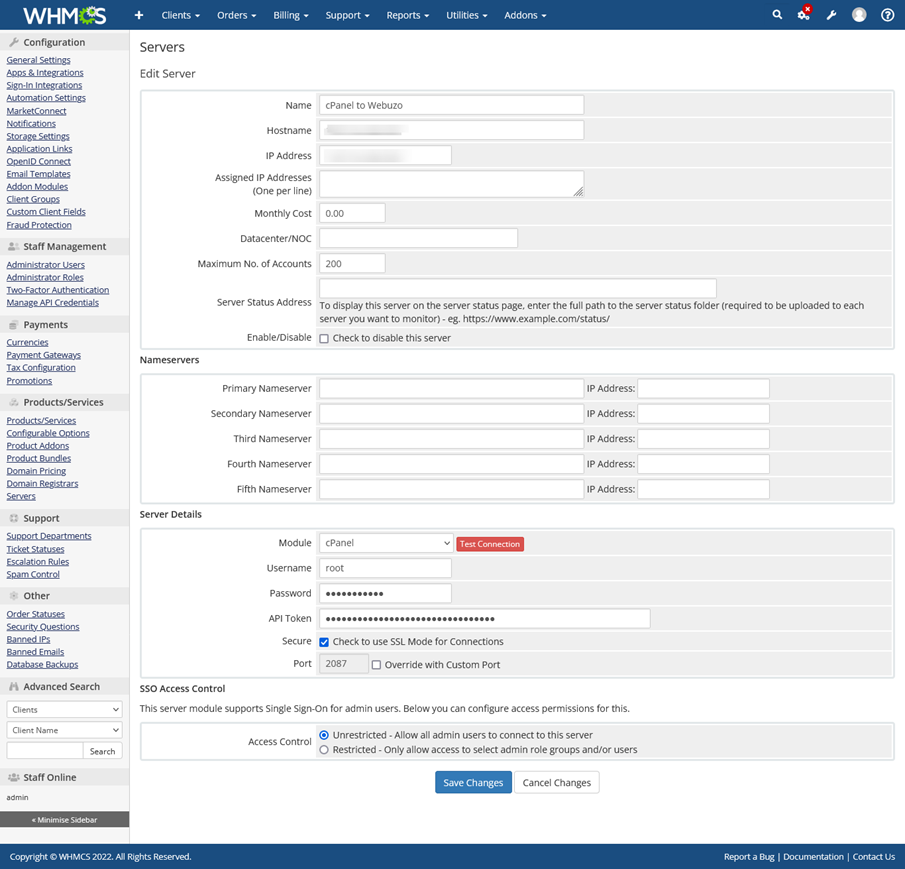
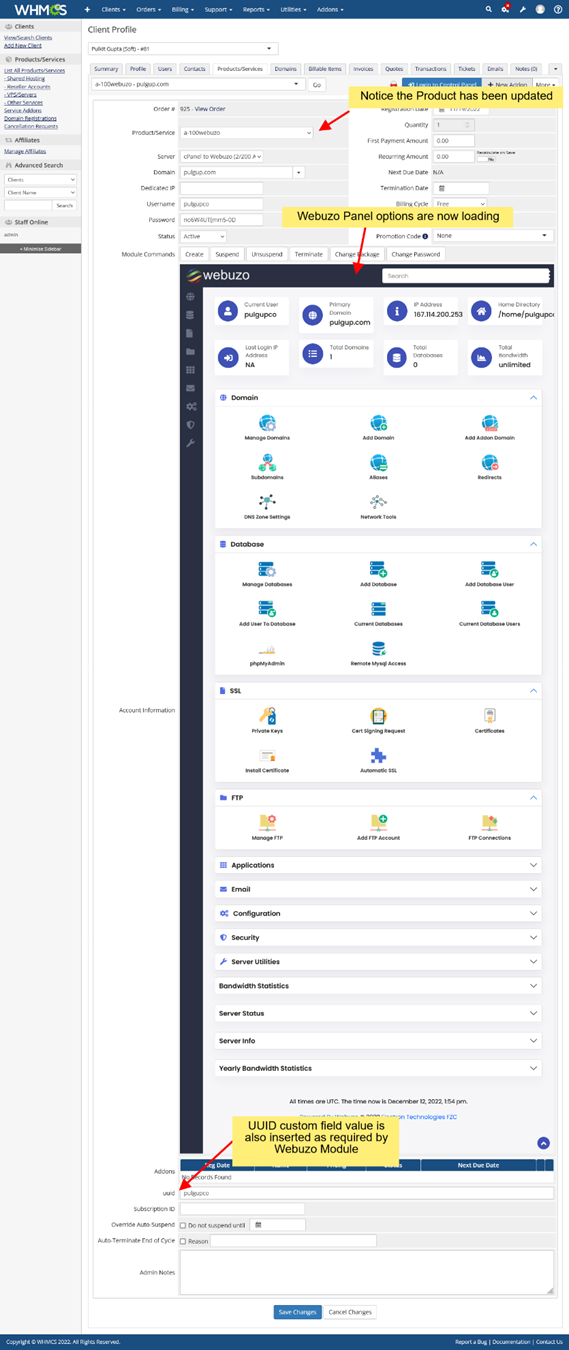
Update the cPanel server in WHMCS to use the Webuzo module. Shown image below is the real image of the cPanel server in Webuzo’s WHMCS installation.
It is necessary to update the above server to the following as per Webuzo module settings:
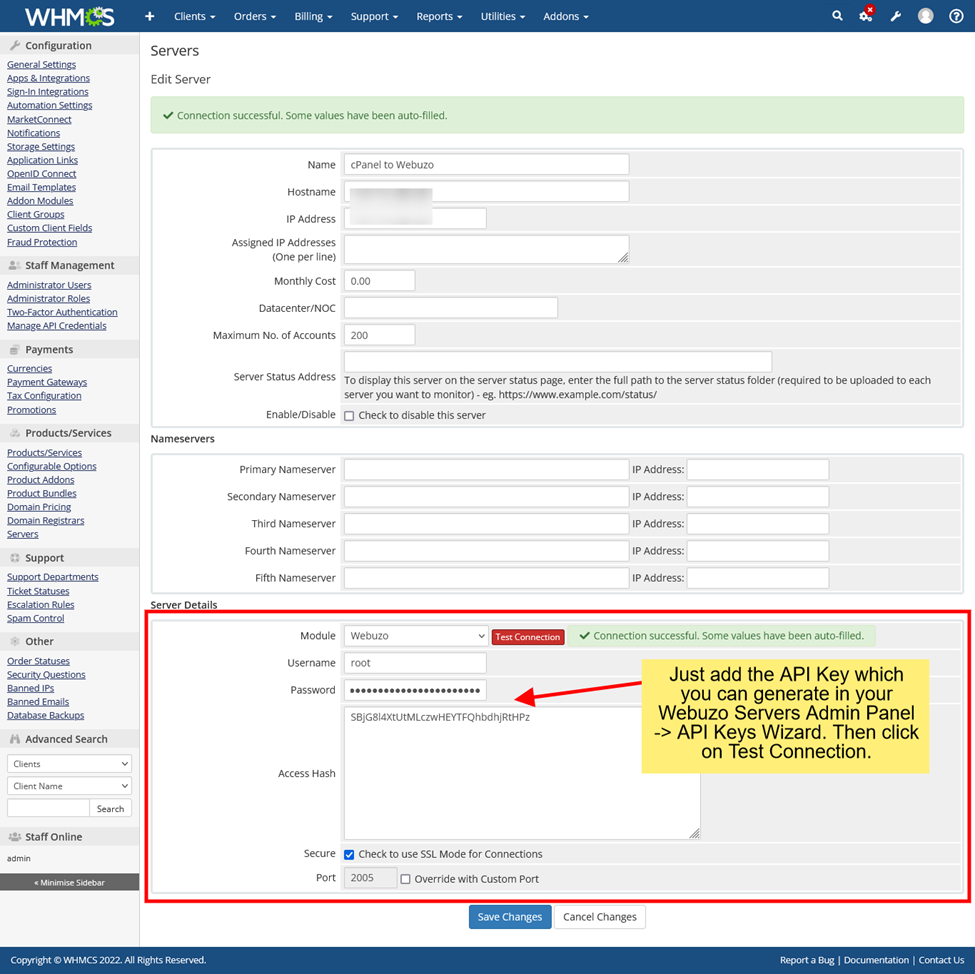
Once the test of connection is done save the server and all your hosting accounts converted should able to load the Webuzo Enduser Panel in WHMCS.
Verify
Verify data that has been imported and start with a new cPanel i.e. Webuzo.
Support
Webuzo support team will help you to migrate smoothly. You can contact their support team for migrating purposes.
The post Steps to Convert WHMCS cPanel Hosting Account to Webuzo first appeared on Web Hosting Stuff.
]]>The post Steps to buy a license of Webuzo first appeared on Web Hosting Stuff.
]]>Steps to buy a license of Webuzo
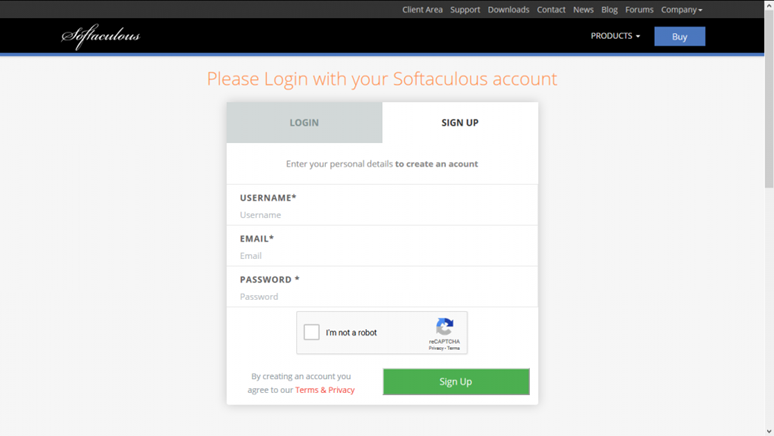
Create an Account
Create an Account and log in: In the beginning, you’ve to create an account at the Softaculous Client Center and login to your account.
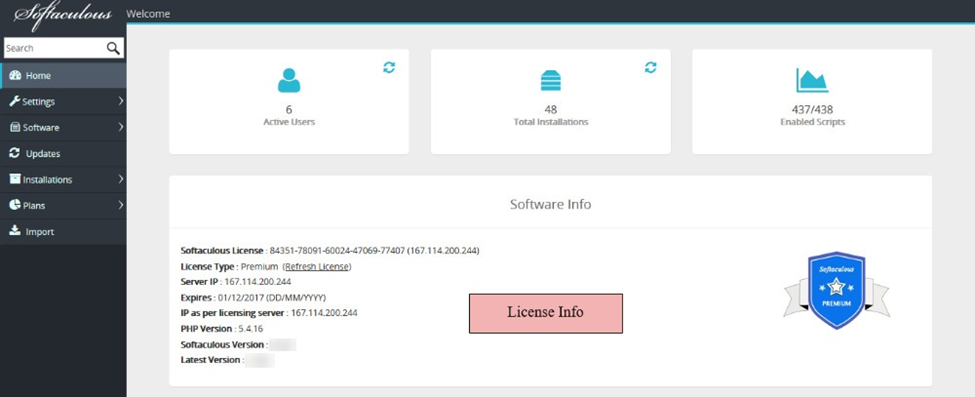
Get the License Key
Login to your control panel as root and click on Webuzo Admin Panel. In the Webuzo admin panel, you can search for the license key for your server.
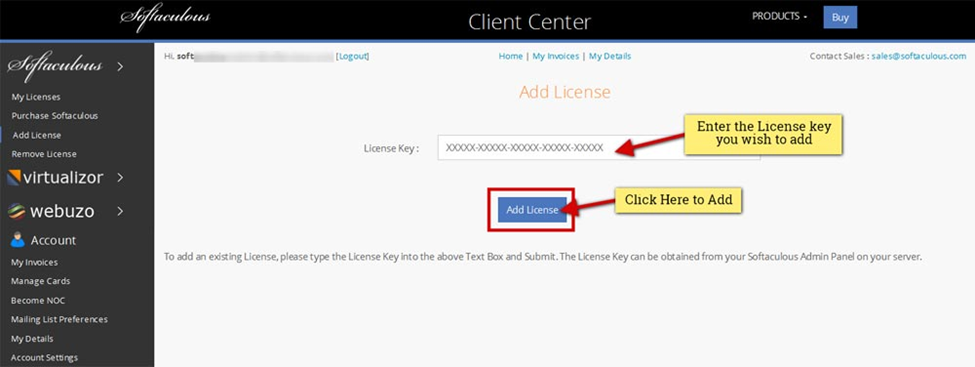
Adding a license
Move ahead to the Client Center: Please go to the Client Area and Login. If you’ve an existing license then search in the Webuzo Admin Panel of your server and fill in the License Key on the Add License page. After adding the license key, it will start showing in the client’s area. A screenshot of the client’s area is given below:
Choose Type of License:
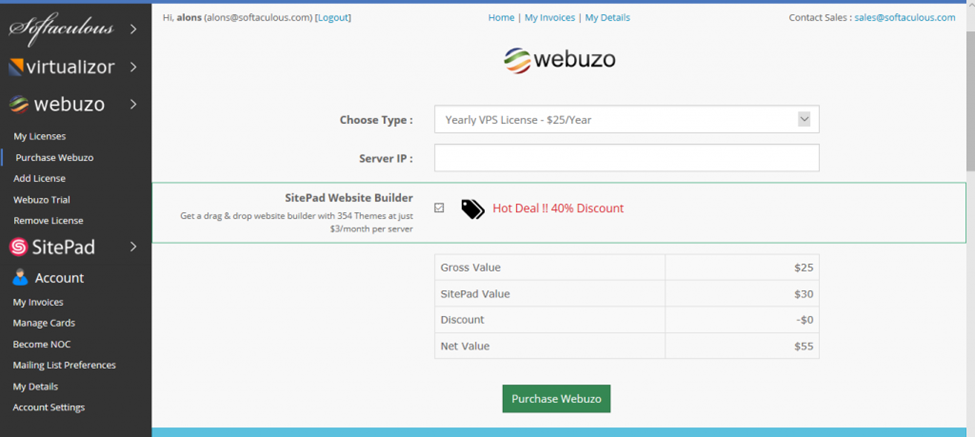
In the menu bar > left click on the purchase Webuzo link. Select the Type of License and fill out the form as per the requirement. In case of renewal of an existing license or making a free license to a premium License then enter the License IP Address of the server where Webuzo is going to be installed. Last click on the Purchase Webuzo button to complete the process.
Pay the Invoice
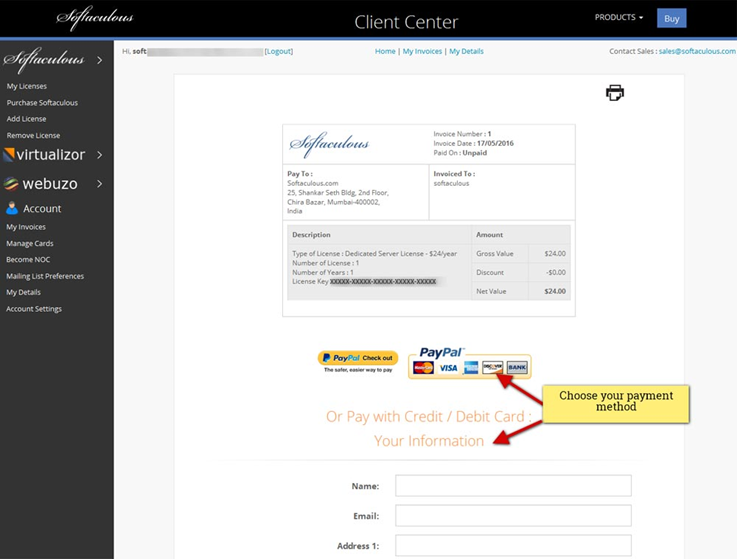
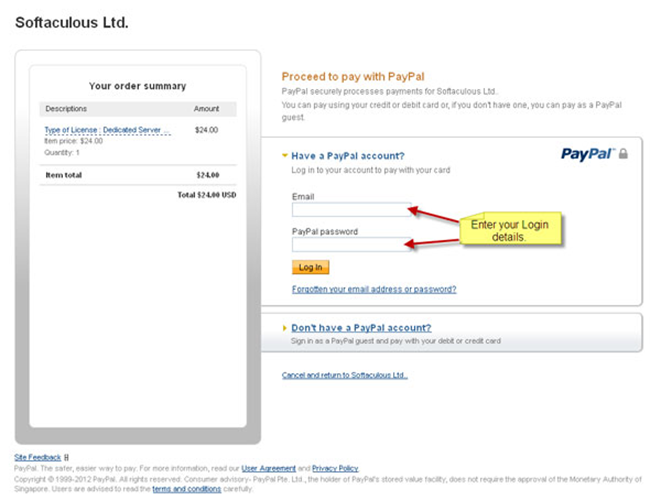
After clicking on the purchase button an Invoice is produced and you’ll redirected to the Invoice. Tap on the PayPal button that reads Check out with PayPal. You will redirect to the Paypal Payment Page which is a secured Gateway to pay.
Payment is done successfully
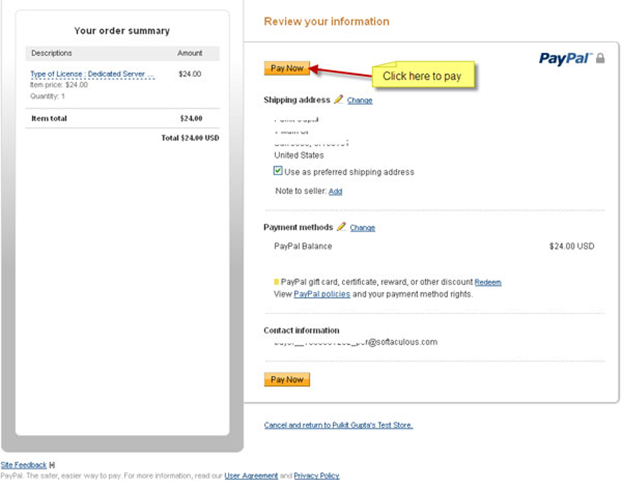
After paying for the invoice PayPal will redirect you to the Softaculous Client Area. It will highlight the payment was made successfully and your License has been activated.
The post Steps to buy a license of Webuzo first appeared on Web Hosting Stuff.
]]>The post How to Import From cPanel to Webuzo first appeared on Web Hosting Stuff.
]]>This article will guide you on importing databases from cPanel to Webuzo.
Procedure:
Move to Webuzo Enduser Panel > Server Utilities > Import From cPanel.
Find below screenshot from cPanel:
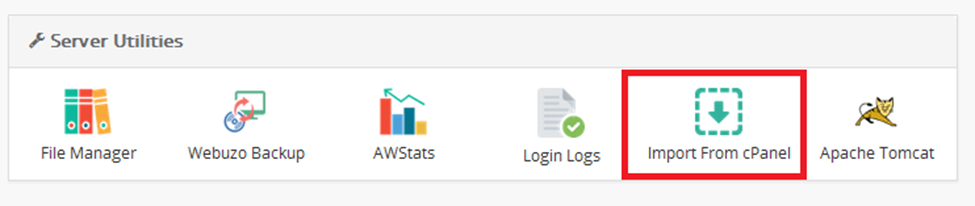
Remote Import
Steps:
- Fill the form with the cPanel server, user, and password details.
- Tab on Submit to Import the cPanel Account.
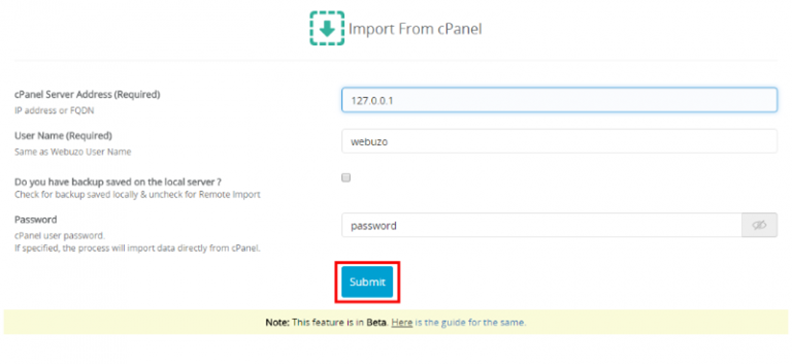
A below-mentioned screen shot indicates Import process has started successfully.

- Once completion is done then you’ll receive the email.
- Import logs can be found at /usr/local/webuzo/includes/cli/cpanel_migration.log
Local Backup File Import
Steps
- Circulate the Form with the cPanel Server, User, and backup file path details.
- Click on Submit to Import the cPanel Account.
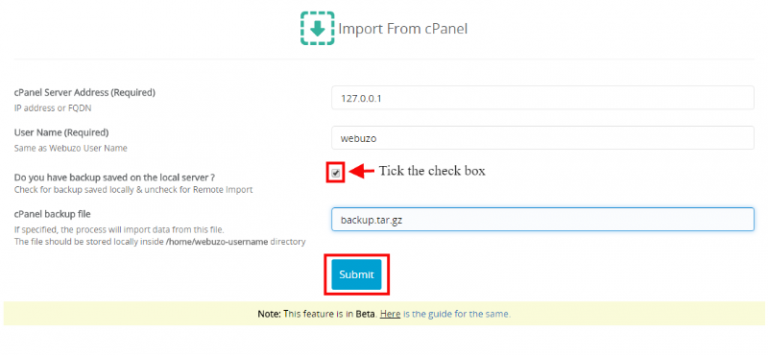
A below-mentioned screenshot indicates Import process has started successfully.
- On completion of the Import process, you will receive an email.
- Import logs can be found at /usr/local/webuzo/includes/cli/cpanel_migration.log
Important tip
Note: This feature is available in the BETA stage as of now.
- You need to install a fresh Webuzo Server and the name of the Webuzo user should be the same as the cPanel Username
- Import utility will overwrite all your Webuzo user data.
- Your backup of cPanel must be stored at /home/webuzo_username/ directory.
Once the import process has taken place then you can withdraw the archive.
Domains, Databases, etc are generalized in the Webuzo account like cPanel.
A random password is given to FTP users imported on the new Webuzo server. It is suggested to change the passwords of the FTP user’s account.
Email notifications of the FTP accounts are also created.
Import logs are generated at /usr/local/webuzo/includes/cli/cpanel_migration.log
Import Email accounts if any are not imported
- Once completion is done then you’ll receive the email.
- Import logs can be found at /usr/local/webuzo/includes/cli/cpanel_migration.log
Required Inputs
- cPanel Server Address: IP address or FQDN of your cPanel account.
- User name – cPanel Username same as Webuzo username.
- Password – cPanel user password
- cPanel backup file – Full cPanel backup file name stored on Webuzo machine e.g. backup.tar.gz
The post How to Import From cPanel to Webuzo first appeared on Web Hosting Stuff.
]]>The post How to Convert cPanel to Webuzo first appeared on Web Hosting Stuff.
]]>This guide will help you to convert your cPanel server to Webuzo. This tool performs many tasks like converting your cPanel server itself uninstalls cPanel, installing Webuzo, and converting all cPanel data to Webuzo. Everything works smoothly and all your users’ websites, domains, databases, emails, FTP accounts, and SSL certificates remain as it is.
Note: Please ensure you’ve fully backed up your VPS / Server. For the safer side, you need to restore the VPS backup as cPanel will be uninstalled from the server.
Commands

The conversion will monitor the requirements and ask for confirmation. It is advised to type yes and press enter to proceed with the conversion.
Later, you can check converter logs at:
/root/webuzo_convert/cpanel-webuzo-convert.log
The required time is 5 minutes to 30 minutes based on the resources available on the server and the network connection speed.
Since this takes time, we suggest implementing the above commands using tmux or session, so if your machine disconnects due to an internet connection issue on your desktop the command still runs in the background.
WHMCS Converter
Webuzo comes with a converter script that helps to convert the WHMCS cPanel hosting accounts to Webuzo. Please refer to the guide.
What Data will be Migrated?
The converter will move the following data:
1) All Domains – Addon, Parked, Sub-domain.
2) MultiPHP preferences per domain
3) All Databases and Database Users
4) FTP Accounts
5) It covers all email-related data like accounts, forwarders, and autoresponders.
6) DNS records
7) SSL Certificates
8) Cron Jobs
9) ACL Packages
10) Users and Resellers with appropriate ownership
11) IP allocation to users and resellers
12) For All plans installed on the cPanel server the same version will be installed on Webuzo.
13) All other data needed for accessing the control panel.
Understand the difference between Converter and Importer?
The converter is responsible for converting the data on the cPanel server itself and doesn’t need a new server. Hence, no IPs are changed. As compared to importer as it does not need to transfer the files across servers. It needs a full backup of the server if in case you need to revert it for restore purposes from the backup.
An importer is required to set up a new server with Webuzo and data is moved from the cPanel server to Webuzo. Further, IPs need to be changed to run the cPanel server compared to cPanel and Webuzo. If you prefer to import the sites instead of in-place converter you can refer to this guide.
The post How to Convert cPanel to Webuzo first appeared on Web Hosting Stuff.
]]>The post How to Install CloudLinux OS with Webuzo Control Panel first appeared on Web Hosting Stuff.
]]>Steps to Install CloudLinux OS
Supported CloudLinux versions: CloudLinux 8.x, CloudLinux 9.x
You need to install CloudLinux OS and the guide to follow the instructions:
https://docs.cloudlinux.com/cloudlinux_installation/
Note: Don’t forget to reboot the OS once CloudLinux is installed.
Step to Install CloudLinux Plugin
After rebooting the CloudLinux OS, the next is to install the CloudLinux plugin in Webuzo. To get the installed plugin, you have to run the following command.
wget -N https://files.webuzo.com/plugins/cloudlinux/cloudlinux.sh
chmod +x cloudlinux.sh
./cloudlinux.sh
Install the CloudLinux plugin in Webuzo and allow users and admins to check the CloudLinux utilities.
Note: To eliminate the error showing “reboot the server in the correct kernel in Webuzo Tasks, then opt for right kernel for CloudLinux OS with ‘Ive’ in the name.
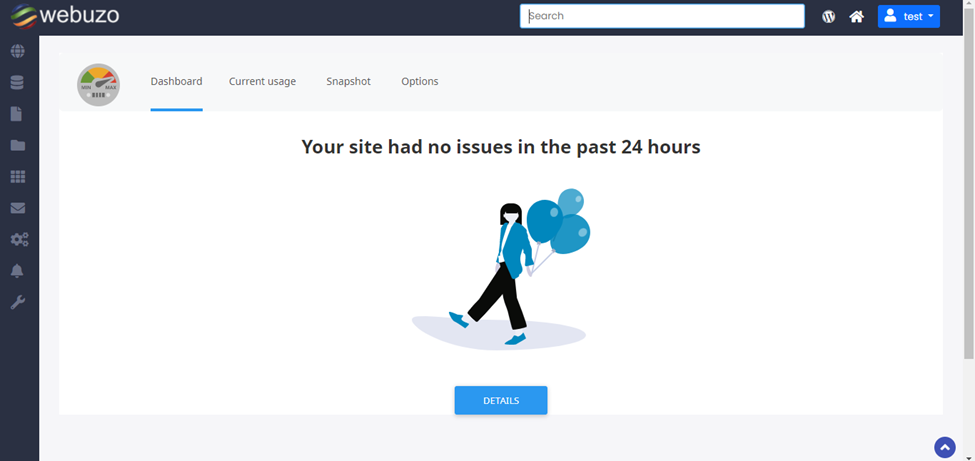
Admin Panel Screenshot
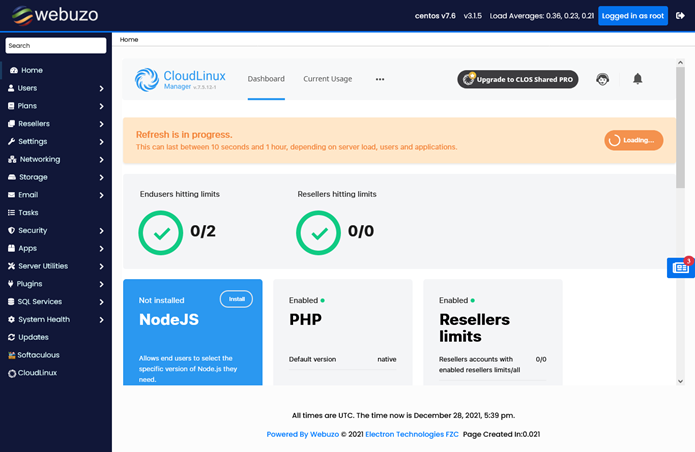
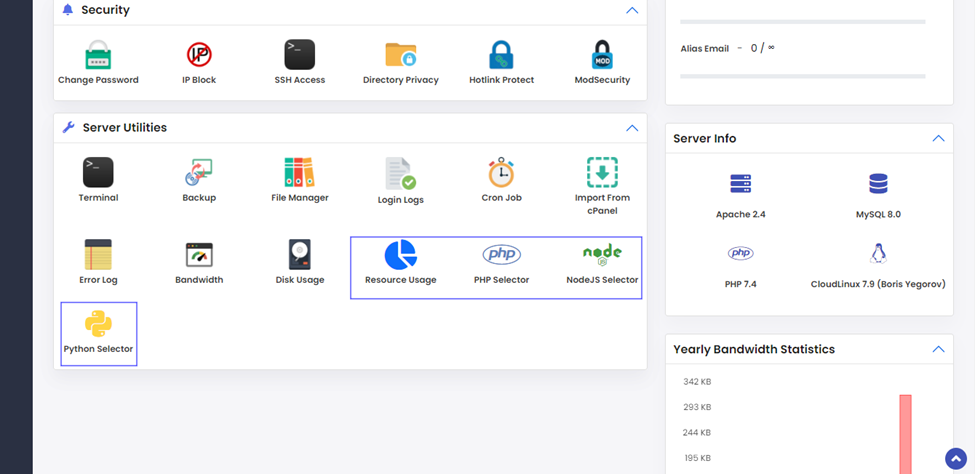
Enduser Panel Screenshot
The post How to Install CloudLinux OS with Webuzo Control Panel first appeared on Web Hosting Stuff.
]]>