The post How to install SOGo on Ubuntu first appeared on Web Hosting Stuff.
]]>We’ll see how to install this fantastic suite in an Ubuntu 12.04Lts Server Edition. Please follow the instruction.

* If you’re using Ubuntu Trusty Tahr (14.04)
Step 1 : From terminal prompt:
/etc/apt/sources.list
Step 2 : Add the following line to your apt source list
deb http://inverse.ca/ubuntu trusty trusty
Step 3 : When you prefer using the nightly builds, then simply use the following line:
deb http://inverse.ca/ubuntu-nightly trusty trusty
* If you’re using Ubuntu Precise Pangolin (12.04)
Step 1 : From terminal prompt:
/etc/apt/sources.list
Step 2 : Add the following line to your apt source list
deb http://inverse.ca/ubuntu precise precise
Step 3 : When you prefer using the nightly builds, then simply use the following line:
deb http://inverse.ca/ubuntu-nightly precise precise
* If you’re using Ubuntu Lucid Lynx (10.04)
Step 1 : From terminal prompt:
/etc/apt/sources.list
Step 2 : Add the following line to your apt source list
deb http://inverse.ca/ubuntu lucid main
Step 3 : When you prefer using the nightly builds, then simply use the following line:
deb http://inverse.ca/ubuntu-nightly lucid main
For SOGo v3, simply add the “-v3” suffix to the http source path.
Signed builds
Since 2011-05-17
To verify their signature, our GPG public key has to be added into apt keyring.
Run the following commands:
sudo apt-key adv –keyserver keys.gnupg.net –recv-key 0x810273C4
Then, update your lists of available software packages
sudo apt-get update
sudo apt-get upgrade
sudo apt-get install sogo
From that point, apt-get should not complain about package signatures anymore.
That’s!!
The post How to install SOGo on Ubuntu first appeared on Web Hosting Stuff.
]]>The post How to install Nvidia drivers in Ubuntu first appeared on Web Hosting Stuff.
]]>
If you are using an older version of Ubuntu, or if you aren’t notified about additional drivers, you can launch the installation yourself.
Step 1 : Go to Software & Updates -> Additional Drivers
Then you’ll see that Nvidia drivers are not in use.
Step 2 : To Check or tick the box underneath Enabled to enable the drivers.
Step 3 : Click Enable Driver.
Step 4 : Wait for the installer file to download.
Step 5 : Open the downloaded file.
Step 6 : Right click on downloaded file and mark it as execute.
Step 7 : The drivers can only be installed in command mode, under sudo and the graphics daemon must not be running.
Step 8 : Switch to command mode tty CTRL+ALT+F1, then run following command to stop the display manager.
sudo service lightdm stop
Step 9 : If you see a blank screen, that means the mode resolution conflicts with improper video driver. Fix that by running this..
sudo sed -i -e ‘s/#GRUB_TERMINAL/GRUB_TERMINAL/g’ /etc/default/grub
sudo update-grub
Step 10 : Run your nvidia installer by using following command.
sudo ./NVIDIA_750TI_350.linux64.run
Thats it,
You’ll then see that the drivers are enabled and will be available for use upon a reboot.
The post How to install Nvidia drivers in Ubuntu first appeared on Web Hosting Stuff.
]]>The post How to Install Memcached on Ubuntu 12.04 LTS first appeared on Web Hosting Stuff.
]]>
Memcached is a system that works to speed up virtual private servers by caching server information. It is a high-performance distributed memory object caching that caches objects for faster website performance. The program functions somewhat like short term memory for your applications. Memcached runs on Unix, Linux, Mac OS X, Ubuntu, PHP and Windows. Installation of memcached on Ubuntu 12.04 is very simple. You can see how to install Memcache on Ubuntu 12.04.
Step 1 : To make sure that all of the packages we download to the VPS are up to date. Use the following command.
sudo apt-get update
Step 2 : You should have MySQL and PHP installed on the virtual server.
sudo apt-get install mysql-server php5-mysql php5 php5-memcache
To Install Memcache on Ubuntu 12.04
Step 1 : To install memcached via apt-get by using following command.
sudo apt-get install memcached
Step 2 : To install php-pear, the repository that stores memcache by using following command.
sudo apt-get install php-pear
Step 3 : To use PECL (PHP Extension Community Library) to install memcached by using following command.
sudo pecl install memcache
Step 4 : Click to Enable memcache session handler support? [yes].
You have completed the installation of memcache with PECL on the VPS
Add memcached to memcache.ini by using following command.
echo “extension=memcache.so” | sudo tee /etc/php5/conf.d/memcache.ini
You can start to using Memcache.
The post How to Install Memcached on Ubuntu 12.04 LTS first appeared on Web Hosting Stuff.
]]>The post How to Configuring Self-Signed SSL / HTTPS Access first appeared on Web Hosting Stuff.
]]>1) To install OpenSSL on your VPS:
apt-get -y install openssl
2) To generate a self-signed certificate that ZPanel will use to secure your connection by using following commands:
openssl req -x509 -nodes -days 365 -newkey rsa:2048 -out /etc/pki/tls/certs/zpanel.crt -keyout /etc/pki/tls/certs/zpanel.key
3) To be configured to use the new certificate by using following commands:
nano /etc/httpd/conf.d/ssl.conf
4) Now, Find the SSLCertificateFile and SSLCertificateKeyFile entries and change them to :
SSLCertificateFile /etc/pki/tls/certs/zpanel.crt
SSLCertificateKeyFile /etc/pki/tls/certs/zpanel.key
5) Save changes and Exit from the file.
We need to redirect all HTTP based ZPanel login attempts to the secure HTTPS URL.
1) Login to ZPanel
2) Navigate the menu system as follows:
Zpanel -> Admin -> Module Admin -> Apache Admin
3) In Global Zpanel section, insert the following:
Redirect Permanent / https://[VPS FQDN]/
4) Now restart the Apache server on your VPS.
service apache2 restart
.
.
.
.
.
.
The installation is now complete!
You can now access your Ubuntu ZPanel installation via secure SSL (HTTPS) connections!
The post How to Configuring Self-Signed SSL / HTTPS Access first appeared on Web Hosting Stuff.
]]>The post How to install ZPanel on Ubuntu first appeared on Web Hosting Stuff.
]]>
ZPanel is a free to download and use Web hosting control panel. It is written to work effortlessly with Microsoft Windows and POSIX (Linux, UNIX and MacOSX) based servers or computers. This solution can turn a home or professional server into a fully fledged, easy to use and manage web hosting server.
As of writing the currently release of ZPanel is 10.1.0. You can go to the ZPanel download page to find the latest version.
To Install ZPanel on Ubuntu
1) Log into the VPS as root.
2) To the update and upgrade by entering the following commands:
apt-get update -y && apt-get upgrade -y
3) Obtain the ZPanel installer:
wget http://www.zvps.co.uk/sites/default/files/downloads/ubuntu-12-04/package/installer-x86_64-install.sh.x.tar.gz
4) Extract the .tar.gz installer by using following commands:
tar -xf installer-x86_64-install.sh.x.tar.gz
5) Run the installer by using following commands:
./installer-x86_64-install.sh.x
6) Follow the on screen prompts to complete the install.
.
.
.
.
.
Your ZPanel Installation Complete !
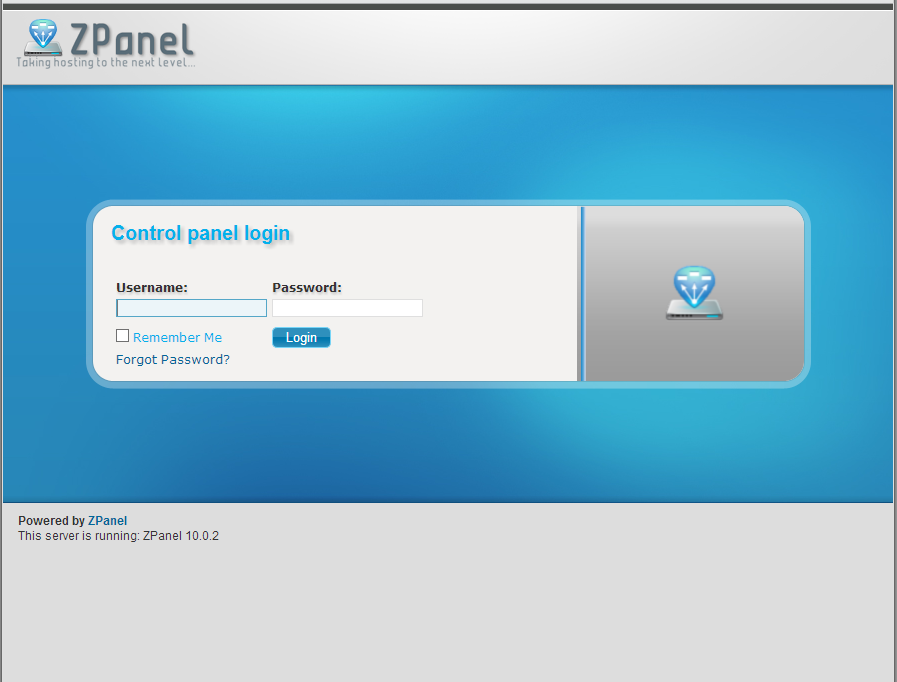
Then,
1) After installation, reboot your VPS.
2) Go to the VPS’s IP address in your web browser you can access ZPanel.
3) The default admin login is zadmin, the password is located inside the
/root/passwords.txt file.
4) You can get the password by logging into SSH and issuing :
cat /root/passwords.txt
The post How to install ZPanel on Ubuntu first appeared on Web Hosting Stuff.
]]>The post How to Configuring & Customising Ajenti on Ubuntu first appeared on Web Hosting Stuff.
]]>1) To change the root user’s password to the “Configure” menu.
2) Click “Change password” on root account
3) Write a new password.
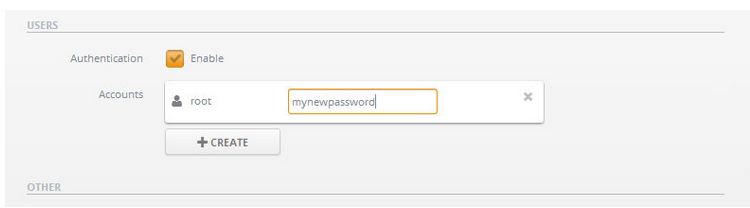
4) You can also create a new user, Select features you would like to grant the user access.
5) Click “Create” button.
6) Set the name by clicking “unnamed“
7) Writing the new name.

8) Click the icon on the left from the name to set the permissions.
9) Click “Save” on the top of the page.
Note : If you altered any other settings, also remember to apply the changes by restarting the control panel.
Customising Ajenti
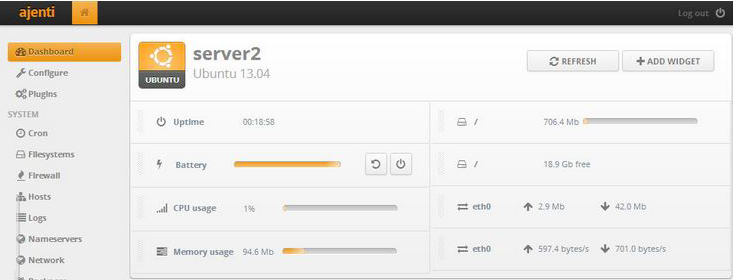
You can remove widgets by grabbing from the dotted area and dragging them down.
Step 1 : Add new widgets by clicking “Add widget”
Step 2 : Drag them to the position you would like them to be
The post How to Configuring & Customising Ajenti on Ubuntu first appeared on Web Hosting Stuff.
]]>The post How to Install Ajenti on Ubuntu first appeared on Web Hosting Stuff.
]]>
Ajenti is a simple, lightweight, free and open source tool with a web-based administration control panel. It allowing to manage ubuntu servers and this is similar to Webmin. Ajenti is provides fast and responsive web interface for managing small server set-ups and also best suitable for VPS and Dedicated servers. It has built with many pre-made plugins for configuring and monitoring server software’s and services such as Apache, Cron, File System, Firewall, MySQL, Nginx, Munin, Samba, FTP, Squid and many other tools like File Manager, Code Editor for developers and Terminal access.
Connecting To Your VPS
1) Establish a SSH connection to your virtual server and authenticate as root by using follownig commands
ssh root@your-ip
2) Download the latest package files by using following commands :
apt-get update
Importing the repository key
The following command downloads the key and automatically adds it to your system.
wget http://repo.ajenti.org/debian/key -O- | apt-key add –
Adding the APT repository
1) To Add the repository to your sources.list by using the following command
echo “deb http://repo.ajenti.org/ng/debian main main ubuntu” >> /etc/apt/sources.list
2) Navigate to the end of the file and paste the following line
deb http://repo.ajenti.org/debian main main debian
3) Save this changes and Exit.
Installing Ajenti
Step 1 : Update the package sources.
Step 2 : Install ajenti package by using following commands
apt-get update && apt-get install ajenti -y
Step 3 : Start the service by using following commands
service ajenti restart
Step 4 : If you are using UFW firewall open port 8000 to enable access to the control panel by using following command
ufw allow 8000
.
.
.
.
Congratulation’s! You have successfully installed Ajenti.
Or
Quick automatic installation then use following commands
wget -O- https://raw.github.com/ajenti/ajenti/1.x/scripts/install-ubuntu.sh | sudo sh
Related Post “How to Configure Ajenti on Ubuntu“
The post How to Install Ajenti on Ubuntu first appeared on Web Hosting Stuff.
]]>The post Install Easy Hosting Control Panel first appeared on Web Hosting Stuff.
]]>
Easy Hosting Control Panel
EHCP (Easy Hosting Control Panel) is an open source hosting control panel for administrators who want to sell hosting or set up hosting servers. EHCP is compatible with a server running a Debian-based system such as Debian Squeeze, Ubuntu, Linux Mint, etc. Ehcp is a Hosting Control Panel (hcp). hcp is a tool in a server to facilate the process of hosting domains, emails, adding domains, ftp users and so on.
EHCP Features:
EHCP has many unique features compared to other control panels.
General Features:
* Full php, full opensource, easily modifiable, customazible, ehcp templates
* Unlimited “resellers, panel users, domains, ftp users, emails, mysqls”
* Domains, subdomains, ftp, mysql, dns (automatic), email etc. management
* password protected domains,
* Email forwarding, autoreply, catch-all emails
* Web-stats (webalizer)
* web-ftp (net2ftp)
* Easy Install Scripts (scripts easily downloaded and copied by means of server)
* Disk quota control,
* Custom http, custom dns, domain aliases, domain redirect,
* Ssl support
* Different languages, templates support, a few lang/templates included,
* Different Menus/pages for Server Admin, Reseller, domain admin, email user (4 level)
* server backup/restore (files+db)
* domain transfer to another ehcp user
* simple, light, fast, host hundreds of domains in it.
* supports Ubuntu 6-9.10, debian 4,5, all debian based linux’es
* Any server related program may be installed with Ubuntu’s apt-get command
* Almost all programs are always up-to-date when you update your server, with Ubuntu’s: apt-get update ; apt-get upgrade
* Opensource, GPL, free, full php, object oriented, modular, easily modifiable/extendable design..
* More features that I forgot to write..
New with 0.29.12:
* Customizable, templates
* add domain to my ftp
* add ftp with any directory under home
* add ftp with subdomain
* add ftp with subdirectory under domainname
* list related/similar functions in ehcp
* edit dns/apache template for a domain
* domain aliases
* email forwardings
* catch all email
* default domain settable for ehcp gui
* “fix apache configuration” link in options
* “fix email (postfix) configuration” link in options
* apache ssl support
* new default theme: xp5-z7
* more “easy install scripts”, a total of 30 scripts
* disk quota support
* smtp auth support
* more options for ehcp
* bulk add domain feature
* multi server intro: separate mysql server support
* improved installer

How to Install Easy Hosting Control Panel (EHCP) In Ubuntu 14.04 ?
1) Login as root user using ssh and download the EHCP installation script using the following command:
# wget http://www.ehcp.net/ehcp_latest.tgz
2) Extract the downloaded file using tar command:
# tar -zxvf ehcp_latest.tgz
3) Switch to the extracted folder and run the installation script using the following commands:
# cd ehcp
# ./install.sh
Follow installation wizard and read the instructions carefully, the install script will install all required packages including Apache, MySql and Postfix. You will need to provide some information to configure the services and set the admin passwords.
When the installer is finished. you will be provided with the ehcp login page in your Web browser window, if you are on your local machine, otherwise, you need to connect to your new web Server by entering the IP address of you server.
http://hostripples.com/vhosts/ehcp
Your default admin username: admin
Default admin pass: 1234
The post Install Easy Hosting Control Panel first appeared on Web Hosting Stuff.
]]>