The post How to Restart a Server using Plesk? first appeared on Web Hosting Stuff.
]]>Steps to Restart the Server:
- Log in to Plesk as the Administrator:
- Open your web browser.
- Enter your Plesk login URL (usually something like https://your-server-ip:8443 or https://your-domain.com:8443).
- Enter your administrator username and password.
- Navigate to the “Tools & Settings” section:
- Once logged in, look for the main navigation menu on the left-hand side.
- Click on “Tools & Settings”.
- Find the “Server Management” group:
- In the “Tools & Settings” page, locate the group of settings related to server administration. This is usually labeled “Server Management”.
- In the “Tools & Settings” page, locate the group of settings related to server administration. This is usually labeled “Server Management”.
- Click on “Services Management”:
- Within the “Server Management” group, click on “Services Management”.
- Within the “Server Management” group, click on “Services Management”.
- Locate the “Server” service (or similar):
- On the “Services Management” page, you will see a list of various services running on the server.
- Look for a service that represents the entire server or operating system. This might be labeled simply as “Server”, or it could have a more specific name depending on your operating system (e.g., initd, systemd).
- Use the Restart Button:
- Next to the “Server” service (or the appropriate service you identified), you should see a set of control buttons.
- Click the “Restart” button. It might look like a circular arrow or a power icon.
- Confirmation Prompt:
- Plesk will likely display a confirmation prompt asking if you are sure you want to restart the server.Be sure you want to proceed. Restarting the server will interrupt all services and websites hosted on it.
- Click “OK” or “Yes” to confirm the restart.
- Wait for the Server to Restart:
- The server will now begin the restart process. This can take several minutes, depending on your server’s configuration and the number of services running.
- Do not interrupt the process. Close your browser window only after you are sure the server has completely restarted.
- Verify the Restart:
- Once you believe the server has restarted, try accessing your websites or Plesk panel again to confirm that the server is back online and functioning correctly.
Important Considerations:
- Impact on Hosted Services: Restarting the server will cause downtime for all websites, email services, and other applications hosted on it. Plan your restarts carefully to minimize disruption.
- Data Loss Risk: While a normal restart shouldn’t cause data loss, it’s always a good practice to have recent backups of your server data before performing any server-level operations.
- Troubleshooting: If the server doesn’t come back online after a reasonable amount of time, you may need to contact your hosting provider for assistance. They might have physical access to the server and can diagnose any issues.
- Alternative Methods (Command Line): If you have SSH or Remote Desktop access to the server, you can also restart it using command-line commands specific to your operating system (e.g., reboot or shutdown -r now on Linux, shutdown /r /t 0 on Windows Server). However, the Plesk interface provides a graphical way to do this.
If you do not see the “Server Management” or “Services Management” sections, it means your Plesk user account does not have the necessary administrator privileges to restart the entire server.
In this case, you must contact your hosting provider or the Plesk administrator for assistance with server restarts. You might only be able to restart individual services within your subscription.
The post How to Restart a Server using Plesk? first appeared on Web Hosting Stuff.
]]>The post A Beginner’s Journey: Installing Cinnamon on AlmaLinux 9 first appeared on Web Hosting Stuff.
]]>Modern and intuitive interface
Windows-like familiar layout
Excellent system performance
Customization options
While AlmaLinux and Rocky Linux are primarily designed for server environments, adding a desktop environment can make system administration tasks more manageable, especially for those who prefer graphical interfaces over command-line operations.
In this step-by-step guide, we’ll walk you through installing the Cinnamon Desktop environment on your AlmaLinux 9 or Rocky Linux 9 server. Whether you’re a system administrator looking to streamline your workflow or a Linux enthusiast wanting to explore different desktop environments, this tutorial has you covered.
Note: Before proceeding with installation, ensure your system meets the minimum hardware requirements and has a stable internet connection.
What is a Cinnamon Desktop?
Cinnamon is a free and open-source desktop environment primarily for Linux operating systems, designed to provide a traditional and user-friendly experience. Originating from the Linux Mint project, it was developed in response to changes in GNOME 3 that moved away from the classic desktop metaphor. Cinnamon aims to recreate the familiar layout of GNOME 2, featuring a traditional start menu, taskbar, and system tray, while incorporating modern desktop features and customization options. This makes it a popular choice for users who prefer a straightforward and intuitive desktop environment.
Why Choose Cinnamon Desktop?
Familiar layout: Feels like classic Windows/GNOME 2.
Easy to use: Intuitive and straightforward.
Customizable: Themes, panels, “Spices” for personalization.
Stable and reliable: Solid performance.
Good performance: Relatively lightweight.
Feature-rich: Contains many useful features.
Read: WordPress on Windows: Installation Made Simple
Steps to install Cinnamon Desktop on AlmaLinux 9 or Rocky 9 server
Installing the Cinnamon desktop environment on AlmaLinux 9 or Rocky Linux 9 server involves several steps. Since these distributions are typically server-oriented and may not have a graphical user interface (GUI) installed by default, you’ll need to install the necessary packages.
Important Considerations:
- Server vs. Desktop:
- AlmaLinux and Rocky Linux are often used as server operating systems. Therefore, installing a desktop environment might not be the standard practice.
- Ensure that you understand the implications of adding a GUI to your server, especially regarding resource consumption and potential security considerations.
- Dependencies: Installing a desktop environment will pull in a significant number of dependencies.
- Root Privileges: You’ll need root privileges to perform these installations.
Installation Steps:
1. Update Your System: It’s crucial to update your system before installing any new packages
sudo dnf update -y
2. Install the EPEL Repository (if needed): The Extra Packages for Enterprise Linux (EPEL) repository provides additional packages that might be required.
sudo dnf install epel-release -y
3. Install the Cinnamon Desktop: Install the Cinnamon desktop environment and its dependencies:
sudo dnf groupinstall “Cinnamon Desktop” -y
Also, consider installing the “X Window System” group to have the necessary Xorg components.
sudo systemctl set-default graphical.target
4. Set the Default Graphical Target:
To ensure that the GUI starts when you boot your system, set the default target to graphical:
sudo systemctl set-default graphical.target
5. Reboot Your System: Reboot your system to apply the changes
sudo reboot
6. Login: After rebooting, you should be presented with the Cinnamon login screen. You may have the ability to select Cinnamon as the desktop environment on the login screen, if there are multiple Desktop environments installed.
Important Notes:
- Installing a full desktop environment on a server can increase the attack surface and consume additional system resources.
- If you need a GUI for remote server management, consider using remote desktop solutions like VNC or X2Go, which might be more efficient.
- If you find any dependency issues, consult the AlmaLinux or Rocky Linux documentation for further troubleshooting.
The post A Beginner’s Journey: Installing Cinnamon on AlmaLinux 9 first appeared on Web Hosting Stuff.
]]>The post How to install Zend Optimizer in Cpanel Linux Server first appeared on Web Hosting Stuff.
]]>
Introduction :
Zend Server is the most complete PHP distribution with a continuously updated set of advanced value-add features designed to optimize productivity, performance, scalability and reliability. It is a free PHP extension to enable the web server to execute files encoded by Zend Guard/Encoder so it’s executed the same as any regular PHP files. Zend Encoder also is useful for encoding PHP files to protect source code. Zend Server supports any and all PHP code and provides deep insights into that code including the most popular PHP applications and frameworks like WordPress, Magento, Drupal, Zend Framework, Symfony, and Laravel. Any code you have in PHP will run on Zend Server. You will need to install Zend Optimizer in your server running Linux.
Installing zend in cPanel Linux Server follow this Steps:
Step 1 : Log in to your server via SSH with root user.
Step 2 : Run the following command.
/scripts/installzendopt
Step 3 : Follow the instructions on the screen to install Zend Optimizer.
Step 4 : Then, Restart the apache.
service httpd restart
Step 5 : To check whether zend optimizer is running and vserion.
php -v
It would show ioncube or zend optimizer version.
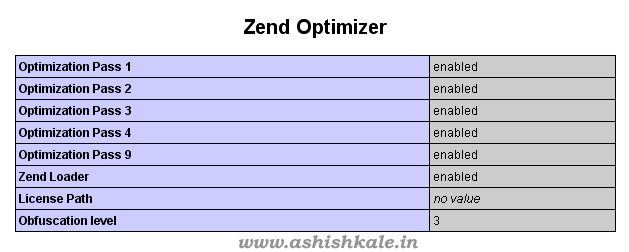
OR
Follow the on-screen instructions.
When you want to install Zend Optimizer on a Non-cPanel server please follow the steps:
Step 1 : Download Zend Optimizer.
http://www.zend.com/en/products/guard/optimizer/
Step 2 : Upload the .tar.gz into your web server.
/home/temp
Step 3 : Extract the archive by using the following command.
tar -zxvf filename_here.tar.gz
Step 4 : Now a new directory should appear.
Step 5 : Execute the following command.
./install.sh
Step 6 : Follow the instructions on-screen.
Step 7 : Restart HTTPD (Apache) by using following command.
service httpd restart
That it !
The post How to install Zend Optimizer in Cpanel Linux Server first appeared on Web Hosting Stuff.
]]>The post How to Remove/Uninstall RVSkin from Cpanel/WHM Server ? first appeared on Web Hosting Stuff.
]]>
RVSkin is a management software offered with cPanel server that provides a user with complete branding and skinning control over cPanel and Reseller accounts. In a short span of time you will be able to create impressive looking cPanel overlay skins for your end users that are customizable in accordance to your preferences.

To Remove/Uninstall RVSkin from Cpanel/WHM Server
Follow the steps to uninstalling RVSkins from Cpanel/WHM Server
Step 1 : Login to Cpanel/WHM server via SSH
Step 2 : Run the following command as root on the server:
# perl /root/rvadmin/uninstall.pl
.
.
.
.
You will be completely Removed/Uninstall RVSkin from your Cpanel/WHM Server
And
If for some reason RVskin was installed in a different location, change the path accordingly.
Restart your cpanel by using following command:
# /etc/rc.d/init.d/cpanel stop
# /etc/rc.d/init.d/cpanel start
The post How to Remove/Uninstall RVSkin from Cpanel/WHM Server ? first appeared on Web Hosting Stuff.
]]>The post SSH Connection Sequence first appeared on Web Hosting Stuff.
]]>
The following series of events help protect the integrity of SSH communication.
SSH Connection Sequence
1) A cryptographic handshake is made with the server
2) The connection between client and remote server is encrypted using symmetric cipher
3) Client authenticates itself
4) Client can now interact safely with remote server over encrypted connection
The post SSH Connection Sequence first appeared on Web Hosting Stuff.
]]>The post How to install MariaDB Server in cPanel/WHM servers? first appeared on Web Hosting Stuff.
]]>And
What are the advantages of using MariaDB Server ?
Ans:
* Install MariaDB Server in cPanel/WHM servers
1. Backup existing MySQL data
# mysqldump --all-databases --routines --triggers > /home/db_dump/alldb.sql
# service mysql stop
# cp -r /var/lib/mysql/mysql /home/db_dump/
# service mysql start
2. Select MySQL version as MariaDB
# /usr/share/lve/dbgovernor/db-select-mysql --mysql-version=mariadb100
MariaDB versions:
mariadb55 for MariaDB v5.5
mariadb100 for MariaDB v10.0
mariadb101 for MariaDB v10.1
3. Install MariaDB
# /usr/share/lve/dbgovernor/db-select-mysql --install-now
Final step is to recompile PHP and Apache in the server.
# /scripts/easyapache
* Advantages of using MariaDB Server
1) Faster and safer replication.
2) Indexes for the MEMORY(HEAP) engine are faster.
3) CHECKSUM TABLE is faster.
4) MariaDB improved the performance of character set conversions.
5) Pool of Threads in MariaDB 5.1 and even better in MariaDB 5.5.
6) There are some improvements to the DBUG code to make its execution faster when debug is compiled in but not used.
7) Our use of the Aria storage engine enables faster complex queries.
8) The test suite has been extended and now runs much faster than before, even though it tests more things.
The post How to install MariaDB Server in cPanel/WHM servers? first appeared on Web Hosting Stuff.
]]>The post How to Installation Linux Malware Detect (Maldet) On Linux first appeared on Web Hosting Stuff.
]]>Linux Malware Detect (LMD) is a malware scanner for Linux released under the GNU GPLv2 license, that is designed around the threats faced in shared hosted environments. It uses threat data from network edge intrusion detection systems to extract malware that is actively being used in attacks and generates signatures for detection.
Follow the steps below to install maldet on your server.
A) Install maldet on your server
1) SSH to your server
2) Download the tar file and install it.
cd /usr/local/src/ && wget http://www.rfxn.com/downloads/maldetect-current.tar.gz && tar -xzvf maldetect-current.tar.gz && cd maldetect-* && sh install.sh
This will automatically install a cronjob inside /etc/cron.daily/maldet so a daily scan will be run for local cPanel or Plesk accounts.
B) Update to the latest version and virus signatures:
maldet -d && maldet -u
C) Run the first scan manually
Launch a background scan for all user’s public_html and public_ftp in all home directories, run the following command:
maldet -b –scan-all /home?/?/public_?
D) Verify the scan report
1) List all scan reports time and SCANID:
maldet –report list
2) Show a specific report details :
maldet –report SCANID
3) Show all scan details from log file:
grep “{scan}” /usr/local/maldetect/event_log
E) Clean the malicious files
The quarantine is disabled. You will have to launch it manually.
maldet -q SCANID
The post How to Installation Linux Malware Detect (Maldet) On Linux first appeared on Web Hosting Stuff.
]]>The post How To Create FTP Accounts In cPanel first appeared on Web Hosting Stuff.
]]>All account can use the cPanel username and password for FTP, but additional FTP Accounts can be created and removed from your cPanel at any time. To add new FTP accounts,
Follow these process:
1) Log into cPanel
2) In the Files section, and click on FTP accounts
3) In the Login field, type the name of the FTP user.
Note: You cannot create an FTP username without your primary domain name in it, so your FTP username will always look like this – username@primarydomain.tld
4) In the Password fields, enter a password which will be used to authenticate this FTP account. Make sure you write the password down somewhere
5) In “Directory:” field you must enter the directory access you want this FTP account to have. You can leave it blank, which means this FTP account will have access to ALL web sites located on your server
6) Quota is the maximum amount of bandwidth you want this FTP account to use
7) Click on “Create FTP Account” button
You will then see a message stating “Account Created“
The post How To Create FTP Accounts In cPanel first appeared on Web Hosting Stuff.
]]>