The post A Beginner’s Journey: Installing Cinnamon on AlmaLinux 9 first appeared on Web Hosting Stuff.
]]>Modern and intuitive interface
Windows-like familiar layout
Excellent system performance
Customization options
While AlmaLinux and Rocky Linux are primarily designed for server environments, adding a desktop environment can make system administration tasks more manageable, especially for those who prefer graphical interfaces over command-line operations.
In this step-by-step guide, we’ll walk you through installing the Cinnamon Desktop environment on your AlmaLinux 9 or Rocky Linux 9 server. Whether you’re a system administrator looking to streamline your workflow or a Linux enthusiast wanting to explore different desktop environments, this tutorial has you covered.
Note: Before proceeding with installation, ensure your system meets the minimum hardware requirements and has a stable internet connection.
What is a Cinnamon Desktop?
Cinnamon is a free and open-source desktop environment primarily for Linux operating systems, designed to provide a traditional and user-friendly experience. Originating from the Linux Mint project, it was developed in response to changes in GNOME 3 that moved away from the classic desktop metaphor. Cinnamon aims to recreate the familiar layout of GNOME 2, featuring a traditional start menu, taskbar, and system tray, while incorporating modern desktop features and customization options. This makes it a popular choice for users who prefer a straightforward and intuitive desktop environment.
Why Choose Cinnamon Desktop?
Familiar layout: Feels like classic Windows/GNOME 2.
Easy to use: Intuitive and straightforward.
Customizable: Themes, panels, “Spices” for personalization.
Stable and reliable: Solid performance.
Good performance: Relatively lightweight.
Feature-rich: Contains many useful features.
Read: WordPress on Windows: Installation Made Simple
Steps to install Cinnamon Desktop on AlmaLinux 9 or Rocky 9 server
Installing the Cinnamon desktop environment on AlmaLinux 9 or Rocky Linux 9 server involves several steps. Since these distributions are typically server-oriented and may not have a graphical user interface (GUI) installed by default, you’ll need to install the necessary packages.
Important Considerations:
- Server vs. Desktop:
- AlmaLinux and Rocky Linux are often used as server operating systems. Therefore, installing a desktop environment might not be the standard practice.
- Ensure that you understand the implications of adding a GUI to your server, especially regarding resource consumption and potential security considerations.
- Dependencies: Installing a desktop environment will pull in a significant number of dependencies.
- Root Privileges: You’ll need root privileges to perform these installations.
Installation Steps:
1. Update Your System: It’s crucial to update your system before installing any new packages
sudo dnf update -y
2. Install the EPEL Repository (if needed): The Extra Packages for Enterprise Linux (EPEL) repository provides additional packages that might be required.
sudo dnf install epel-release -y
3. Install the Cinnamon Desktop: Install the Cinnamon desktop environment and its dependencies:
sudo dnf groupinstall “Cinnamon Desktop” -y
Also, consider installing the “X Window System” group to have the necessary Xorg components.
sudo systemctl set-default graphical.target
4. Set the Default Graphical Target:
To ensure that the GUI starts when you boot your system, set the default target to graphical:
sudo systemctl set-default graphical.target
5. Reboot Your System: Reboot your system to apply the changes
sudo reboot
6. Login: After rebooting, you should be presented with the Cinnamon login screen. You may have the ability to select Cinnamon as the desktop environment on the login screen, if there are multiple Desktop environments installed.
Important Notes:
- Installing a full desktop environment on a server can increase the attack surface and consume additional system resources.
- If you need a GUI for remote server management, consider using remote desktop solutions like VNC or X2Go, which might be more efficient.
- If you find any dependency issues, consult the AlmaLinux or Rocky Linux documentation for further troubleshooting.
The post A Beginner’s Journey: Installing Cinnamon on AlmaLinux 9 first appeared on Web Hosting Stuff.
]]>The post How to Disable MySQL Strict Mode in Linux and Windows first appeared on Web Hosting Stuff.
]]>When strict mode is enabled in MySQL then invalid or missing data may cause warnings or errors when trying to move the query.
When strict mode is disabled, a similar query would have its invalid or missing values adjusted and produce a simple warning.
This may seem like the preferred result, but though strict mode is disabled, certain actions may lead to unexpected results. For example, when the character limit is exceeded, it will be shortened to fit the limit.
There are plenty of reasons why MySQL’s strict mode may require to be disabled. The frequent reason is when a server is operating WHMCS – a requirement of the tool.
Necessities
- Their guide is specifically for disabling MySQL strict mode on a managed server with cPanel or a Windows server.
- The server should be accessible to MySQL 5.X or MariaDB 10.X and higher.
- Command line and root-level access via SSH will be compulsory to follow this tutorial on Linux servers.
Disable MySQL Strict Mode
Step 1: Backup Your Data
It’s always better to have a backup before modifying server files. You have to revert changes if something goes wrong. Backups are also needed to help track changes.
Linux
When logged into SSH with the root user on Linux, with the following Bash brace expansion command to make a backup copy of the file in its original Linux directory.
cp -a /usr/my.cnf{,.strict.bak}
cp -a /etc/my.cnf{,.strict.bak}
Windows
Windows users must identify and take a backup of the my.ini file. In the start menu, go to Settings > Update & Security > Backup > Add a drive, and then opt for the external drive or network location where you are allowed to store the backups of your machine.
Step 2: Disable MySQL Strict Mode
Based on the server and the current configurations, you may be required to edit one, or both, of the following files on the server. Generally, relevant configuration lines are available. However, it could be in either one without causing issues, so generally, it’s good to go with both.
Linux
In Linux, you can edit the files and open the file with your favorite command line editor. This guide uses Vim:
vim /usr/my.cnf
vim /etc/my.cnf
In vim, you can type a or i to enter text insertion mode; pressing the Esc key on your keyboard will take back you to command mode. For a refresher on editing files with vim, you can check articles on the web.
Within the file, check the following line.sql_mode=NO_ENGINE_SUBSTITUTION,STRICT_TRANS_TABLES
This line is setting the sql_mode variable. Replace it with the following line to disable MySQL strict mode. sql_mode=""
After adjusting or you’ve to confirm the file that doesn’t need an adjustment, save and close the file. Press Esc to enter command mode and type:wq to write and end the file.
Windows
The step is similar for Windows, but don’t forgot to locate and open the my.ini file from File Explorer—the standard location for its C:\ProgramData\MySQL\MySQL Server X.X.
The escape folder is ProgramData. To show a hidden folder, go to the view tab from the menu bar, and click the checkbox next to hidden items in the Show/hide section. Once you identify the my.ini file, open it with Notepad or Notepad ++ and search the following line.
sql-mode = “STRICT_TRANS_TABLES,NO_AUTO_CREATE_USER,NO_ENGINE_SUBSTITUTION”
Change this line in the file to get the mode to blank.
sql-mode = “”
Step 3: Restart the MySQL Service
You have to restart the MySQL service to make these changes, as it will only read the configuration files when it initially loads up.
Linux
For CentOS 7 servers, use this command.
systemctl restart mysql
For CentOS 6 and prior, write this command,
/etc/init.d/mysql restart
After furnishing this command on the server, the MySQL service will restart and load the changes. The MySQL strict mode is now disabled.
You can operate the following command to verify that the process was done properly.
mysql -e “SELECT @@sql_mode;”
Check the example of the output:
+——————————————–+ | @@sql_mode +——————————————–+ | NO_AUTO_CREATE_USER +——————————————–+
Windows
To restart MySQL in Windows, look for and open the Administrative Tools app. Just Double – Click Services. Identify and select MySQL. You are shown the following options on the left:
Stop the service: Stop the selected service.
Pause the service: Pause the selected service.
Restart the service: Restart the selected service.
Click on Restart the service which will redirect to change back to Started.
Conclusion
Disabling Strict Mode in MySQL is a painless task, regardless of why an administrator is required to disable it. Check this article to disable the MySQL Strict Mode for Linux or Windows servers.
The post How to Disable MySQL Strict Mode in Linux and Windows first appeared on Web Hosting Stuff.
]]>The post How to : Exim Remove All messages From the Mail Queue first appeared on Web Hosting Stuff.
]]>Exim is a mail transfer agent (MTA) used on Unix-like operating systems. It aims to be a general and flexible mailer with extensive facilities for checking incoming e-mail. For more information you can see Exim documentation.

In this article i will show some commands to removing all messages from the Mail Queue. Please Follow the Steps.
Step 1 : To print a list of the messages in the queue, enter the following command :
# exim -bp
Step 2 : To remove a message from the queue, enter the following command :
# exim -Mrm {message-id}

Step 3 : To remove all messages from the queue, enter the following command :
# exim -bp | awk ‘/^ *[0-9]+[mhd]/{print “exim -Mrm ” $3}’ | bash
Step 4 : Dallas Marlow, suggested following clean command:
# exim -bp | exiqgrep -i | xargs exim -Mrm
That’s it ! 
The post How to : Exim Remove All messages From the Mail Queue first appeared on Web Hosting Stuff.
]]>The post How to Uploading Files using Unzip in Linux first appeared on Web Hosting Stuff.
]]>When you want to upload large number of files in your web server, you can easy to uploading large number of files by using unzip in Linux. Please follow the steps and quickly upload the necessary files in your linux os.

Step 1 : To Upload the zipped file to your SSH server.
Step 2 : To Unzip the zipped file to the destination folder.
Step 3 : To test the zipped file by using following command.
unzip -t zip_file_name

Step 4 : To extract the zipped file, use the following command.
unzip zip_file_name -d destination_folder

Note: Don’t forget to use the -d parameter as otherwise you will have nasty errors. Be careful with permissions as well.
That’s it !
The post How to Uploading Files using Unzip in Linux first appeared on Web Hosting Stuff.
]]>The post How to install PEAR for PHP in Linux first appeared on Web Hosting Stuff.
]]>

PEAR is a structured library of open-source code for users of PHP. When pear is not installed in your server, then install it. You can easily install PEAR for php in Linux.
In this article we will give you how to install PEAR for php in Linux. Follow the steps for Installing PEAR.
Step 1 : Download the installation php file.
Step 2 : Rename to php file by using following command.
cp go-pear go-pear.php
Step 3 : Run the php script.
Then, Windows Command Prompt to start the installation.
Step 4 : You can install php various extensions by using following command.
pear install package
After installing PEAR, you can install modules by going to the PEAR admin at example :-
hostripples.com/pearadmin, where hostripples.com is your domain name.
The post How to install PEAR for PHP in Linux first appeared on Web Hosting Stuff.
]]>The post How to disable core dumps on Linux Servers first appeared on Web Hosting Stuff.
]]>Core dump is a memory or a storage dump which records the memory state of a computer program when it was terminated by the operating system due to various error behavior. In this article Hostripples will give you how to disable core dumps on Linux Servers.

Please follow the steps to disable core dumps for all users :
Step 1 : Edit /etc/security/limits.conf and use the following command.
vi /etc/security/limits.conf
Step 2: Make sure the following config directive exists by using following command.
hard core 0
Step 3 : Disable core dumps for setuid programs by using following command.
echo ‘fs.suid_dumpable = 0’ >> /etc/sysctl.conf
sysctl -p
Step 4 : Now, Set a soft limit to stop core dumps being created by using following command.
echo ‘ulimit -S -c 0 > /dev/null 2>&1’ >> /etc/profile
That’s it!
The post How to disable core dumps on Linux Servers first appeared on Web Hosting Stuff.
]]>The post How to install Zend Optimizer in Cpanel Linux Server first appeared on Web Hosting Stuff.
]]>
Introduction :
Zend Server is the most complete PHP distribution with a continuously updated set of advanced value-add features designed to optimize productivity, performance, scalability and reliability. It is a free PHP extension to enable the web server to execute files encoded by Zend Guard/Encoder so it’s executed the same as any regular PHP files. Zend Encoder also is useful for encoding PHP files to protect source code. Zend Server supports any and all PHP code and provides deep insights into that code including the most popular PHP applications and frameworks like WordPress, Magento, Drupal, Zend Framework, Symfony, and Laravel. Any code you have in PHP will run on Zend Server. You will need to install Zend Optimizer in your server running Linux.
Installing zend in cPanel Linux Server follow this Steps:
Step 1 : Log in to your server via SSH with root user.
Step 2 : Run the following command.
/scripts/installzendopt
Step 3 : Follow the instructions on the screen to install Zend Optimizer.
Step 4 : Then, Restart the apache.
service httpd restart
Step 5 : To check whether zend optimizer is running and vserion.
php -v
It would show ioncube or zend optimizer version.
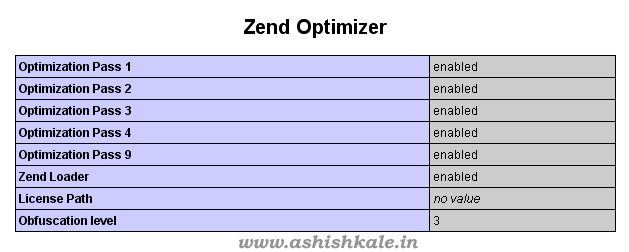
OR
Follow the on-screen instructions.
When you want to install Zend Optimizer on a Non-cPanel server please follow the steps:
Step 1 : Download Zend Optimizer.
http://www.zend.com/en/products/guard/optimizer/
Step 2 : Upload the .tar.gz into your web server.
/home/temp
Step 3 : Extract the archive by using the following command.
tar -zxvf filename_here.tar.gz
Step 4 : Now a new directory should appear.
Step 5 : Execute the following command.
./install.sh
Step 6 : Follow the instructions on-screen.
Step 7 : Restart HTTPD (Apache) by using following command.
service httpd restart
That it !
The post How to install Zend Optimizer in Cpanel Linux Server first appeared on Web Hosting Stuff.
]]>The post Change Linux Root Password Temporarily first appeared on Web Hosting Stuff.
]]>If you are logged in as root and you don’t know the root password then you can follow the steps. You can easy to change your root password.
Step 1. Back-up your current shadow file.
[root@hostripples ~]# cp /etc/shadow /etc/shadowbkup
Step 2. Change the current root password
[root@hostripples ~]# passwd root
Changing password for user root.
New UNIX password:
BAD PASSWORD: it is based on a dictionary word
Retype new UNIX password:
passwd: all authentication tokens updated successfully.
Step 3. Switch to a local user to test whether ‘your’ root password is working or not.
[root@hostripples ~]# su – localuser
[localuser@hostripples ~]$ su – root
Password:
[root@hostripples ~]#
Yes, you are now logged in as root with ‘your’ password.
Step 4. Restore the previous root password
[root@hostripples ~]# mv /etc/shadowbkup /etc/shadow
mv: overwrite `/etc/shadow’? y
[root@hostripples ~]#
.
.
.
.
This trick is meant for students and kindly do not misuse.
The post Change Linux Root Password Temporarily first appeared on Web Hosting Stuff.
]]>The post How to Setup Minecraft on a Linux CentOS Server first appeared on Web Hosting Stuff.
]]>

* First, To download PuTTY to access SSH.
* Installing Minecraft by using following command:
yum install java-1.6.0-openjdk
* Switch to the root directory by using following command:
cd
* Create a Minecraft directory
mkdir minecraft
* Enter the directory by using following command:
cd minecraft
* Download Minecraft by using following line
wget http://minecraft.net/download/minecraft_server.jar
* Now, Using Following Scripts
chmod +x minecraft_server.jar
yum install screen
screen
* Then, Start up Minecraft
java -Xmx1024M -Xms1024M -jar minecraft_server.jar nogui
===========================================
** To close PuTTY and keep Minecraft running.:
Control + a + d
** To get back to the screen where Minecraft is running hold the following keys on your keyboard:
screen -r

The post How to Setup Minecraft on a Linux CentOS Server first appeared on Web Hosting Stuff.
]]>The post How to Disable Clamav and Amavis for Postfix first appeared on Web Hosting Stuff.
]]>
If you want to run postfix but not run the antivirus (Clam, Amavis), there is a way to disable those services while allowing postfix to run as normal.
Follow the instructions you can easily to disable Clamav and Amavis for postfix.
1) Edit the file/etc/postfix/main.cf
And use the following commands :
content_filter = amavis:[127.0.0.1]:10024
receive_override_options = no_address_mappings
2) Edit the file /etc/postfix/master.cf
And use the following commend :
amavis unix – – – – 2 smtp
-o smtp_data_done_timeout=1200
-o smtp_send_xforward_command=yes
127.0.0.1:10025 inet n – – – – smtpd
-o content_filter=
-o local_recipient_maps=
-o relay_recipient_maps=
-o smtpd_restriction_classes=
-o smtpd_client_restrictions=
-o smtpd_helo_restrictions=
-o smtpd_sender_restrictions=
-o smtpd_recipient_restrictions=permit_mynetworks,rej ect
-o mynetworks=127.0.0.0/8
-o strict_rfc821_envelopes=yes
-o receive_override_options=no_unknown_recipient_chec ks,no_header_body_checks
-o smtpd_bind_address=127.0.0.1
3) To stop the services :
/etc/init.d/amavisd stop
/etc/init.d/clamav-daemon stop
/etc/init.d/clamav-freshclam stop
/etc/init.d/clamd.amavisd stop
4) Disable the services from start-up :
chkconfig –levels 235 amavisd off
chkconfig –levels 235 clamav-daemon off
chkconfig –levels 235 clamav-freshclam off
chkconfig –levels 235 clamd.amavisd off
5) Reboot your server, and restart postfix by entering :
/etc/init.d/postfix restart
The post How to Disable Clamav and Amavis for Postfix first appeared on Web Hosting Stuff.
]]>