The post Install Varnish with Apache on Ubuntu 12.04 first appeared on Web Hosting Stuff.
]]>

Varnish is an HTTP accelerator and a useful tool for speeding up a server, especially during a times when there is high traffic to a site. It works by redirecting visitors to static pages whenever possible and only drawing on the virtual private server itself if there is a need for an active process.
How to Install Varnish
Varnish is distributed in the Ubuntu package repositories, but the version there might be out of date, so the varnish site recommends installing the varnish package through their repository.
1) Start that process by grabbing the repository:
sudo curl http://repo.varnish-cache.org/debian/GPG-key.txt | sudo apt-key add –
2) To add the repository to the list of apt sources. Go ahead and open up that file.
sudo nano /etc/apt/sources.list
3) Add the varnish repository to the list of sources.
deb http://repo.varnish-cache.org/ubuntu/ lucid varnish-3.0
4) Save and exit
.
.
.
Congrats , Update apt-get and install varnish.
sudo apt-get update
sudo apt-get install varnish
The post Install Varnish with Apache on Ubuntu 12.04 first appeared on Web Hosting Stuff.
]]>The post How to Activate Varnish Cache Server on Centos Web Panel. first appeared on Web Hosting Stuff.
]]>
Activate Varnish Cache Server on Centos Web Panel.
- First, install CWP on your server.
- Do some basic configuration tasks.
- Login to CWP admin page as root or as user with root privilege via:
http://ip-address:2030
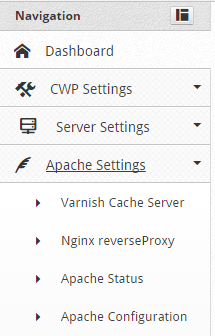
Step 1 – Go to Apache Settings then Varnish Cache Server.
Step 2 – You’ll then see a message saying that ***Varnish not installed. Now click on the blue Install Varnish button.
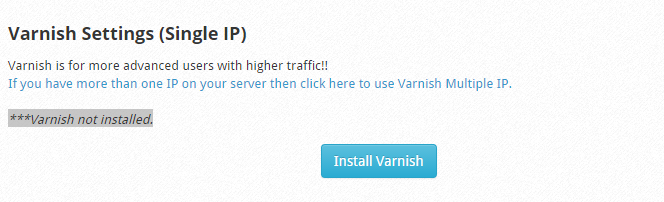
Once you Click on Install Varnish you can see all the Install Process :
Preparing...                ##################################################
varnish-release             ##################################################
Loaded plugins: fastestmirror
Loading mirror speeds from cached hostfile
 * base: mirror1.babylon.network
 * extras: mirror1.babylon.network
 * rpmforge: www.mirrorservice.org
 * updates: mirror1.babylon.network
Setting up Install Process
Resolving Dependencies
--> Running transaction check
---> Package varnish.x86_64 0:3.0.7-1.el6 will be installed
--> Processing Dependency: varnish-libs = 3.0.7-1.el6 for package: varnish-3.0.7-1.el6.x86_64
--> Processing Dependency: libvarnishapi.so.1(LIBVARNISHAPI_1.0)(64bit) for package: varnish-3.0.7-1.el6.x86_64
--> Processing Dependency: libvarnishapi.so.1()(64bit) for package: varnish-3.0.7-1.el6.x86_64
--> Running transaction check
---> Package varnish-libs.x86_64 0:3.0.7-1.el6 will be installed
--> Finished Dependency Resolution

Dependencies Resolved

================================================================================
 Package             Arch          Version             Repository          Size
================================================================================
Installing:
 varnish             x86_64        3.0.7-1.el6         varnish-3.0        445 k
Installing for dependencies:
 varnish-libs        x86_64        3.0.7-1.el6         varnish-3.0         42 k

Transaction Summary
================================================================================
Install       2 Package(s)

Total download size: 487 k
Installed size: 1.2 M
Downloading Packages:
--------------------------------------------------------------------------------
Total                                           1.1 MB/s | 487 kB     00:00
Running rpm_check_debug
Running Transaction Test
Transaction Test Succeeded
Running Transaction

  Installing : varnish-libs-3.0.7-1.el6.x86_64                              1/2

  Installing : varnish-3.0.7-1.el6.x86_64                                   2/2

  Verifying  : varnish-libs-3.0.7-1.el6.x86_64                              1/2

  Verifying  : varnish-3.0.7-1.el6.x86_64                                   2/2

Installed:
  varnish.x86_64 0:3.0.7-1.el6

Dependency Installed:
  varnish-libs.x86_64 0:3.0.7-1.el6

Complete!
Step 3 – Make few changes in configuration so Varnish can run properly. By default, the configuration is set as following:

Now scroll down and you can see the options to Adjust the values :
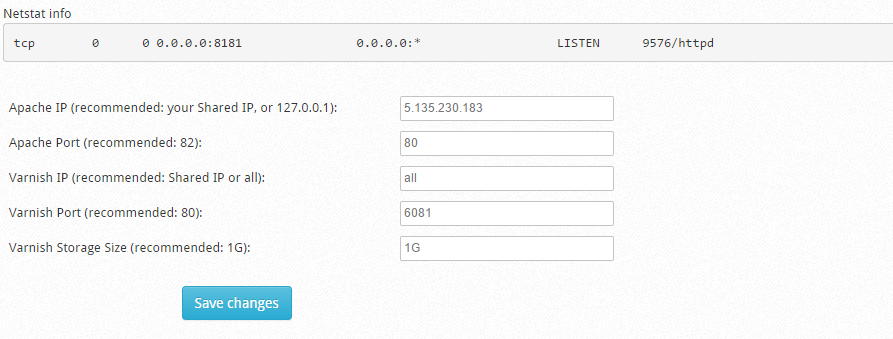
Edit all the values as recommended . Also you can see that Varnish Storage Size recommendation is 1 GB . Make sure you have more than 1 GB RAM on your Server. If you have 1 GB RAM then you can set it to 256MB or 512 MB. In my case I will set it as 1GB as i have 5 GB ram on the server.
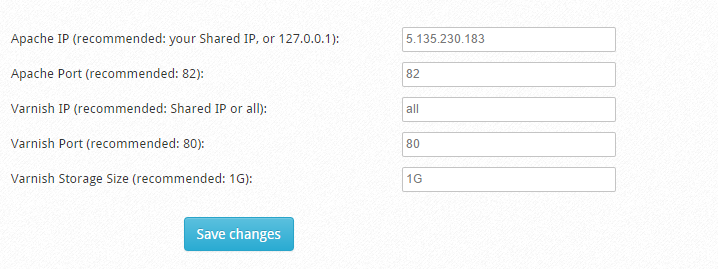
Click on Save Changes . You can see the message Data Updated.
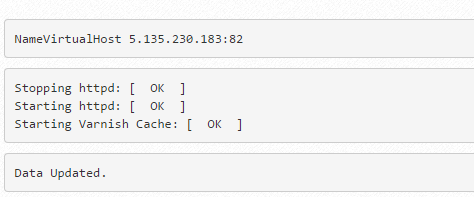
This means CentOs Web Panel has updated all Virtual Host entries adjusting its port to 82 (Apache).
The post How to Activate Varnish Cache Server on Centos Web Panel. first appeared on Web Hosting Stuff.
]]>