The post How to Rebuild Plesk Apache Config Files first appeared on Web Hosting Stuff.
]]>
If you want to rebuild apache configuration files on the pleask server then, follow the condition.
- Run the following coomand on the server
[root@hostripples~]# /usr/local/psa/admin/bin/websrvmng -av
This will rebuild all your httpd.include files.
That’s it!
The post How to Rebuild Plesk Apache Config Files first appeared on Web Hosting Stuff.
]]>The post How to Install mod_cloudflare on cPanel first appeared on Web Hosting Stuff.
]]>
Installing mod_cloudflare on cPanel
CloudFlare is a performance and security service. The CloudFlare cPanel plugin makes it easy to integrate into your hosting control panel. The CloudFlare module automatically translates visitor IP addresses to reflect the visitor’s original IP address rather than the IP address of the CloudFlare proxy servers.
Installing mod_cloudflare on a cPanel server is very easy. Just follow 8 steps as below.
Step 1 :
Download core file by using the following command :
wget https://raw.githubusercontent.com/cloudflare/mod_cloudflare/master/mod_cloudflare.c
Step 2 :
Connect to your server through SSH and log in as root.
Step 3 :
Change directory to /usr/local/src by using the following command :
cd /usr/local/src
Step 4 :
Get the source code for mod_cloudflare by using the following command :
wget –no-check-certificate https://raw.github.com/cloudflare/mod_cloudflare/master/mod_cloudflare.c CloudFlare-Tools/master/mod_cloudflare.c
Step 5 :
Build and install mod_cloudflare by using Apache Extension Tool by using the following command :
apxs -a -i -c mod_cloudflare.c
Step 6 :
Restart the Apache Server daemon by using the following command :
service httpd restart
Step 7 :
Update the Apache configuration data by using the following command :
/usr/local/cpanel/bin/apache_conf_distiller –update
Step 8 :
Confirm the module is loaded properly by using the following command :
httpd -M | grep cloud

.
.
.
.
.
Now,
Apache will log the visitors’ IP addresses instead of the CloudFlare IP’s.
The post How to Install mod_cloudflare on cPanel first appeared on Web Hosting Stuff.
]]>The post How to Enable Apache SpamAssassin in Cpanel first appeared on Web Hosting Stuff.
]]>Apache SpamAssassin is the Open Source anti-spam platform giving system administrators a filter to classify email and block spam (unsolicited bulk email). It uses a robust scoring framework and plug-ins to integrate a wide range of advanced heuristic and statistical analysis tests on email headers and body text including text analysis, Bayesian filtering, DNS blocklists, and collaborative filtering databases.
To Enable Apache SpamAssassin in Cpanel
Following steps to enable Apache SpamAssassin
1) Log into cPanel
2) Navigate to Mail Section
3) Click on Apache SpamAssassin option
See Following Screenshot
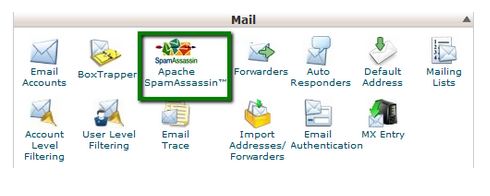
4) Click on Enable Apache SpamAssassin button
See Following Screenshot

.
.
.
Apache SpamAssassin is Enable!
The post How to Enable Apache SpamAssassin in Cpanel first appeared on Web Hosting Stuff.
]]>The post Installing LAMP On Linux Mint first appeared on Web Hosting Stuff.
]]>LAMP stands for Linux, Apache, MySQL, PHP. How to install Linux the L of LAMP.

Install Apache
To start off we will install Apache.
1) Open up the Terminal
(Applications > Accessories > Terminal)
2) Copy/Paste the following line of code into Terminal and then press enter
sudo apt-get install apache2
3) Type you’re password, and then press enter.
The page should display the words
.
.
.
.
“It works!”
Testing Apache
To make sure everything installed correctly we will now test Apache to ensure it is working properly.
1) Open up any web browser and then enter the following line.
http://localhost/
2) You should see a folder entitled apache2-default/.
3) Open it and you will see a message saying
.
.
.
.
“It works!”, congrats to you!
Install PHP
PHP is an open source web scripting language that is widely use to build dynamic webpages.
To install PHP
1) Open up the Terminal
(Applications > Accessories > Terminal)
2) Type in this command
sudo apt-get install php5 libapache2-mod-php5
After you answer yes to the prompt twice, PHP will install itself.
3) It may also be useful to add php to the directory index, to serve the relevant php index files
sudo nano /etc/apache2/mods-enabled/dir.conf
Test PHP
To ensure there are no issues with PHP let’s give it a quick test run.
1) Open up the Terminal
(Applications > Accessories > Terminal)
2) Type in this command
sudo gedit /var/www/testphp.php
This will open up a file called phptest.php.
3) Copy/Paste this line into the phptest file:
<?php phpinfo(); ?>
4) Save and close the file.
5) Now open you’re web browser and type the following into the web address:
http://localhost/testphp.php
The page should look
.
.
.
Congrats you have now installed both Apache and PHP!
Install MySQL
To finish this guide up we will install MySQL. MySQL is a powerful database management system used for organizing and retrieving data
To install MySQL,
1) Open terminal and type in these commands
sudo apt-get install mysql-server libapache2-mod-auth-mysql php5-mysql
During the installation, MySQL will ask you to set a root password. If you miss the chance to set the password while the program is installing, it is very easy to set the password later from within the MySQL shell.
2) Once you have installed MySQL, we should activate it with this command
sudo mysql_install_db
3) Finish up by running the MySQL set up script
sudo /usr/bin/mysql_secure_installation
4) The prompt will ask you for your current root password.
Type it in.
5) Enter current password for root (enter for none)
OK,
.
.
.
successfully used password, moving on…
The post Installing LAMP On Linux Mint first appeared on Web Hosting Stuff.
]]>The post How to install MariaDB Server in cPanel/WHM servers? first appeared on Web Hosting Stuff.
]]>And
What are the advantages of using MariaDB Server ?
Ans:
* Install MariaDB Server in cPanel/WHM servers
1. Backup existing MySQL data
# mysqldump --all-databases --routines --triggers > /home/db_dump/alldb.sql
# service mysql stop
# cp -r /var/lib/mysql/mysql /home/db_dump/
# service mysql start
2. Select MySQL version as MariaDB
# /usr/share/lve/dbgovernor/db-select-mysql --mysql-version=mariadb100
MariaDB versions:
mariadb55 for MariaDB v5.5
mariadb100 for MariaDB v10.0
mariadb101 for MariaDB v10.1
3. Install MariaDB
# /usr/share/lve/dbgovernor/db-select-mysql --install-now
Final step is to recompile PHP and Apache in the server.
# /scripts/easyapache
* Advantages of using MariaDB Server
1) Faster and safer replication.
2) Indexes for the MEMORY(HEAP) engine are faster.
3) CHECKSUM TABLE is faster.
4) MariaDB improved the performance of character set conversions.
5) Pool of Threads in MariaDB 5.1 and even better in MariaDB 5.5.
6) There are some improvements to the DBUG code to make its execution faster when debug is compiled in but not used.
7) Our use of the Aria storage engine enables faster complex queries.
8) The test suite has been extended and now runs much faster than before, even though it tests more things.
The post How to install MariaDB Server in cPanel/WHM servers? first appeared on Web Hosting Stuff.
]]>