The post How to Configuring & Customising Ajenti on Ubuntu first appeared on Web Hosting Stuff.
]]>1) To change the root user’s password to the “Configure” menu.
2) Click “Change password” on root account
3) Write a new password.
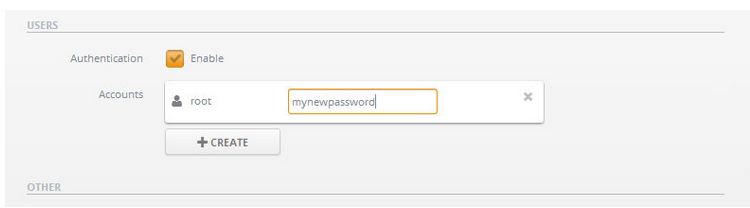
4) You can also create a new user, Select features you would like to grant the user access.
5) Click “Create” button.
6) Set the name by clicking “unnamed“
7) Writing the new name.

8) Click the icon on the left from the name to set the permissions.
9) Click “Save” on the top of the page.
Note : If you altered any other settings, also remember to apply the changes by restarting the control panel.
Customising Ajenti
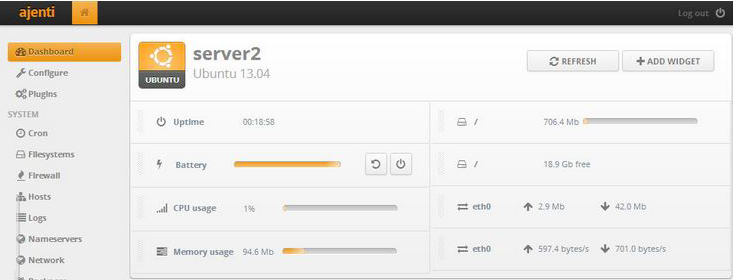
You can remove widgets by grabbing from the dotted area and dragging them down.
Step 1 : Add new widgets by clicking “Add widget”
Step 2 : Drag them to the position you would like them to be
The post How to Configuring & Customising Ajenti on Ubuntu first appeared on Web Hosting Stuff.
]]>The post How to Install Ajenti on Ubuntu first appeared on Web Hosting Stuff.
]]>
Ajenti is a simple, lightweight, free and open source tool with a web-based administration control panel. It allowing to manage ubuntu servers and this is similar to Webmin. Ajenti is provides fast and responsive web interface for managing small server set-ups and also best suitable for VPS and Dedicated servers. It has built with many pre-made plugins for configuring and monitoring server software’s and services such as Apache, Cron, File System, Firewall, MySQL, Nginx, Munin, Samba, FTP, Squid and many other tools like File Manager, Code Editor for developers and Terminal access.
Connecting To Your VPS
1) Establish a SSH connection to your virtual server and authenticate as root by using follownig commands
ssh root@your-ip
2) Download the latest package files by using following commands :
apt-get update
Importing the repository key
The following command downloads the key and automatically adds it to your system.
wget http://repo.ajenti.org/debian/key -O- | apt-key add –
Adding the APT repository
1) To Add the repository to your sources.list by using the following command
echo “deb http://repo.ajenti.org/ng/debian main main ubuntu” >> /etc/apt/sources.list
2) Navigate to the end of the file and paste the following line
deb http://repo.ajenti.org/debian main main debian
3) Save this changes and Exit.
Installing Ajenti
Step 1 : Update the package sources.
Step 2 : Install ajenti package by using following commands
apt-get update && apt-get install ajenti -y
Step 3 : Start the service by using following commands
service ajenti restart
Step 4 : If you are using UFW firewall open port 8000 to enable access to the control panel by using following command
ufw allow 8000
.
.
.
.
Congratulation’s! You have successfully installed Ajenti.
Or
Quick automatic installation then use following commands
wget -O- https://raw.github.com/ajenti/ajenti/1.x/scripts/install-ubuntu.sh | sudo sh
Related Post “How to Configure Ajenti on Ubuntu“
The post How to Install Ajenti on Ubuntu first appeared on Web Hosting Stuff.
]]>