The post How to Resolve cPanel File Upload Issues? first appeared on Web Hosting Stuff.
]]>If you are facing an issue with file uploading on the cPanel, this is the exact article where you can get the solution. We have written the causes and solutions for fixing the problem. So, let’s check the article below:
What are the common causes of cPanel file upload issues?
cPanel file upload issues can stem from various factors, including:
- File Size Restrictions:
- cPanel has default limits on file upload sizes.
- Attempting to upload larger files will result in errors.
- Solution: Check your cPanel’s file size limits and consider splitting large files or optimizing them for smaller sizes.
- Permission Issues:
- Incorrect file or directory permissions can prevent uploads.
- Solution: Ensure proper permissions are set for the target directory and files.
- Browser or Cache Problems:
- Browser cache or settings might interfere with cPanel’s upload functionality.
- Solution: Clear your browser’s cache and cookies, try a different browser, or disable browser extensions that might be interfering.
- Insufficient Storage:
- If your hosting account is running low on disk space, uploads might fail.
- Solution: Free up space by deleting unnecessary files or upgrading your hosting plan.
- Network Connectivity Issues:
- A poor internet connection or firewall settings can block uploads.
- Solution: Check your network connection and firewall settings.
- PHP Configuration Limits:
- PHP configurations like upload_max_filesize and post_max_size can limit upload sizes.
- Solution: Modify these settings in your PHP configuration (if allowed by your hosting provider).
- Server Errors:
- Server-side issues can sometimes hinder uploads.
- Solution: Check server error logs or contact your hosting provider for assistance.
By understanding these common causes and troubleshooting steps, you can effectively resolve the cPanel file upload issues and ensure smooth website management.
How to Resolve cPanel File Upload Issues?
1. Check File Size Limits
- cPanel Limits: Verify the maximum file upload size allowed by your cPanel account. This information is usually available in your cPanel’s documentation or by contacting your hosting provider.
- PHP Limits: Check the upload_max_filesize and post_max_size settings in your PHP configuration. These settings limit the size of files that can be uploaded through PHP scripts.
2. Adjust File Size Limits (if possible)
- cPanel: If the file size limit is too restrictive, you might be able to increase it by contacting your hosting provider.
- PHP: If you have access to your PHP configuration, you can adjust the upload_max_file size and post_max_size settings. However, this often requires root access or assistance from your hosting provider.
3. Verify File Permissions
- Correct Permissions: Ensure that the directory where you’re uploading files has the correct permissions. Typically, you can write permissions for the user or group that owns the directory.
- Check File Permissions: Also, verify the permissions of the uploaded file itself. It should have appropriate read/write permissions for the web server.
4. Clear Browser Cache and Cookies
- Browser Issues: Sometimes, browser cache or cookies can interfere with cPanel’s upload functionality.
- Clear Cache: Clear your browser’s cache and cookies, then try uploading again.
5. Try a Different Browser
- Browser Compatibility: Incompatibility between your browser and cPanel can sometimes cause upload problems.
- Test with Another Browser: Try uploading using a different web browser (e.g., Chrome, Firefox, Edge).
6. Check Network Connectivity
- Stable Connection: A weak or unstable internet connection can interrupt file uploads.
- Test Connection: Ensure you have a stable internet connection.
7. Contact Your Hosting Provider
- Server-Side Issues: If you’ve checked all the above and are still experiencing problems, contact your hosting provider’s support team. They can investigate server-side issues or provide further assistance.
Additional Tips:
- Split Large Files: If you’re uploading large files, consider splitting them into smaller parts and uploading them individually.
- Use FTP/SFTP: You can consider using File Transfer Protocol (FTP) or Secure File Transfer Protocol (SFTP) clients like FileZilla for larger files. These tools can often handle larger uploads more efficiently.
By following these steps and working closely with your hosting provider, you should be able to resolve most cPanel file upload issues.
The post How to Resolve cPanel File Upload Issues? first appeared on Web Hosting Stuff.
]]>The post How do you check the version of cPanel/WHM? first appeared on Web Hosting Stuff.
]]>Just make sure that your cPanel/WHM software is updated; keeping the server safe and working is crucial. Here, in this document, you will see in-depth knowledge on checking the cPanel version using multiple methods to stay informed about hosting setup.
Method 1: Checking cPanel Version Through the WHM Command Line
Log in to WHM: Access your WHM interface using the root username and password.
Navigate to Terminal: Go to Server Configuration -> Terminal.
Execute the Command:
In the terminal window, use this command and type Enter:
/usr/local/cpanel/cpanel -V
This command will output the cPanel version to the terminal.
Example Output:
11.98.0 (build 12)
Explanation:
- The command /usr/local/cpanel/cpanel -V is the same as running it directly on the server’s command line.
- This method provides a quick and efficient way to check the cPanel version without leaving the WHM interface.
Method 2: Checking cPanel Version Through WHM Dashboard
Steps:
- Log in to your WHM account.
- The cPanel/WHM version is typically displayed at the top of the WHM dashboard.
Method 3: Examine the cPanel Version Through the WHM Version File
Login to WHM: Access your WHM interface using your root credentials.
Navigate to Terminal: Go to Server Configuration -> Terminal.
Write the Command > terminal window > write the following command and give Enter
cat /usr/local/cpanel/version
View the Version: The output will display the cPanel version number.
Method 4: Checking the cPanel Version from the cPanel Dashboard
This is the simplest method to check your cPanel version
Steps:
- Log in to your cPanel account.
- Locate the “Server Information” section: This is usually found on the right side of the dashboard. It might be in a sidebar or a separate panel.
- Click on “Server Information”.
- Look for the “cPanel Version” information: This will be listed along with other server details.
Method 5: Checking cPanel Version Through SSH
Establish an SSH connection: Use an SSH client like PuTTY or the built-in terminal on macOS/Linux to connect to your server as root.
Execute the command: Once connected, type the following command and press Enter:
Conclusion
Frequently checking and updating your cPanel/WHM installation confirms excellent features, improvement, and security patches. Retain the server running smoothly by updating yourself about the cPanel/WHM version.
The post How do you check the version of cPanel/WHM? first appeared on Web Hosting Stuff.
]]>The post How to Terminate a cPanel License first appeared on Web Hosting Stuff.
]]>- Setting up domains and subdomains
- Creating email accounts
- Managing databases
- Uploading and managing website files
- Security controls
How cPanel licenses work:
- Required for Functionality: You need a separate cPanel license for each server you plan to run the cPanel & WHM on. Without a valid license, the software won’t function.
- Purchasing Options: You can buy cPanel licenses directly from the cPanel store or through authorized resellers like web hosting providers https://www.licensepal.com/products/cpanel.php.
- License Tiers: cPanel offers tiered licenses based on the number of accounts you can manage on the server, ranging from basic plans for a single account to enterprise-level options for hundreds of accounts https://www.cpanel.net/pricing/.
- Free Trial: Luckily, cPanel offers a free 15-day trial license to test the software before committing https://cpanel.net/products/trial/.
Terminating a cPanel license involves canceling it through your cPanel Store account. Check how to do it:
- Log in to your cPanel Store account.
- Navigate to the “Manage Licenses” section.
- Find the specific cPanel license you want to terminate in the list.
- You’ll see a menu icon under the “Actions” column (often represented by dots or ellipses). Click on it.
- From the menu, select “Cancel“.
- A confirmation window will pop up. You’ll have the option to provide a reason for cancellation (optional).
- Confirm the cancellation by clicking “Yes“.
Important points to remember:
You can only cancel licenses through the cPanel Store account. Canceling a license after the initial 72-hour purchase window won’t grant you a refund. The license will stay active until the end of the billing month.
The post How to Terminate a cPanel License first appeared on Web Hosting Stuff.
]]>The post How to restore a Full cPanel Account using JetBackup 5 first appeared on Web Hosting Stuff.
]]>- Service downtime: Your cPanel account will be pulled down and re-developed during this restoration process. Based on the total size of your account, you can expect interruptions for a few minutes up to one hour.
- Viable data loss: All websites, primary domains, addon domains, aliases, and associated databases will get restored, just select the date and time. Any changes done after that time will get lost.
- Viable email loss: All email accounts will be restored to the selected date and time. If any email is received after that selected time will be lost.
Check the below steps to restore a Full cPanel Account using JetBackup 5
You have to log in to your cPanel.

After logging in browse the Files section and tab on jetBackup5

Under the “Restore & Download section, the tab “Full Backups”

Next, you have to select the backup for the folder that you like to restore (sorted by date), then click the Restore button.

In the fifth step, you have to tab the Restore Summary screen, where you’ll see the selected backups to restore the items To Restore, then click Restore Selected Items.

Now, you have to wait for Queue to complete the restoration job, the ‘Completed’ status will be shown when the restore process is completed.

In the bottom line, “Processing… state, the backup will get downloaded from the backup server, and your account will be pulled down and re-developed, rendering your account inoperable for some time. You have to keep patient.
Let’s learn the Queue statuses:
The queue status “Pending” indicates the server is waiting for the restoration task to be processed.
The queue status “In Progress” indicates that you need to wait, and avoid any actions inside the cPanel account, till the restoration is done.
The queue status “completed” indicates that the restoration has been successful. If you have shown the queue status “Failed”, you have to try another date or contact their support team.
The post How to restore a Full cPanel Account using JetBackup 5 first appeared on Web Hosting Stuff.
]]>The post How do I Create and Delete Cron Jobs/? first appeared on Web Hosting Stuff.
]]>1. Using cPanel:
cPanel is a web hosting control panel that allows you to manage your account. Most web hosting providers offer cPanel access. Here’s how to create and delete cron jobs using cPanel:
Creating a Cron Job:
- Log in to your cPanel account.
- In the “Advanced” section, click on the “Cron Jobs” icon.
- Under “Cron Email,” ensure a valid email address is entered to receive notifications about cron jobs.
- You can either choose a predefined schedule from the “Common Settings” dropdown menu or set a specific schedule using the individual time unit dropdown menus (Minute, Hour, Day, Month, Day of Week).
- In the “Command” field, enter the exact command you want to run at the scheduled time. This could be a script path or a specific command-line instruction.
- Click “Add New Cron Job” to save the cron job.
Deleting a Cron Job:
- Within the “Cron Jobs” section of cPanel, scroll down to “Current Cron Jobs.”
- Locate the cron job you want to delete.
- Under the “Actions” column, click “Delete.”
2. Using Crontab:
Crontab is a command-line utility for managing cron jobs on Linux/Unix systems. If you have direct access to the server shell, You can use crontab commands to create and delete cron jobs.
Creating a Cron Job:
- Open a terminal window.
- Use the following command to edit your crontab:
crontab -e
This command will open your crontab file in a text editor. Be cautious while editing the crontab file, as syntax errors can prevent cron jobs from running.
- In the opened editor, add a new line with the cron expression followed by the command you want to run. The cron expression defines the schedule for the job.
For reference, you can find cron expression examples online https://www.ibm.com/docs/en/db2oc?topic=task-unix-cron-format
- Save and close the editor.
Deleting a Cron Job:
- There are two ways to delete cron jobs using crontab:
- Delete all cron jobs:
crontab -r
- Delete a specific cron job:
This method involves editing the crontab file and removing the specific line corresponding to the desired cron job. However, this might be not easy to identify for beginners. An alternative way is to:
- Use crontab -l to list all your cron jobs.
- Copy the remaining lines (excluding the one you want to delete) into a new file.
- Delete the old crontab using crontab -r
- Edit the new file containing the desired cron jobs (remove unnecessary lines).
- Use crontab – to install the new crontab containing the filtered jobs.
Remember, using crontab requires some familiarity with the command line and cron expressions. If you’re unsure, it’s recommended to use cPanel for managing cron jobs on your web hosting account.
The post How do I Create and Delete Cron Jobs/? first appeared on Web Hosting Stuff.
]]>The post How to configure SSH keys using cPanel first appeared on Web Hosting Stuff.
]]>Generating a Key Pair on cPanel:
- Log in to cPanel.
- Navigate to the Security section and find the SSH Access tool.
- Click on Manage SSH Keys.
- Click on Generate a New Key.
- You can choose a name for the key pair or leave the default “id_rsa”.
- Optionally, set a strong password for the key and click Generate Key.
Adding the Public Key to Authorized Keys:
- In the Manage SSH Keys section, you need to scroll down to the Authorized Keys area.
- Next, you have to click on Manage next to the key you just generated.
- A box with the public key will be displayed. You can copy the entire contents of the box.
- Here you’ll need to access your server through another method (like root access or a current SSH connection) and add the copied public key to the authorized_keys file located in the .ssh directory of your home directory.
Downloading the Private Key (for SSH client):
- Go back to the Manage SSH Keys section in cPanel.
- Find the key you have created under Private Keys.
- Click View/Download next to the key.
- You’ll see the option to convert the key to PPK format (if using PuTTY). Then, you have to choose the conversion if needed.
- Click on Download Key and save the private key securely on your local machine. This private key will be used for SSH login with your client program.
Tips:
- Make sure to keep your private key confidential and avoid sharing it with anyone.
- Consult your SSH client’s documentation for specific instructions on using the private key for login.
For a more detailed walkthrough, you can refer to resources like the cPanel documentation or tutorials from web hosting providers.
The post How to configure SSH keys using cPanel first appeared on Web Hosting Stuff.
]]>The post Migration from Another Webuzo Instance first appeared on Web Hosting Stuff.
]]>This guide will help you to Migrate from another Webuzo instance.
Requirement:
- It is compulsory to install on the new server.
- Keep the same username of the account as the one you’re migrating from the other Panel. For example; If the username is Jenny on the other panel, it must be Jenny on Webuzo also.
Build Domain Structure
Insert domains to the new server from the Webuzo Enduser Panel with the same details that you’ve used on the old server so as to speed up the migration process.
Procedure
Move to Webuzo Enduser Panel > Server Utilities > Import from Webuzo
Find below the screenshot of the Import from Webuzo
Steps
- Mentioned correct details in the form
- Click on Submit to Import Webuzo details.
- After submitting, you’ll get a message “Migration process is started. Check the logs for more info”
CLI
You can manually execute the commands below to import data from another Webuzo instance.
Migration from one Webuzo instance to another can be straightforward with these steps:
Backup Your Data:
It’s strictly suggested to take back up of all data on the old Webuzo instance. This backup includes website files, databases, email accounts, and other migration data. You can take the help of built–in backup and restore functionality to develop backups of the websites and databases.
Set Up the New Webuzo Instance:
Install a fresh Webuzo instance on your new server or hosting environment. Just copy the website file.
Copy website files:
Transfer your website files from the old server to the new one. To do this you can use FTP details or SCP. Ensure that file permissions and ownership are mentioned properly on the new server to match the old server.
Export and Import Databases:
Export databases from the old Webuzo instance using tools like phpMyAdmin or the command–-line. Import the database dumps into the new Webuzo instance, making sure to update your website’s configuration files to use the new database connection details.
Update DNS Records:
If your domain is hosted on a different DNS provider then update your DNS records to point to the IP address of your new server. If your domain’s DNS is managed within Webuzo then update the DNS records in Webuzo accordingly.
Test your website:
Once data migration and DNS records are migrated, it’s time to test your website on the new Webuzo instance to ensure that all is well. Monitor broken links, missing files, and database connectivity issues.
Email Configuration:
If your email accounts are linked with the domain, configure email settings on the new Webuzo instance to match the old setup. Also, make a copy of the email account data and settings.
SSL Certificates:
If your website consists of an SSL Certificate on your websites, install and configure an SSL Certificate on the new server. You can use Let’s Encrypt or commercial SSL Certificate providers to avail of this.
Monitor:
After completion of all steps keep a close eye on the new Webuzo instance for the next few days to make sure that everything is fine. The next step is to check the logs and error messages for any issues that have arisen. Keep in mind that the steps and tools you use may vary based on setup and requirements. It is important to plan and test thoroughly to minimize downtime and potential issues during the migration process.
Move Webuzo Configurations
- Insert the contents of the /var/webuzo/ directory on the OLD Server to an archive as follows:
root@host > cd /var/webuzo/
root@host > tar -pczvf wuser_conf.tar.gz *
- Transfer the above archive to the NEW server as follows:
root@host > scp -p wuser_conf.tar.gz root@NEW_IP_ADDRESS:/var/webuzo/
- Now SSH to your NEW Server as root user and extract the archive as follows:
root@host > tar -zxvf /var/webuzo/wuser_conf.tar.gz -C /var/webuzo That’s it. You have successfully moved the Webuzo Configurations.
Move User Account
- Include the contents of the /home/USER/ directory on the OLD Server to an archive as follows:
Note: Replace the USER with your Webuzo USERNAME. Transfer to the home directory of the user account.
root@host > cd /home/USER/
root@host > tar -pczvf wuser_account_data.tar.gz *
- Move the above archive to the NEW server as follows:
root@host > scp -p wuser_account_data.tar.gz root@NEW_IP_ADDRESS:/home/USER/
- Now SSH to your New Server as root user and extract the archive as follows:
root@host > tar -zxvf /home/USER/wuser_account_data.tar.gz -C /home/USER
Move Databases
It is compulsory to install MySQL on the new server.
- Include the contents of the/var/lib/mysql/ directory on the OLD Server to an archive as follows:
root@host > cd /var/lib/mysql/
root@host > tar -pczvf wuser_mysql_data.tar.gz *
- Move the above archive to the NEW server as follows:
root@host > scp -p wuser_mysql_data.tar.gz root@NEW_IP_ADDRESS:/var/lib/mysql/
- Now SSH to your NEW Server as root user and extract the archive as follows:
root@host > cd /var/lib/mysql/
root@host > tar -zxvf wuser_mysql_data.tar.gz
Install SSL Certificates
- In STEP 1, SSL Certificates and keys are moved.
- Don’t miss to install individual certificates from the Webuzo Enduser Panel.
Move Emails
- Include the contents of the /etc/vmail/ directory on the OLD Server to an archive as follows:
root@host > cd /etc/vmail
root@host > tar -pczvf wuser_email_accnts.tar.gz *
- Move the above archive to the NEW server as follows:
root@host > scp -p wuser_email_accnts.tar.gz root@NEW_IP_ADDRESS:/etc/vmail/
- Include the contents of the /var/local/vmail/ directory on the OLD Server to an archive as follows:
root@host > cd /var/local/vmail
root@host > tar -pczvf wuser_email_data.tar.gz *
- Move the above archive to the NEW server as follows:
root@host > scp -p wuser_email_data.tar.gz root@NEW_IP_ADDRESS:/var/local/vmail/
- Now SSH to your NEW Server as root user and extract the archive as follows:
root@host > tar -zxvf /etc/vmail/wuser_email_accnts.tar.gz -C /etc/vmail/
root@host > tar -zxvf /var/local/vmail/wuser_email_data.tar.gz -C /var/local/vmail/
- Done, you have successfully transferred your FTP accounts.
Contact Support: support@webuzo.com
Move FTP Users
Note: Change the url from /usr/local/apps/pureftpd/etc/pure-ftpd/ with /etc/pure-ftpd for Webuzo version 2.0.6 or lower
- Include the contents of the /usr/local/apps/pureftpd/etc/ directory on the OLD Server to an archive as follows
root@host > cd /usr/local/apps/pureftpd/etc/
root@host > tar -pczvf wuser_ftp_data.tar.gz *
- Move the above archive to the New server as follows:
root@host > scp -p wuser_ftp_data.tar.gz root@NEW_IP_ADDRESS:/usr/local/apps/pureftpd/etc/
- Now SSH to your NEW Server as root user and extract the archive as follows:
root@host > tar -zxvf /usr/local/apps/pureftpd/etc/wuser_ftp_data.tar.gz -C /usr/local/apps/pureftpd/etc/
- Done, you have successfully transferred your FTP accounts.
Contact Support: support@webuzo.com
The post Migration from Another Webuzo Instance first appeared on Web Hosting Stuff.
]]>The post How to Import From cPanel to Webuzo first appeared on Web Hosting Stuff.
]]>This article will guide you on importing databases from cPanel to Webuzo.
Procedure:
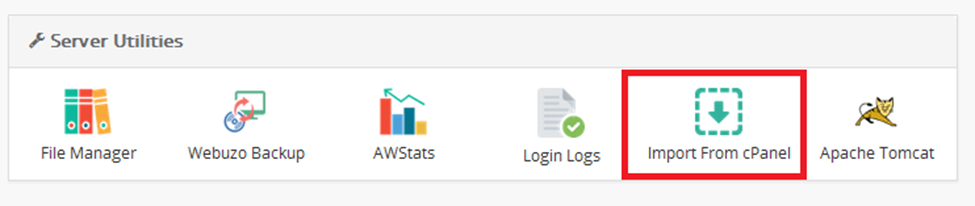
Move to Webuzo Enduser Panel > Server Utilities > Import From cPanel.
Find below screenshot from cPanel:
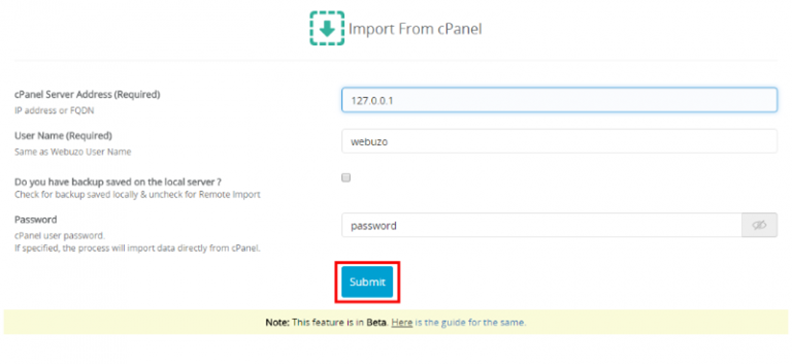
Remote Import
Steps:
- Fill the form with the cPanel server, user, and password details.
- Tab on Submit to Import the cPanel Account.
A below-mentioned screen shot indicates Import process has started successfully.

- Once completion is done then you’ll receive the email.
- Import logs can be found at /usr/local/webuzo/includes/cli/cpanel_migration.log
Local Backup File Import
Steps
- Circulate the Form with the cPanel Server, User, and backup file path details.
- Click on Submit to Import the cPanel Account.
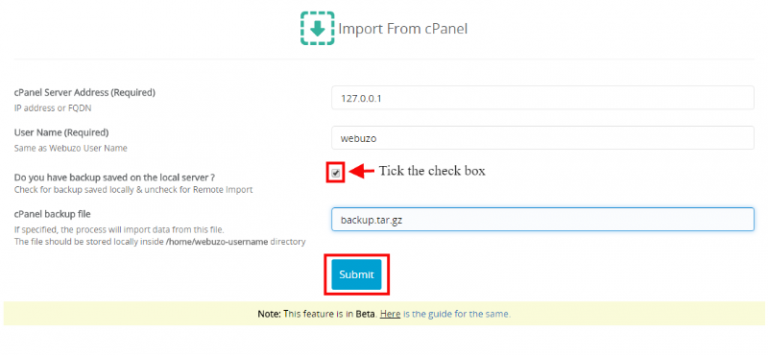
A below-mentioned screenshot indicates Import process has started successfully.
- On completion of the Import process, you will receive an email.
- Import logs can be found at /usr/local/webuzo/includes/cli/cpanel_migration.log
Important tip
Note: This feature is available in the BETA stage as of now.
- You need to install a fresh Webuzo Server and the name of the Webuzo user should be the same as the cPanel Username
- Import utility will overwrite all your Webuzo user data.
- Your backup of cPanel must be stored at /home/webuzo_username/ directory.
Once the import process has taken place then you can withdraw the archive.
Domains, Databases, etc are generalized in the Webuzo account like cPanel.
A random password is given to FTP users imported on the new Webuzo server. It is suggested to change the passwords of the FTP user’s account.
Email notifications of the FTP accounts are also created.
Import logs are generated at /usr/local/webuzo/includes/cli/cpanel_migration.log
Import Email accounts if any are not imported
- Once completion is done then you’ll receive the email.
- Import logs can be found at /usr/local/webuzo/includes/cli/cpanel_migration.log
Required Inputs
- cPanel Server Address: IP address or FQDN of your cPanel account.
- User name – cPanel Username same as Webuzo username.
- Password – cPanel user password
- cPanel backup file – Full cPanel backup file name stored on Webuzo machine e.g. backup.tar.gz
The post How to Import From cPanel to Webuzo first appeared on Web Hosting Stuff.
]]>The post How to Convert cPanel to Webuzo first appeared on Web Hosting Stuff.
]]>This guide will help you to convert your cPanel server to Webuzo. This tool performs many tasks like converting your cPanel server itself uninstalls cPanel, installing Webuzo, and converting all cPanel data to Webuzo. Everything works smoothly and all your users’ websites, domains, databases, emails, FTP accounts, and SSL certificates remain as it is.
Note: Please ensure you’ve fully backed up your VPS / Server. For the safer side, you need to restore the VPS backup as cPanel will be uninstalled from the server.
Commands

The conversion will monitor the requirements and ask for confirmation. It is advised to type yes and press enter to proceed with the conversion.
Later, you can check converter logs at:
/root/webuzo_convert/cpanel-webuzo-convert.log
The required time is 5 minutes to 30 minutes based on the resources available on the server and the network connection speed.
Since this takes time, we suggest implementing the above commands using tmux or session, so if your machine disconnects due to an internet connection issue on your desktop the command still runs in the background.
WHMCS Converter
Webuzo comes with a converter script that helps to convert the WHMCS cPanel hosting accounts to Webuzo. Please refer to the guide.
What Data will be Migrated?
The converter will move the following data:
1) All Domains – Addon, Parked, Sub-domain.
2) MultiPHP preferences per domain
3) All Databases and Database Users
4) FTP Accounts
5) It covers all email-related data like accounts, forwarders, and autoresponders.
6) DNS records
7) SSL Certificates
8) Cron Jobs
9) ACL Packages
10) Users and Resellers with appropriate ownership
11) IP allocation to users and resellers
12) For All plans installed on the cPanel server the same version will be installed on Webuzo.
13) All other data needed for accessing the control panel.
Understand the difference between Converter and Importer?
The converter is responsible for converting the data on the cPanel server itself and doesn’t need a new server. Hence, no IPs are changed. As compared to importer as it does not need to transfer the files across servers. It needs a full backup of the server if in case you need to revert it for restore purposes from the backup.
An importer is required to set up a new server with Webuzo and data is moved from the cPanel server to Webuzo. Further, IPs need to be changed to run the cPanel server compared to cPanel and Webuzo. If you prefer to import the sites instead of in-place converter you can refer to this guide.
The post How to Convert cPanel to Webuzo first appeared on Web Hosting Stuff.
]]>The post How to Install Webuzo V3 first appeared on Web Hosting Stuff.
]]>Requirements:
- Newly installed OS from the following list :
– CentOS 7.x / 8.x
– AlmaLinux 8.x / 9.x
– Ubuntu LTS 18.04 / 20.04 / 22.04
– Red Hat Enterprise Linux 7.x / 8.x
– Scientific Linux 7.x / 8.x
– Rocky Linux 8.x
- YUM / apt-get / tar / wget packages installed
- RAM – Minimum 1 GB (Recommended 2 GB for best performance)
- Disk Space – Minimum 5 GB (Recommended 10 GB for best performance)
- Open Ports – 2002, 2003, 2004, 2005, 21, 22, 25, 53, 80, 110,143, 443, 465, 993, 995, 587, and 3306 (It is recommended to keep these ports open on your server)
- SELinux should be disabled
Note: There should be no PHP, Apache, or MySQL installed on the server.
Installation:
Open a Shell Terminal (e.g. PuTTY) and SSH to your server. Run the following commands:

Default Apps
The “install parameter is optional and if in case it’s not then Webuzo will install the app by default:
Apache 2.4, MySQL 8.0, PHP 7.3, Pure-FTPd, Bind, Exim, Dovecot, GIT, Web Disk
For allowing Webuzo to install any apps please use the following command:
./install.sh
No Apps
In case, you don’t want Webuzo to install any apps you can use the following value to install the parameter:
./install.sh --install=none
Later you can install apps from Webuzo Admin Panel > Apps > Install an App page.
Selected Apps
To allow Webuzo to install selected apps then you can enter the app names comma-separated to the install parameter:
E.g. ./install.sh --install=apache2, mariadb108,bind,exim,dovecot,php81,php80,php74
Below mentioned are the popular apps for
Web Servers
- apache2
- openlitespeed
- lsws
- nginx
- nodejs
- nodejs14
- nodejs16
- nodejs17
- nodejs18
- nodejs19
Database Servers
- mysql80
- mysql57
- mariadb109
- mariadb108
- mariadb107
- mongodb
- pgsql
- sqlite
Scripting Languages
- php82
- php81
- php80
- php74
- php73
- php72
- php71
- perl
- python2
- python3
Utilities
- exim
- dovecot
- bind
- pureftpd
- sa (SpamAssasin)
- jailshell
- webdisk
- varnish
- django
- passenger
Security
- csf
- clamav
- cxs
- ImunifyAV
- ImunifyAV+
- Imunify360
Find below the list of softnames of all available apps here:
https://api.webuzo.com/apps.php?in=json
Utilize the softname values from above mentioned list.
Hence, the installation will start immediately. If your network is running slow then you might experience that the installation has stopped.
In such cases, it’s suggested to continue with the process, once the installation is completed then you’ll see the notification:
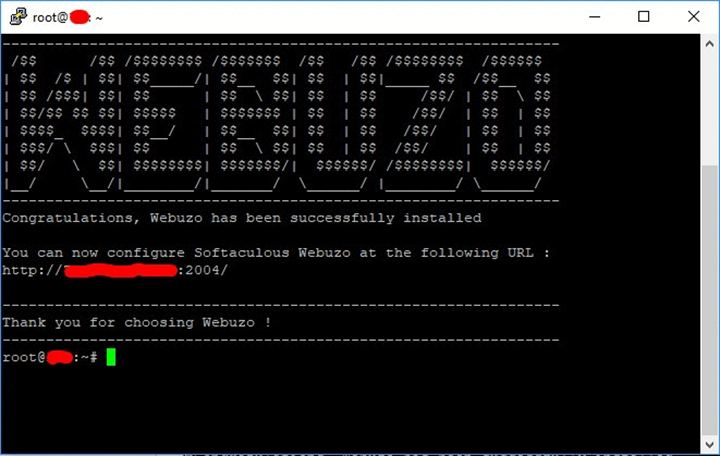
The required Web Server and other important configurations are set up.
Note: A log file of the installation process will be created – /root/webuzo-install.log
Login to The Admin Panel
To login to the Webuzo Admin Panel, use this Url:
OR
You have to use the root credentials details of your server for username and password.
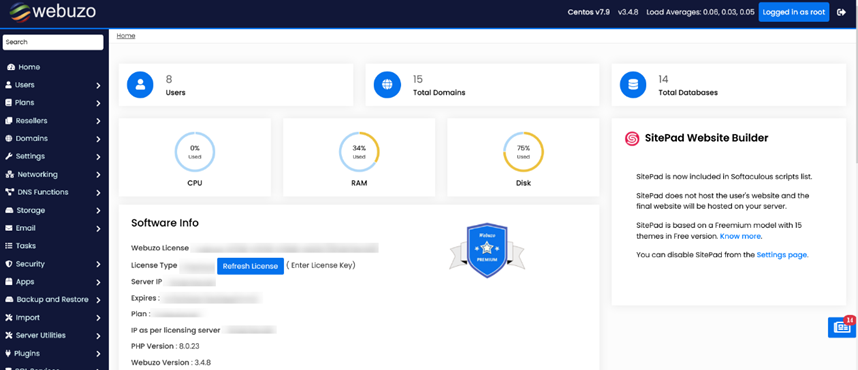
Panel Configuration
After installing we suggest checking the panel configuration. It is located at the Admin Panel > Settings > Panel Config.
Please monitor the options there and correct anything as per your requirement on the server.
Server IP, Hostname, and Nameservers
Please enter the valid IP of the server and a hostname so that any user can’t use the same.
You need to point your nameserver to the server’s IP where you want to install Webuzo. Webuzo will ask you to enter a Primary Nameserver to the server’s IP where you want to install Webuzo. It will also ask you for a primary Nameserver (e.g. ns1 example.com and a secondary Nameserver (ns2.example.com).
Create A User
Once the panel is configured then you’ve to create endusers / shared hosting users. You have to click on Users >> Add users on the admin panel. Over there, you’ve to enter the user’s domain, username, password and email. After that, you’ve to select the hosting plan if you have created any or manually assign the resources to the user. You can also automate the process and link WHMCS, Blesta, etc.
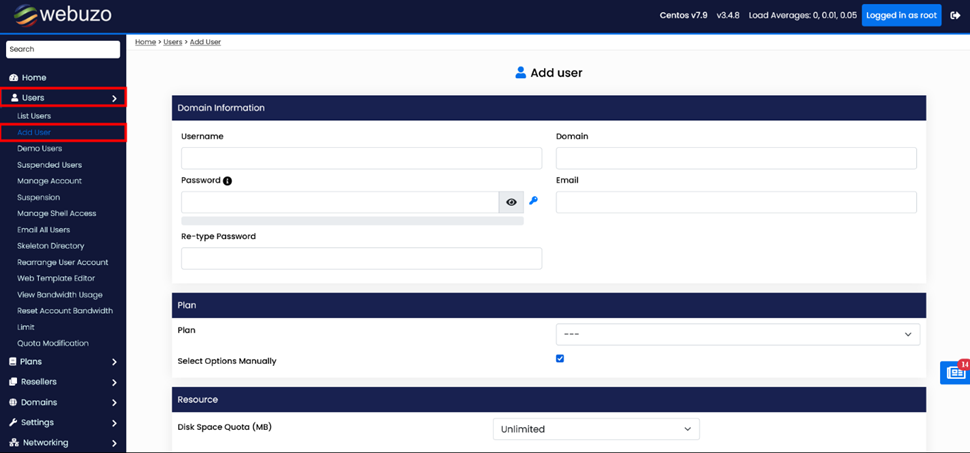
Add User Wizard
It also allows to creation of resellers who then can create their sub-users.
Access the Enduser Panel
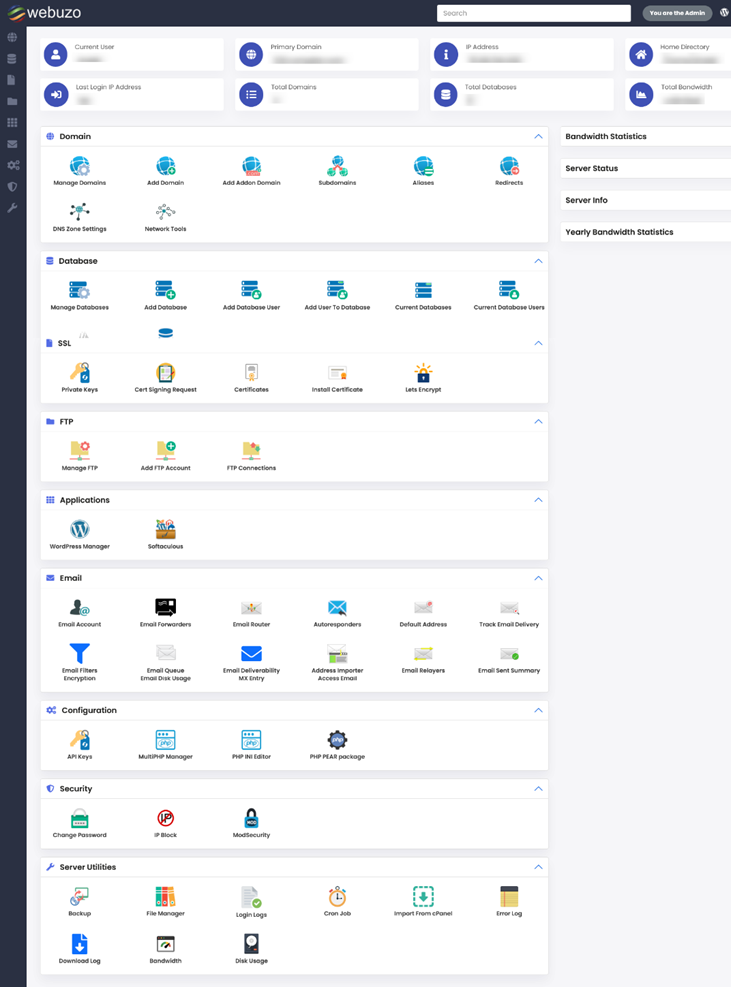
The Webuzo Enduser Panel is located at ports 2002 and 2003:
Or
Users can log in from the Admin Panel, visit the UZsers >> Lists Users Wizard, and click on the icon in the Login column.
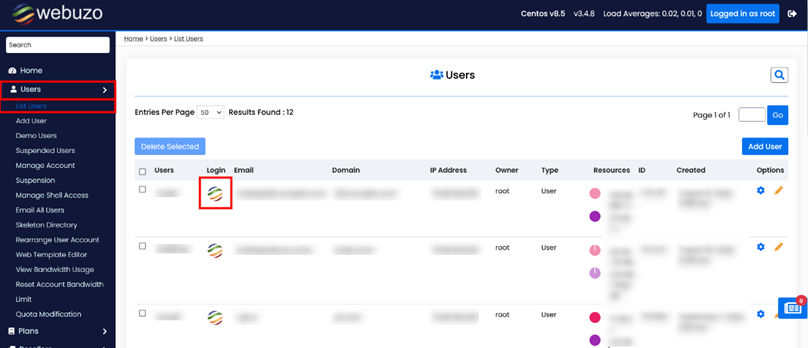
Enduser Panel Screenshot
The post How to Install Webuzo V3 first appeared on Web Hosting Stuff.
]]>