The post How to check Postfix’s email queue and delete it . first appeared on Web Hosting Stuff.
]]>
On this post you can check the messages in the postfix queue.
1- Postfix maintains two queues, the pending mails queue, and the deferred mail queue,
the differed mail queue has the mail that has soft-fail and should be retried (Temporary failure),
Postfix retries the deferred queue on set intervals (configurable, and by default 5 minutes)
1- Display a list of queued mail, deferred and pending
mailq
or
postqueue -p
To save the output to a text file you can run
mailq > mail.txt
or
postqueue -p > mail.txt
the above commands display all queued messages (Not the message itself but the sender and recipients and ID), The ID is particularly useful if you want to inspect the message itself.
2- View message (contents, header and body) in Postfix queue
Assuming the message has the ID XXXXXXX (you can see the ID form the QUEUE)
postcat -vq XXXXXXXXXX
Or to save it in a file
postcat -vq XXXXXXXXXX > themessage.txt
3- Tell Postfix to process the Queue now
postqueue -f
OR
postfix flush
4- Delete queued mail
Delete all queued mail
postsuper -d ALL
Delete differed mail queue messages
(The ones the system intends to retry later)
postsuper -d ALL deferred
Delete from queue selectively
To delete from the queue all emails that have a certain address in them, we can use this program (perl script)…
NOTE: This perl script seems to be free, and is all over the internet, i could not find out where it originates or who wrote it.
1- Download this file, unzip, and upload the file to your server, then from your bash command line, Change Directory to wherever you uploaded this file, for example cd /root (Just an example, You can upload it wherever you wish)
NOTE: A second script here works differently, i have not yet tested it, download it here
Now, from within that directory, execute…
./postfix-queue-delete.pl ashish@ashishkale.in
Any mail that has this email address in it’s IN or OUT list will be deleted
The script uses the postqueue -p then looks for your string, once found, it deletes the email by ID, this means that this script can delete messages using any text that appears when you run mailq (or postqueue -p), so if you run it with the parameter joe all mail with addresses such as joefriend@example.com and
Other moethods exist, like executing directly
mailq | tail +2 | grep -v '^ *(' | awk 'BEGIN { RS = "" } { if ($8 == "email@address.com" && $9 == "") print $1 } ' | tr -d '*!' | postsuper -d -
——————————–
Sample Messages in a differed mail queue
——————————–
SOME282672ID 63974 Mon Nov 29 05:12:30 someaddresss@yahoo.com
(temporary failure. Command output: maildrop: maildir over quota.)
localuser@exmple.com
———————————-
SOME282672ID 9440 Wed Jun 30 05:30:11 MAILER-DAEMON
(SomeHostName [xxx.xxx.xxx.xxx] said: 452 <username@example.org> Mailbox size limit exceeded (in reply to RCPT TO command))
username@example.org
———————————-
SOME282672ID 4171 Thu Nov 25 13:22:03 MAILER-DAEMON
(host inbound.somedomain.net [yyy.yyy.yyy.yyy] refused to talk to me: 550 Rejected: 188.xx.179.46, listed at http://csi.cloudmark.com/reset-request for remediation.)
someuser@example.com
———————————
SOME282672ID 37031 Thu Nov 25 08:53:36 someuser@example.net
(Host or domain name not found. Name service error for name=example.com type=MX: Host not found, try again)
someuser@example.com
The post How to check Postfix’s email queue and delete it . first appeared on Web Hosting Stuff.
]]>The post How to increase session timeout in php? first appeared on Web Hosting Stuff.
]]>First locate php.ini
root@host[~]# php -i | grep php.ini

Configuration File (php.ini) Path => /usr/local/lib

Loaded Configuration File => /usr/local/lib/php.ini
Get current session time out time
root@host[~]# grep -i session.gc_maxlifetime /usr/local/lib/php.ini

session.gc_maxlifetime = 14400

; setting session.gc_maxlifetime to 1440 (1440 seconds = 24 minutes):
Edit php.ini
root@host [~]# vi /usr/local/lib/php.ini
Change value of session.gc_maxlifetime.
Restart httpd service!! its done
The post How to increase session timeout in php? first appeared on Web Hosting Stuff.
]]>The post error: field ‘st_atim’ has incomplete type FFMPEG first appeared on Web Hosting Stuff.
]]>
While installing ffmpeg-php-0.6.0 on centos server, if you may came across the below error ,
In file included from /usr/include/sys/stat.h:107,
from /usr/include/php/main/php_streams.h:28,
from /usr/include/php/main/php.h:395,
from /root/ffmpeg-php-0.6.0/ffmpeg-php.c:40:
/usr/include/bits/stat.h:91: error: field ‘st_atim’ has incomplete type
/usr/include/bits/stat.h:92: error: field ‘st_mtim’ has incomplete type
/usr/include/bits/stat.h:93: error: field ‘st_ctim’ has incomplete type
/usr/include/bits/stat.h:152: error: field ‘st_atim’ has incomplete type
/usr/include/bits/stat.h:153: error: field ‘st_mtim’ has incomplete type
/usr/include/bits/stat.h:154: error: field ‘st_ctim’ has incomplete type
In file included from /usr/include/php/main/php_streams.h:28,
from /usr/include/php/main/php.h:395,
from /root/ffmpeg-php-0.6.0/ffmpeg-php.c:40:
/usr/include/sys/stat.h:367: error: array type has incomplete element type
/usr/include/sys/stat.h:374: error: array type has incomplete element type
In file included from /usr/include/php/main/php.h:401,
from /root/ffmpeg-php-0.6.0/ffmpeg-php.c:40:
/usr/include/php/TSRM/tsrm_virtual_cwd.h:218: error: expected specifier-qualifier-list before ‘time_t’
/usr/include/php/TSRM/tsrm_virtual_cwd.h:246: error: expected declaration specifiers or ‘…’ before ‘time_t’
/root/ffmpeg-php-0.6.0/ffmpeg-php.c: In function ‘zm_startup_ffmpeg’:
/root/ffmpeg-php-0.6.0/ffmpeg-php.c:94: warning: implicit declaration of function ‘avcodec_init’
To solve this issue follow the below steps and install the new repo :
git clone https://github.com/pbek/ffmpeg-php.git
cd ffmpeg-php
phpize
./configure
make && make install
The post error: field ‘st_atim’ has incomplete type FFMPEG first appeared on Web Hosting Stuff.
]]>The post How to Install Softaculous in CentOS Web Panel first appeared on Web Hosting Stuff.
]]>Softaculous is very easy to install in CentOS Web Panel. The following article will show you how to install Softaculous on CentOS Web Panel.

Step 1 : Login to CentOS Web Panel.
Step 2 : Go to : Script Installers > Scripts Manager
Step 3 : Click on the Install Softaculous button.
The Installation of Softaculous is completed!

* When logged in as a USER
User logs in to the CentOS Web Panel they can access Softaculous Enduser Panel under the File Management and Script Installers section.
The post How to Install Softaculous in CentOS Web Panel first appeared on Web Hosting Stuff.
]]>The post How to Setup Minecraft on a Linux CentOS Server first appeared on Web Hosting Stuff.
]]>

* First, To download PuTTY to access SSH.
* Installing Minecraft by using following command:
yum install java-1.6.0-openjdk
* Switch to the root directory by using following command:
cd
* Create a Minecraft directory
mkdir minecraft
* Enter the directory by using following command:
cd minecraft
* Download Minecraft by using following line
wget http://minecraft.net/download/minecraft_server.jar
* Now, Using Following Scripts
chmod +x minecraft_server.jar
yum install screen
screen
* Then, Start up Minecraft
java -Xmx1024M -Xms1024M -jar minecraft_server.jar nogui
===========================================
** To close PuTTY and keep Minecraft running.:
Control + a + d
** To get back to the screen where Minecraft is running hold the following keys on your keyboard:
screen -r

The post How to Setup Minecraft on a Linux CentOS Server first appeared on Web Hosting Stuff.
]]>The post How to Install Minecraft Server on CentOS VPS first appeared on Web Hosting Stuff.
]]>

- First, Installing Java-JDK by using following command:
yum install java-1.6.0-openjdk
- If have check Java was installed then you can use following command:
which java
- The following command will be displayed if it was properly installed:
/usr/bin/java
- Switch to the root directory by using following command:
cd
- Create a Minecraft directory, using following command:
mkdir Minecraft
- Now, Enter the directory:
cd Minecraft
- Download Minecraft:
wget http://minecraft.net/download/minecraft_server.jar
.
.
.
.
Minecraft is now installed.
- You’ll now need to install “screen” to keep the Minecraft server running after the SSH session is closed, you can use following command.
yum install screen
- Use the screen and run Minecraft. Enter screen:
screen
- Start up Minecraft
java -Xmx1024M -Xms1024M -jar minecraft_server.jar nogui
===========================================
- To get back to the normal screen, press these keys:
Control+A+D
- To get back to the screen where Minecraft is running:
screen -r
The post How to Install Minecraft Server on CentOS VPS first appeared on Web Hosting Stuff.
]]>The post How to Install phpmyadmin on centOs 7 first appeared on Web Hosting Stuff.
]]>phpMyAdmin is an open source tool used for the administration of MySQL. phpMyAdmin depends on the LAMP stack. It requires Apache2 or any compatible web servers, MySQL and PHP. This post will show you how to install phpmyadmin on centos 7.

Installation :
Step 1 :
Download epel-release-7-x.noarch.rpm
Step 2 :
Install epel-release-7-x.noarch.rpm file
Step 3 :
Copying the rpm link by using follownig command
[root@hostripples ~]# rpm -ivh http://epel.mirror.net.in/epel/7/x86_64/e/epel-release-7-1.noarch.rpm
Step 4 :
Now, update repositories by issuing follownig command
[root@hostripples ~]# yum check-update
Step 5 :
Install phpmyadmin package along with dependencies
[root@hostripples ~]# yum -y install phpmyadmin
When you are finished
Step 6 :
Open /etc/httpd/conf.d/phpMyAdmin.conf file and edit as follows and Find follownig lines.
Note : ( you are found these line 2 times )
# Apache 2.4
<RequireAny>
Require ip 127.0.0.1
Require ip ::1
</RequireAny>
Replace with
# Apache 2.4
<RequireAny>
# Require ip 127.0.0.1
# Require ip ::1
Require all granted
</RequireAny>
Step 7 :
Then, Restart Apache service by using following commands
[root@hostripples ~]# systemctl restart httpd.service
Step 8 :
Now open http://serverIP/phpmyadmin in your browser.
.
.
.
.
.
Congratulations! You have just installed phpMyAdmin on your CentOS 7
You can login using root as username and mysql root password.
The post How to Install phpmyadmin on centOs 7 first appeared on Web Hosting Stuff.
]]>The post How to install CentOS Web Panel on Dedicated & VPS Server. first appeared on Web Hosting Stuff.
]]>
CentOS Web Panel – Free Web Hosting control panel is designed for quick and easy management of (Dedicated & VPS) servers without of need to use ssh console for every little thing. There is lot’s of options and features for server management in this control panel.
CWP is really considered feature-rich. Some of notable features including:
– Apache Web Server (Mod Security + OWASP rules optional)
– PHP 5.4 (suPHP, SuExec + PHP version switcher)
– MySQL + phpMyAdmin
– Postfix + Dovecot + roundcube webmail (Antivirus, Spamassassin optional)
– CSF Firewall
– File System Lock (no more website hacking, all your files are locked from changes)
– Backups (optional)
– AutoFixer for server configuration
– Varnish Cache server (improve your server performances by 3x)
– Compiles Apache from source (improves up to 15% on performances)
– Apache reCompiler + Additional modules install with one click
– Apache server status, configuration
– Edit apache vhosts, vhosts templates, include configuration
– Rebuild all apache Virtual hosts with one click
– suPHP & suExec (improved security)
– Mod Security + OWASP rules (one click install, easy management)
– Tomcat 8 server management & install in one click
– DoS protection from the Slow-Loris attacks
– Compiles PHP from source (improves up to 20% on performances)
– PHP switcher (switch between PHP versions like: 5.2, 5.3, 5.4, 5.5)
– Simple php editor
– PHP addons with one click
– PHP.ini editor & PHP info & List modules
– php.ini per user account (you can add changes in /home/USER/php.ini)
– postfix & dovecot
– MailBoxes, Alias
– Roundcube webmail
– Postfix Mail queue
– rDNS Checker Module (check you rDNS records)
– AntiSPAM (Spamhaus cronjob)
– Re-Build Postfix/Dovecot Mail server with (AntiVirus, AntiSpam Protection)
– Email Auto Responder
– MySQL Database Managment
– Add local or remote access user
– Live Monitor MySQL process list
Requirements
A server / VPS running CentOS 6 (at the time of writing it still does not support CentOS 7). Clean minimal install is recommended. Need recommendation? try Hostripples or Hostdens.
Basic knowledge about most common Unix command to manage a Linux VPS.
Any favorite SSH client like Putty or simply Terminal if you’re using Linux or Mac.
Make sure your VPS is running CentOS 6 with no LAMP component installed (Apache, MySQL, PHP)
How to Install CWP
Follow steps below to setup CentOS Web Panel on your VPS:
Step 1 – Login to your server as root

Step 2 – Go to /usr/local/src directory and download CWP installer package
cd/usr/local/srcwget http://centos-webpanel.com/cwp-latest

Step 3 – Start Installation using below command in screen :
screen-i
sh cwp-latest
If screen is not install then you can install it using
yum install screen
Just wait for some time till get get install .
The CWP will take some times for installation as several software will be compiled from source for improved performance, security and flexibility.Once its completed you can see below screen :

Make sure you copy all the details mention on the scree.
Step 4 – Now hit Enter and your server should reboot automatically. Next time you login to your server via SSH, you will now see CWP welcome message.
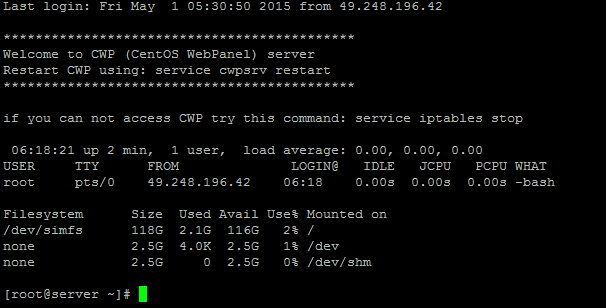
Step 5 – Open up your web browser (Firefox, Chrome,Safari,Opera etc) and open your newly installed CWP admin GUI at one of these URLs:
http://your-ip-address:2030 or https://your-ip-address:2031

CWP uses the same login details you used to SSH your server .
CentOS Web Panel GUI: Dashboard.
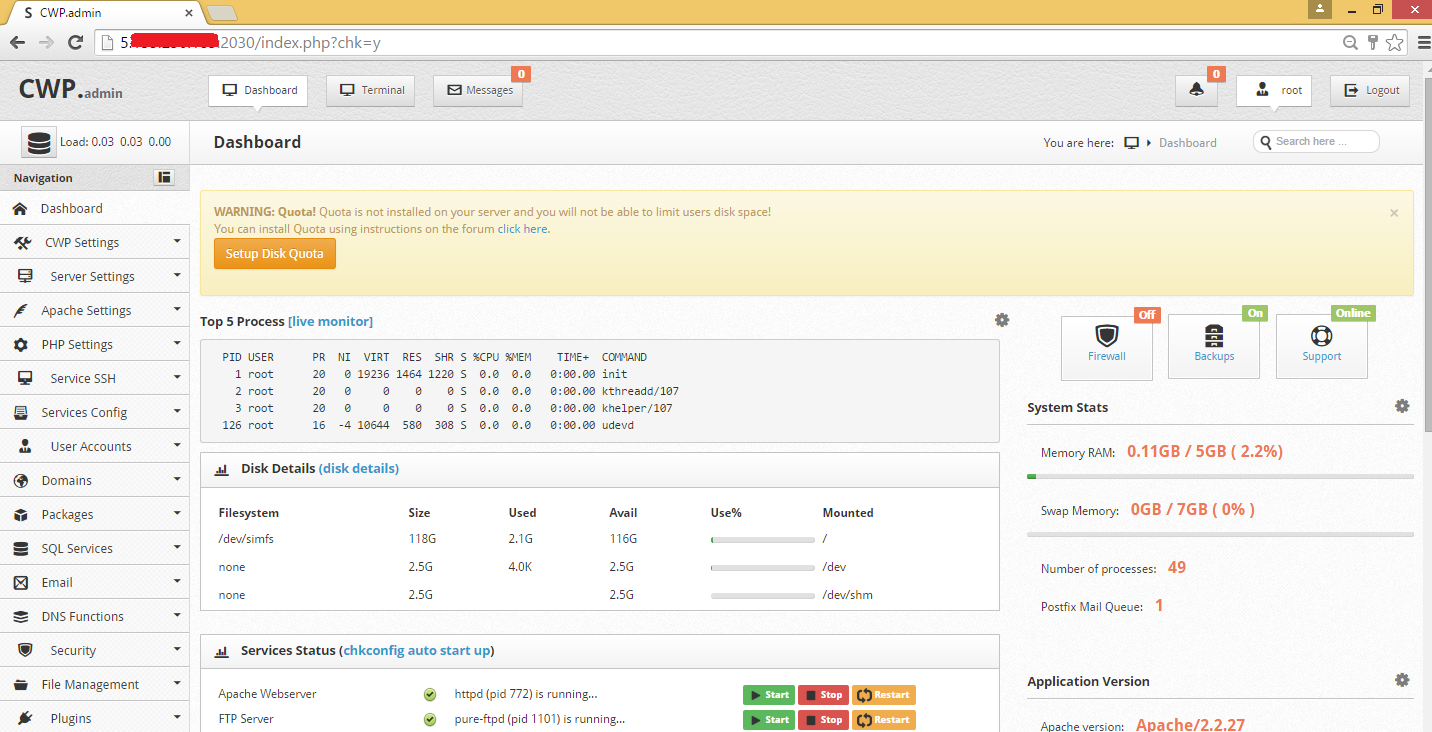
The post How to install CentOS Web Panel on Dedicated & VPS Server. first appeared on Web Hosting Stuff.
]]>