The post How to increase session timeout in php? first appeared on Web Hosting Stuff.
]]>First locate php.ini
root@host[~]# php -i | grep php.ini

Configuration File (php.ini) Path => /usr/local/lib

Loaded Configuration File => /usr/local/lib/php.ini
Get current session time out time
root@host[~]# grep -i session.gc_maxlifetime /usr/local/lib/php.ini

session.gc_maxlifetime = 14400

; setting session.gc_maxlifetime to 1440 (1440 seconds = 24 minutes):
Edit php.ini
root@host [~]# vi /usr/local/lib/php.ini
Change value of session.gc_maxlifetime.
Restart httpd service!! its done
The post How to increase session timeout in php? first appeared on Web Hosting Stuff.
]]>The post ApacheBooster (2.5) new version available for download first appeared on Web Hosting Stuff.
]]>
An Apache based Performance booster plugin for Cpanel Servers. ApacheBooster is an integration of nginx and varnish. Apachebooster caches both the static and dynamic contents which help the web server to serve the content from the cache everytime it is requested. Apachebooster is a Cpanel featured plugin and serves as one stop solution for boosting apache performance in cpanel servers worldwide.
Below are the new update in Apache Booster
 Fixed domain dedicated IP issue
Changed nginx embedded vhost template to perl template toolkit.
Updated /scripts/generate_varnish_conf script to fix the varnish IP address conflict.
Option to disable/enable apachebooster temporarily.
Upgraded nginx and varnish to latest version
In this version, customers have the ability to customize nginx vhost config template as per their needs.
New nginx vhost config template file can be found in /var/ApacheBooster/templates directory.
You can use the below commands to disable or enable ApacheBooster, this will be helpful for administrators to troubleshoot some apache and php related issues.
$> /scripts/manage_apacheboooster --enable

$> /scripts/manage_apacheboooster --disable
The post ApacheBooster (2.5) new version available for download first appeared on Web Hosting Stuff.
]]>The post How to Rebuild Plesk Apache Config Files first appeared on Web Hosting Stuff.
]]>
If you want to rebuild apache configuration files on the pleask server then, follow the condition.
- Run the following coomand on the server
[root@hostripples~]# /usr/local/psa/admin/bin/websrvmng -av
This will rebuild all your httpd.include files.
That’s it!
The post How to Rebuild Plesk Apache Config Files first appeared on Web Hosting Stuff.
]]>The post Cpanel Logs Locations first appeared on Web Hosting Stuff.
]]>cPanel logs provide a goldmine of information to quickly resolve various customer issues and server errors. Following list of the cPanel logs most commonly used by our remote cPanel administrators.
cPanel logs
1) Access logs and user actions
/usr/local/cpanel/logs/access_log
2) Account transfers and misc. logs
/var/cpanel/logs
3) Auditing log (account creations, deletions, etc)
/var/cpanel/accounting.log
4) Backup logs
/usr/local/cpanel/logs/cpbackup
5) Brute force protection (cphulkd) log
/usr/local/cpanel/logs/cphulkd.log
6) Cpanel dnsadmin dns clustering daemon
/usr/local/cpanel/logs/dnsadmin_log
7) Cpanel taskqueue processing daemon
/usr/local/cpanel/logs/queueprocd.log
8) DBmapping
/usr/local/cpanel/logs/setupdbmap_log
9) EasyApache build logs
/usr/local/cpanel/logs/easy/apache/
10) Error log
/usr/local/cpanel/logs/error_log
11) Installation log
/var/log/cpanel
12) License updates and errors
/usr/local/cpanel/logs/license_log
13) Locale database modifications
/usr/local/cpanel/logs/build_locale_database_log
14) Login errors (CPSRVD)
/usr/local/cpanel/logs/login_log
15) Horde
/var/cpanel/horde/log/
16) RoundCube
/var/cpanel/roundcube/log/
17) SquirrelMail
/var/cpanel/squirrelmail/
18) Panic log
/usr/local/cpanel/logs/panic_log
19) Per account bandwidth history (Cached)
/var/cpanel/bandwidth.cache/{USERNAME}
20) Per account bandwidth history (Human Readable)
/var/cpanel/bandwidth/{USERNAME}
21) Service status logs
/var/log/chkservd.log
22) Tailwatch driver tailwatchd log
/usr/local/cpanel/logs/tailwatch_log
23) Update analysis reporting
/usr/local/cpanel/logs/updated_analysis/{TIMESTAMP}.log
24) Update (UPCP) log
/var/cpanel/updatelogs/updated.{TIMESTAMP}.log
25) WebDisk (CPDAVD)
/usr/local/cpanel/logs/cpdavd_error_log
26) Website statistics log
/usr/local/cpanel/logs/stats_log
cPanel access log
Access logs and user actions
/usr/local/cpanel/logs/access_log
cPanel apache log
1) Apache restarts done through cPanel and WHM
/usr/local/cpanel/logs/safeapcherestart_log
2) Domain access logs
/usr/local/apache/domlogs/{DOMAIN}
3) Processing of log splitting
/usr/local/cpanel/logs/splitlogs_log
4) suPHP audit log
/usr/local/apache/logs/suphp_log
5) Web server and CGI application error log
/usr/local/apache/logs/error_log
cPanel email log
1) Delivery and receipt log
/var/log/exim_mainlog
2) Incoming mail queue
/var/spool/exim/input/
3) Log of messages rejected based on ACLS or other policies
/var/log/exim_rejectlog
4) Unexpected/Fatal error log
/var/log/exim_paniclog
5) IMAP, POP login attempts, transactions, fatal errors and spam scoring
/var/log/maillog /var/log/messages
6) Mailman
/usr/local/cpanel/3rdparty/mailmain/logs
MySQL log
1) MySQL error log
/var/lib/mysql/{SERVER_NAME}.err
2) MySQL slow query log (if enabled in my.cnf)
/var/log/slowqueries
The post Cpanel Logs Locations first appeared on Web Hosting Stuff.
]]>The post How to Install mod_cloudflare on cPanel first appeared on Web Hosting Stuff.
]]>
Installing mod_cloudflare on cPanel
CloudFlare is a performance and security service. The CloudFlare cPanel plugin makes it easy to integrate into your hosting control panel. The CloudFlare module automatically translates visitor IP addresses to reflect the visitor’s original IP address rather than the IP address of the CloudFlare proxy servers.
Installing mod_cloudflare on a cPanel server is very easy. Just follow 8 steps as below.
Step 1 :
Download core file by using the following command :
wget https://raw.githubusercontent.com/cloudflare/mod_cloudflare/master/mod_cloudflare.c
Step 2 :
Connect to your server through SSH and log in as root.
Step 3 :
Change directory to /usr/local/src by using the following command :
cd /usr/local/src
Step 4 :
Get the source code for mod_cloudflare by using the following command :
wget –no-check-certificate https://raw.github.com/cloudflare/mod_cloudflare/master/mod_cloudflare.c CloudFlare-Tools/master/mod_cloudflare.c
Step 5 :
Build and install mod_cloudflare by using Apache Extension Tool by using the following command :
apxs -a -i -c mod_cloudflare.c
Step 6 :
Restart the Apache Server daemon by using the following command :
service httpd restart
Step 7 :
Update the Apache configuration data by using the following command :
/usr/local/cpanel/bin/apache_conf_distiller –update
Step 8 :
Confirm the module is loaded properly by using the following command :
httpd -M | grep cloud

.
.
.
.
.
Now,
Apache will log the visitors’ IP addresses instead of the CloudFlare IP’s.
The post How to Install mod_cloudflare on cPanel first appeared on Web Hosting Stuff.
]]>The post How to Enable Apache SpamAssassin in Cpanel first appeared on Web Hosting Stuff.
]]>Apache SpamAssassin is the Open Source anti-spam platform giving system administrators a filter to classify email and block spam (unsolicited bulk email). It uses a robust scoring framework and plug-ins to integrate a wide range of advanced heuristic and statistical analysis tests on email headers and body text including text analysis, Bayesian filtering, DNS blocklists, and collaborative filtering databases.
To Enable Apache SpamAssassin in Cpanel
Following steps to enable Apache SpamAssassin
1) Log into cPanel
2) Navigate to Mail Section
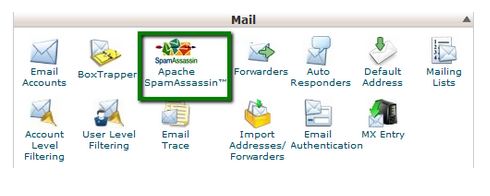
3) Click on Apache SpamAssassin option
See Following Screenshot
4) Click on Enable Apache SpamAssassin button
See Following Screenshot

.
.
.
Apache SpamAssassin is Enable!
The post How to Enable Apache SpamAssassin in Cpanel first appeared on Web Hosting Stuff.
]]>The post Installing LAMP On Linux Mint first appeared on Web Hosting Stuff.
]]>LAMP stands for Linux, Apache, MySQL, PHP. How to install Linux the L of LAMP.

Install Apache
To start off we will install Apache.
1) Open up the Terminal
(Applications > Accessories > Terminal)
2) Copy/Paste the following line of code into Terminal and then press enter
sudo apt-get install apache2
3) Type you’re password, and then press enter.
The page should display the words
.
.
.
.
“It works!”
Testing Apache
To make sure everything installed correctly we will now test Apache to ensure it is working properly.
1) Open up any web browser and then enter the following line.
http://localhost/
2) You should see a folder entitled apache2-default/.
3) Open it and you will see a message saying
.
.
.
.
“It works!”, congrats to you!
Install PHP
PHP is an open source web scripting language that is widely use to build dynamic webpages.
To install PHP
1) Open up the Terminal
(Applications > Accessories > Terminal)
2) Type in this command
sudo apt-get install php5 libapache2-mod-php5
After you answer yes to the prompt twice, PHP will install itself.
3) It may also be useful to add php to the directory index, to serve the relevant php index files
sudo nano /etc/apache2/mods-enabled/dir.conf
Test PHP
To ensure there are no issues with PHP let’s give it a quick test run.
1) Open up the Terminal
(Applications > Accessories > Terminal)
2) Type in this command
sudo gedit /var/www/testphp.php
This will open up a file called phptest.php.
3) Copy/Paste this line into the phptest file:
<?php phpinfo(); ?>
4) Save and close the file.
5) Now open you’re web browser and type the following into the web address:
http://localhost/testphp.php
The page should look
.
.
.
Congrats you have now installed both Apache and PHP!
Install MySQL
To finish this guide up we will install MySQL. MySQL is a powerful database management system used for organizing and retrieving data
To install MySQL,
1) Open terminal and type in these commands
sudo apt-get install mysql-server libapache2-mod-auth-mysql php5-mysql
During the installation, MySQL will ask you to set a root password. If you miss the chance to set the password while the program is installing, it is very easy to set the password later from within the MySQL shell.
2) Once you have installed MySQL, we should activate it with this command
sudo mysql_install_db
3) Finish up by running the MySQL set up script
sudo /usr/bin/mysql_secure_installation
4) The prompt will ask you for your current root password.
Type it in.
5) Enter current password for root (enter for none)
OK,
.
.
.
successfully used password, moving on…
The post Installing LAMP On Linux Mint first appeared on Web Hosting Stuff.
]]>The post How to install CentOS Web Panel on Dedicated & VPS Server. first appeared on Web Hosting Stuff.
]]>
CentOS Web Panel – Free Web Hosting control panel is designed for quick and easy management of (Dedicated & VPS) servers without of need to use ssh console for every little thing. There is lot’s of options and features for server management in this control panel.
CWP is really considered feature-rich. Some of notable features including:
– Apache Web Server (Mod Security + OWASP rules optional)
– PHP 5.4 (suPHP, SuExec + PHP version switcher)
– MySQL + phpMyAdmin
– Postfix + Dovecot + roundcube webmail (Antivirus, Spamassassin optional)
– CSF Firewall
– File System Lock (no more website hacking, all your files are locked from changes)
– Backups (optional)
– AutoFixer for server configuration
– Varnish Cache server (improve your server performances by 3x)
– Compiles Apache from source (improves up to 15% on performances)
– Apache reCompiler + Additional modules install with one click
– Apache server status, configuration
– Edit apache vhosts, vhosts templates, include configuration
– Rebuild all apache Virtual hosts with one click
– suPHP & suExec (improved security)
– Mod Security + OWASP rules (one click install, easy management)
– Tomcat 8 server management & install in one click
– DoS protection from the Slow-Loris attacks
– Compiles PHP from source (improves up to 20% on performances)
– PHP switcher (switch between PHP versions like: 5.2, 5.3, 5.4, 5.5)
– Simple php editor
– PHP addons with one click
– PHP.ini editor & PHP info & List modules
– php.ini per user account (you can add changes in /home/USER/php.ini)
– postfix & dovecot
– MailBoxes, Alias
– Roundcube webmail
– Postfix Mail queue
– rDNS Checker Module (check you rDNS records)
– AntiSPAM (Spamhaus cronjob)
– Re-Build Postfix/Dovecot Mail server with (AntiVirus, AntiSpam Protection)
– Email Auto Responder
– MySQL Database Managment
– Add local or remote access user
– Live Monitor MySQL process list
Requirements
A server / VPS running CentOS 6 (at the time of writing it still does not support CentOS 7). Clean minimal install is recommended. Need recommendation? try Hostripples or Hostdens.
Basic knowledge about most common Unix command to manage a Linux VPS.
Any favorite SSH client like Putty or simply Terminal if you’re using Linux or Mac.
Make sure your VPS is running CentOS 6 with no LAMP component installed (Apache, MySQL, PHP)
How to Install CWP
Follow steps below to setup CentOS Web Panel on your VPS:
Step 1 – Login to your server as root

Step 2 – Go to /usr/local/src directory and download CWP installer package
cd/usr/local/srcwget http://centos-webpanel.com/cwp-latest

Step 3 – Start Installation using below command in screen :
screen-i
sh cwp-latest
If screen is not install then you can install it using
yum install screen
Just wait for some time till get get install .
The CWP will take some times for installation as several software will be compiled from source for improved performance, security and flexibility.Once its completed you can see below screen :

Make sure you copy all the details mention on the scree.
Step 4 – Now hit Enter and your server should reboot automatically. Next time you login to your server via SSH, you will now see CWP welcome message.
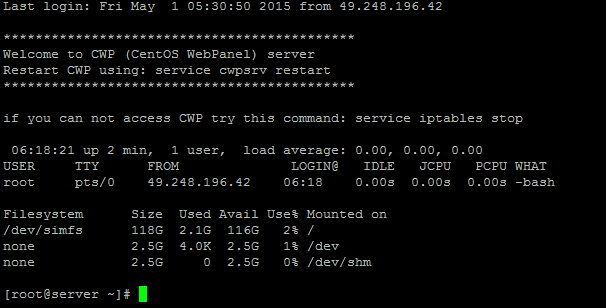
Step 5 – Open up your web browser (Firefox, Chrome,Safari,Opera etc) and open your newly installed CWP admin GUI at one of these URLs:
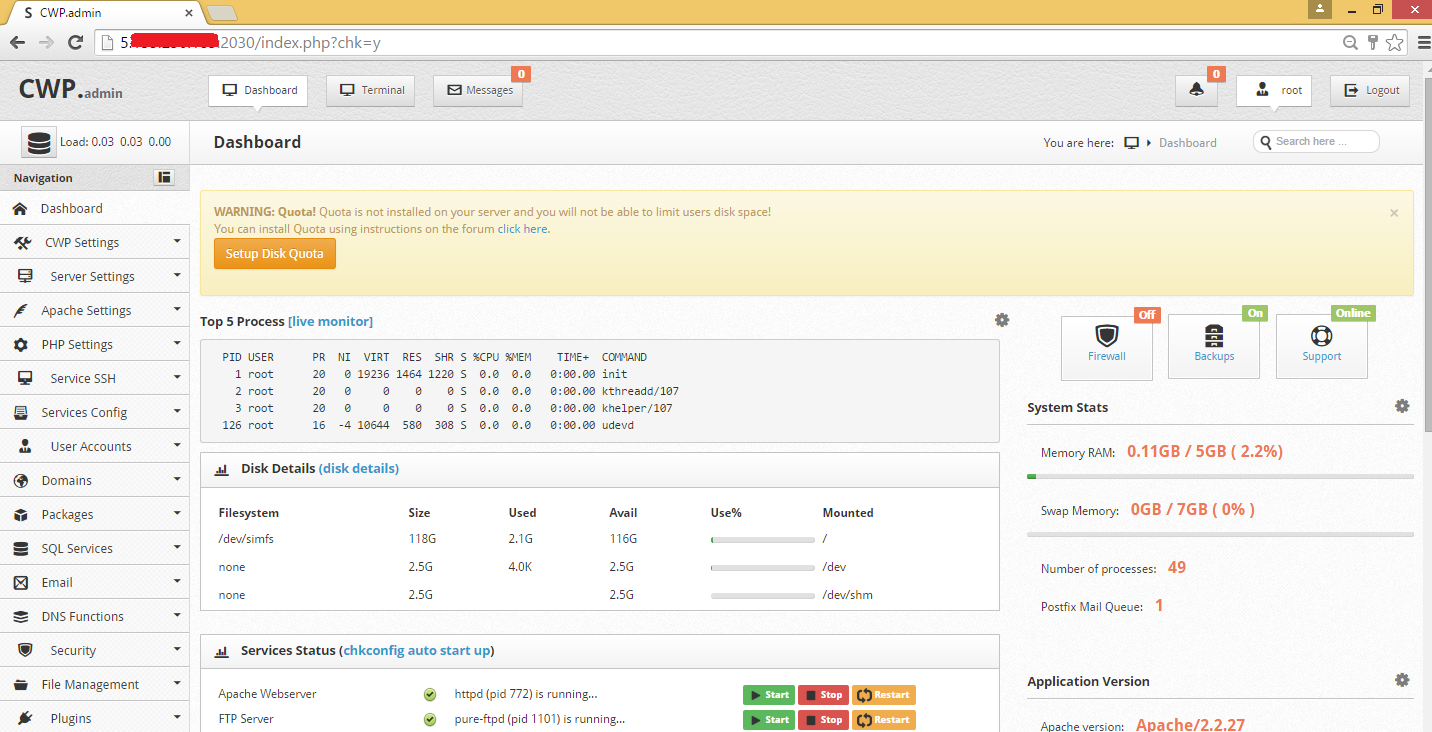
http://your-ip-address:2030 or https://your-ip-address:2031

CWP uses the same login details you used to SSH your server .
CentOS Web Panel GUI: Dashboard.
The post How to install CentOS Web Panel on Dedicated & VPS Server. first appeared on Web Hosting Stuff.
]]>The post How to install Gibbon on a CentOS VPS ? first appeared on Web Hosting Stuff.
]]>
Gibbon is an open source, free and highly flexible education management system. It helps teachers and students to address and solve daily problems. This tool alone caters the needs for all four pillars of educational system (administration, teachers, parents, and students). It provides refreshing and intuitive web interface to teachers, and students where they can engage in their activities and tasks, Parents use this tool to track the progress, upcoming deadlines and activities of their children. The administration department of the educational institutes can use this tool to complete their administrative responsibilities.Gibbon is a flexible application with many features, such as planner, external assessment, online application forms, messenger etc.
Gibbon Installation requires following thing install on your VPS server :
- Apache 2
- PHP 5 (with PDO, gettext, CURL. Turn dispaly_errors off!)
- MySQL 5 (collation set to utf8_general_ci)
Download the latest stable version of Gibbon at https://gibbonedu.org/download to the ‘/opt’ directory on the server. Then, extract it and move the Gibbon core files and directories to the ‘/var/www/html/gibbon’ directory on your server. If you would like to run the very latest version of Gibbon, you can get it from the GitHub repo at https://github.com/GibbonEdu/core
cd /opt/
wget https://github.com/GibbonEdu/core/archive/v9.1.00.zip
unzip v9.1.00.zip
mv core-9.1.00 /var/www/html/gibbon
You will need to change the ownership of the ‘/var/www/html/gibbon’ directory to Apache.
chown apache:apache -R /var/www/html/gibbon
Create a new MySQL database for Gibbon on your server:
mysql -u root -p
mysql> CREATE DATABASE gibbondb;
mysql> GRANT ALL PRIVILEGES ON gibbondb.* TO 'gibbon'@'localhost' IDENTIFIED BY 'your-password' WITH GRANT OPTION;
mysql> FLUSH PRIVILEGES;
mysql> exit
Find php configuration file (php.ini) using below command :
#php -i | grep php.ini
Configuration File (php.ini) Path => /etc
Loaded Configuration File => /etc/php.ini
Now edit the php.ini file using any editor and add the following lines in it:
file_uploads = On
allow_url_fopen = On
register_globals = off
magic_quotes_gpc = Off
set max_input_vars = 5000
dispaly_errors = Off
error_reporting = E_ALL & ~E_NOTICE
Now create an new virtual host directive in Apache :
vi /etc/httpd/conf/httpd.conf
Add following lines :
<VirtualHost *:80>
   ServerAdmin admin@ashishkale.in
   DocumentRoot /var/www/html/gibbon/
   ServerName ashishkale.in
   ServerAlias www.ashishkale.in
   <Directory /var/www/html/gibbon/>
      Options FollowSymLinks
      AllowOverride All
   </Directory>
   ErrorLog /var/log/apache2/ashishkale.in-error_log
   CustomLog /var/log/apache2/ashishkale.in-access_log common
</VirtualHost>
Do not forget to change ‘ashishkale.in’ with your domain name .
Restart the Apache web server
service apache2 restart
Open http://your-domain.com in your favorite web browser and follow the easy instructions: enter the system language, database information, create a new administrator account, enter server settings, organisation settings and click ‘submit’ once you have filled out all of the fields.
That is it. The Gibbon installation is now complete.
The post How to install Gibbon on a CentOS VPS ? first appeared on Web Hosting Stuff.
]]>