How to install Zend Optimizer in Cpanel Linux Server


Cheap reseller Hosting


install-Zend-Optimizer

Introduction : 

Zend Server is the most complete PHP distribution with a continuously updated set of advanced value-add features designed to optimize productivity, performance, scalability and reliability. It is a free PHP extension to enable the web server to execute files encoded by Zend Guard/Encoder so it’s executed the same as any regular PHP files. Zend Encoder also is useful for encoding PHP files to protect source code. Zend Server supports any and all PHP code and provides deep insights into that code including the most popular PHP applications and frameworks like WordPress, Magento, Drupal, Zend Framework, Symfony, and Laravel. Any code you have in PHP will run on Zend Server. You will need to install Zend Optimizer in your server running Linux.


Installing zend in cPanel Linux Server follow this Steps:

Step 1 : Log in to your server via SSH with root user.

Step 2 : Run the following command.

 /scripts/installzendopt

Step 3 : Follow the instructions on the screen to install Zend Optimizer.

Step 4 : Then, Restart the apache.

 service httpd restart

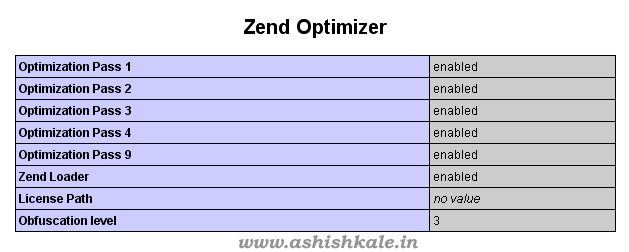
Step 5 : To check whether zend optimizer is running and vserion.

 php -v

It would show ioncube or zend optimizer version.


install Zend Optimizer


            OR


Follow the on-screen instructions.

When you want to install Zend Optimizer on a Non-cPanel server please follow the steps:

Step 1 : Download Zend Optimizer.

http://www.zend.com/en/products/guard/optimizer/

Step 2 : Upload the .tar.gz into your web server.

/home/temp

Step 3 : Extract the archive by using the following command.

tar -zxvf filename_here.tar.gz

Step 4 : Now a new directory should appear.

Step 5 : Execute the following command.

./install.sh

Step 6 : Follow the instructions on-screen.

Step 7 : Restart HTTPD (Apache) by using following command.

service httpd restart


That it !


Cheap web Hosting


How to Install Memcached on Ubuntu 12.04 LTS


Cheap reseller Hosting


Install Memcached on Ubuntu 12.04 LTS

Memcached is a system that works to speed up virtual private servers by caching server information. It is a high-performance distributed memory object caching that caches objects for faster website performance. The program functions somewhat like short term memory for your applications. Memcached runs on Unix, Linux, Mac OS X, Ubuntu, PHP and Windows. Installation of memcached on Ubuntu 12.04 is very simple. You can see how to install Memcache on Ubuntu 12.04.

Step 1 : To make sure that all of the packages we download to the VPS are up to date. Use the following command. 

sudo apt-get update

Step 2 : You should have MySQL and PHP installed on the virtual server.

sudo apt-get install mysql-server php5-mysql php5 php5-memcache


To Install Memcache on Ubuntu 12.04

Step 1 : To install memcached via apt-get by using following command. 

sudo apt-get install memcached


Step 2 : To install php-pear, the repository that stores memcache by using following command.

sudo apt-get install php-pear


Step 3 : To use PECL (PHP Extension Community Library) to install memcached by using following command.

sudo pecl install memcache


Step 4 : Click to Enable memcache session handler support? [yes].

You have completed the installation of memcache with PECL on the VPS

Add memcached to memcache.ini by using following command.

echo “extension=memcache.so” | sudo tee /etc/php5/conf.d/memcache.ini


You can start to using Memcache.


Cheap web Hosting


How to Install Softaculous in CentOS Web Panel


Cheap reseller Hosting


How to Install Softaculous in CentOS Web Panel

Softaculous is very easy to install in CentOS Web Panel.  The following article will show you how to install Softaculous on CentOS Web Panel. 

Install-Softaculous-in-CentOS-Web-Panel

Step 1 : Login to CentOS Web Panel.

Step 2 : Go to : Script Installers > Scripts Manager

Step 3 : Click on the Install Softaculous button.

The Installation of Softaculous is completed!
CWP

* When logged in as a USER

User logs in to the CentOS Web Panel they can access Softaculous Enduser Panel under the File Management and Script Installers section.


Cheap web Hosting


How to Install Softaculous in XAMPP


Cheap reseller Hosting


Installing Softaculous in XAMPP

Hostripples are using Softaculous to provide one click script auto-installer. You can install almost 330+ popular CMS like WordPress, Drupal, Joomla with a single button click by using Softaculous . After install Softaculous on XAMPP server you can start developing forums, blog, e-commerce sites within minutes on your local machine. It is really easy steps to install Softaculous on XAMPP server.


Install Softaculous in XAMPP


The following article will help you on how to install Softaculous on XAMPP for Windows.

Step 1 : Download the Softaculous Package.

    • If you are using PHP version 5.2 then, Click Here and download a zip archive.
    • If you are using PHP version 5.3 and above then, Click Here and download a zip archive.

Step 2 : After downloading compressed files, Extract the package under XAMPP’s htdocs.

Step 3 : Access install file which is located inside our extracted folder. It could be http://localhost/softaculous/install.php normally.

Then, You will get a form like below to fill after this step. 

Step 4 : Fill following the details: 

1.  AMP Path : Location of the XAMPP.

2. PHP Path : Path to PHP Binary e.g C:/xampp/php/php.exe

3. Scripts Path : Softaculous will download the scripts like WordPress, Drupal, Joomla, etc here.

4. Private Folder : All the installation details, backups, data directory of few scripts will be stored here. It should not be web accessible.

5. Document Root : Folder where scripts web directory will reside, generally C:/xampp/htdocs

6. MySQL Root Password : MySQL Root Password. XAMPP’s default MySQL root password is (blank)

See the following screenshot 

Install Softaculous on XAMPP

Step 4 : Please check the check which shows at last to ensure that if the required ionCube is not detected install it automatically.

Step 5 : Click on Start Installation button.

Now, you will displayed a success message with a link to access your Softaculous !

Step 6 : Click on the link which is given on the success message, you can start installing scripts now.


softaculous logo


Softaculous Updates and Cron

1) Upon installation Softaculous will make a new action on your Windows Task Scheduler.

2) This will run a cron job on every 24 hours to check if a new version is available.

This Softaculous Cron is to keep your Softaculous and Scripts updated, you can update your existing installations of WordPress, Joomla, etc scripts to latest version. This will keep all your Scripts on latest versions.


Cheap web Hosting


How to Install Softaculous in ISPConfig


Cheap reseller Hosting


To Install Softaculous in ISPConfig

Install-Softaculous-in-ISPConfig

Please follow the steps to install Softaculous in ISPConfig.

Step 1 : Before starting the installation make sure ionCube Loaders are enabled.

Note : The ionCube Loaders can be downloaded at the ionCube Downloads Page. Softaculous will not work if suHOSIN is enabled in your PHP.

Step 2 : Login to SSH to your server.

Step 3 : Enter following commands:

wget -N http://files.softaculous.com/install.sh
chmod 755 install.sh
./install.sh

Step 4 : ./install.sh should be executed as root.

Step 5 : Add sudo before ./install.sh for Ubuntu users.

The Installer will start showing the Installation Processes.


Note : Scripts will be downloaded during this process. The Download Activity will also be shown on the screen.

ispconfig

Thats it the installation of Softaculous is completed!


You can visit the Softaculous panel after logging into the ISPConfig panel.

ispconfig 1


Cheap web Hosting


How to Install Softaculous on ISPmanager


Cheap reseller Hosting


To Install Softaculous on ISPmanager

Install Softaculous on ISPmanager

Softaculous is the best solution for installing third party web-applications and scripts for cloud, virtual, or dedicated servers. ISPmanager 5 Lite is a flexible web hosting control panel with the perfect balance of functionality, usability and price. The following article will show you how to install Softaculous on ISPmanager. If you are using ISPmanager 5.33+ then Softaculous should be enabled by default on your server. Please follow the steps. 

Step 1 : Before starting the installation make sure ionCube extension is installed and SSL support is enabled for the domain.

Step 2 : Log into your ISPmanager control panel.

Step 3 : Go to the Modules in Integration section.

Step 4 : Click Install button in softaculous tab.

Step 5 : Wait for Softaculous to be installed on your server.

Step 6 : The installer will start a message will be displayed asking you to confirm that Softaculous should be configured on the server.

Step 7 : Click Ok button 

Step 8 : Wait for the installation to finish.

Softaculous is now installed on your server and ready for use!

ISp System


You can access it from the External applications and go to Softaculous section of the panel’s left side menu.

That’s it the installation of Softaculous is completed !


Cheap web Hosting


How to Install Softaculous in H-Sphere


Cheap reseller Hosting


-install-Softaculous-in-H-Sphere

H-Sphere is a Clustered Shared Hosting Management Software. Softaculous for H-Sphere is very simple to install. Please follow the steps to install Softaculous in H-Sphere.

To  Install Softaculous in H-Sphere

Step 1 : Before starting the installation make sure ionCube Loaders are enabled.

Step 2 : Login to your SSH server.

Step 3 : Execute the following commands:

wget -N http://files.softaculous.com/install.sh
chmod 755 install.sh
./install.sh


The Installer will start showing the Installation Processes.

Note : Scripts will be downloaded during this process. The Download Activity will also be shown on the screen.

Thats it the installation of Softaculous is completed on the Slave!

hsphereicon

You will have to reload / restart apache for the changes to take effect.

root> /etc/init.d/httpd reload


If you wish to finish the installation quickly then,

Download the script packages in background use the following scripts.


wget -N http://files.softaculous.com/install.sh
chmod 755 install.sh
./install.sh –quick


Cheap web Hosting


How to Install Softaculous on InterWorx


Cheap reseller Hosting


Installing Softaculous on InterWorx

Softaculous can also easily be integrated into your Interworx Server.  Softaculous is tightly integrated with Interworx. The following article will show you how to install Softaculous on Interworx.


Installing Softaculous on InterWorx


Step 1 : Before starting the installation make sure ionCube Loaders are enabled.

Step 2 : Login to your InterWorx server as root via SSH.

Step 3 : Execute the following commands:

cd /usr/local &&
wget -N http://www.softaculous.com/iwx/install_softaculous.php &&
chmod 755 install_softaculous.php &&
/home/interworx/bin/php /usr/local/install_softaculous.php

The installer will start, and provide you with an on screen updates as they come in. 

Thats it the installation of Softaculous is completed!

Interworx


Cheap web Hosting


How to Install Softaculous in Plesk Linux


Cheap reseller Hosting


How-to-Install-Softaculous-in-Plesk-Linux

It’s similar process as both for DirectAdmin and cPanel, the installation process for Plesk is similar. The following article will show you

How to install Softaculous on Plesk Linux

Step 1 : Before starting the installation make sure ionCube Loaders are enabled.

Step 2 : Login to your Plesk server as root via SSH.

Step 3 : Enter the following commands:

cd /usr/local &&
wget -N http://www.softaculous.com/pl/install_softaculous.php &&
chmod 755 install_softaculous.php &&
/usr/bin/php -d open_basedir=/ -d safe_mode=0 -d disable_functions=”” /usr/local/install_softaculous.php


The installation of Softaculous is completed

You will see following Screen 

Softaculous for Plesk


If you wish to finish the installation quickly then,

Download the script packages in the background by using the following method.


wget -N http://files.softaculous.com/install.sh
chmod 755 install.sh
./install.sh –quick

pleskicon

Upon completion,

Step 1 : Login to your Plesk server as the administrator.

Step 2 : you’ll notice a new text link appear, clearly labeled as: Softaculous Auto Installer.


Cheap web Hosting


How to Install phpBB from Softaculous


Cheap reseller Hosting


Install phpBB from Softaculous

PHPBB copy

PhpBB is a free flat-forum bulletin board software solution that can be used to stay in touch with a group of people or can power your entire website.

To install phpBB using Softaculous, follow these steps:

Step 1. Log into your cPanel account.

Step 2. In the Software and Services section, Click on Softaculous icon.

Softaculous

Step 3. cPanel will redirect you to the Softaculous Panel.

Step 4. On the left side of your screen you should locate the Forums category.

Step 5. Click on Forums.

Step 6. Then click on the phpBB link.

Install-phpBB3_Forums_PHPBB

Step 7. Click on the Install button.

phpbb Install

Step 8. Fill the necessary field under the Software Setup field.

1) Choose Domain
2) In Directory
3) Database Name

Step 9. Enter the following details under the Board Settings field.

1) Board Name
2) Site Description
3) Board E-mail

Step 10. Under the Admin Account field enter the following information

1) Admin Username
2) Admin Password
3) Admin Email

Step 11. Enter the following details under the Choose Language field

Select Language 

Step 12. Scroll down to the end of page.

Step 13. Click on the Install Button.


.
.
.
.
.
.

Your Software has been Installed Correctly.

install-phpbb


Cheap web Hosting


1 2 3 4